HTML User Interfaces
This tutorial is for users who want to provide an HTML user interface to a Mathematica program. The tutorial Interactive Web Tools describes how to use MSPManipulate to provide a user interface akin to Mathematica's Manipulate based on Flash technology. This tutorial covers form-based interfaces using HTML input elements. An interface based on MSPManipulate is convenient and many users may find it sufficient. Form-based HTML interfaces require the user to write more code but with the advantage of more control over the way the interface is structured, as well as its look and feel.
We will explore the HTML User Interface example. This example is available at http://localhost:8080/webMathematica/Examples/UserInterface/PlotUserInterface.jsp (you may need to adjust this URL depending on where webMathematica is installed).
Overview of HTML Forms
This section will describe the flow of control for a form-based user interface. The essential steps of a web user interface based on forms are these:
1. The user visits a page containing a form.
2. The user enters information using the form's input elements.
3. The user submits the form, typically by clicking a submit button.
4. The server processes the form and returns a result page.
The form page can be a static HTML page, or it can be a dynamic page, such as with a JSP. The form's action attribute can specify that step 4 be sent to a different URL, or it can be the same page that the form appeared in. Many examples in webMathematica uses this second approach, a JSP that acts as both the form input and the form action. When reading the Mathematica code in the JSP, it is important to bear in mind that it is called for both the initial request when there is no input data available, and also when the form is submitted and there is input data present.
As an example of this, go to the example at http://localhost:8080/webMathematica/Examples/UserInterface/PlotUserInterface.jsp. The page will look like this:
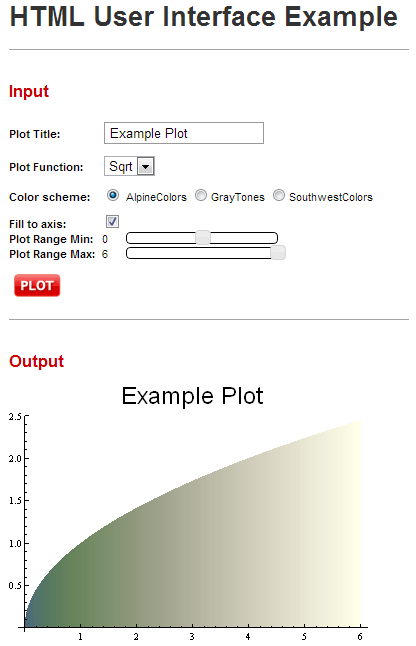
By visiting this page, you have taken step 1 from the above list of essential steps for a form-based web interface, "The user visits a page containing a form."
Use your browser's "View Source" function to examine the HTML for this page and look for this fragment:
        < form action = "PlotUserInterface.jsp" method = "get" >

                   < ! -- Here is where the title is set  -- >
                      < label > Plot Title : < /label >
                       < input name = "title" type = "text"
                       value = "Example Plot"
                    />
                  < br/ >
This is where the HTML form element appears. It specifies the form's action as "PlotUserInterface.jsp", which is its own page name, and a method of "get", which allows us to examine the form inputs in the browser's URL. Note that the HTML form does not correspond to any visible elements in the browser, rather it is a declaration to the browser that there is a form, which encloses certain input elements, and instructs the browser what to do when the form is submitted.
We also see an input element, with a name of "title" and a value of "Example Plot", which along with its preceding label we see in the browser as this part of the page:
The browser shows us this and other input elements, which allows the user to achieve step 2, "The user enters information using the form's input elements."
Look further down the HTML source for this fragment:
                <!--  Form Submission Button -->
                <input type="submit" class="submit" name="Submit" alt="Plot"/>
The submit button appears like this on the page:
The user clicks this button to achieve step 3, "The user submits the form, typically by clicking a submit button."
The browser has been instructed, via the form element's action attribute, to prepare a new request to the server, in this case for the same URL. The PlotUserInterface.jsp code runs and prepares a new version of the plot according to the inputs supplied. It so happens that the result page also has a form, which allows the user to stay on the same page, providing different inputs and re-evaluating the plot.
With an understanding of the flow of control, we can study this example in more detail.
Calculating the Output from Form Inputs
Open a browser tab to examine the source code to PlotUserInterface.jsp:
http://localhost:8080/webMathematica/Examples/UserInterface/PlotUserInterface.jsp.txt
We'll begin with the Output section at the end of the file:
<h2>Output</h2>
<msp:evaluate>
    MSPBlock[{$$fn,$$xMax,$$xMin},
        MSPShow[
            Plot[$$fn[x], {x, $$xMin, $$xMax}, PlotRange -> Full,
                PlotLabel -> Style[$$title, Large, FontFamily -> "SansSerif"],
                Filling -> If[MSPValueQ[$$filling],Axis,None],
                ColorFunction -> $$color]
        ]
    ]
</msp:evaluate>
The point of most forms is perform a calculation and display a result; in this case we are simply plotting a function. This is the point where various variables have been set based on the form inputs, so this shows how they are used.
First notice that it is all wrapped in an MSPBlock. This serves two purposes, one is to run a security check on the variables and the other is to convert input values from strings to Mathematica expressions. One of the concerns about running code on the web is that your site may be open to hostile visitors, and any input has to be considered potentially harmful until checked. MSPBlock will throw an exception if the block variables do not pass the security check. The code inside the MSPBlock can then assume that the values of the variables are safe. It is also a good idea to perform input validation before running this final output expression. In this case, we want to know that $$xMin and $$xMax are real-valued numbers before passing them to Plot. These are routine considerations for a web page programmer.
The MSPShow wrapped around our Plot indicates that this msp:evaluate will produce a graphic, resulting in the appropriate HTML img element, which instructs the browser to include an image file.
Finally, with an assumption that all the input variables have been set to valid values, we proceed with our calculation of interest. The variables going into this calculation are:
1. $$fn - an expression to be plotted; in reality it can be anything, but the user interface presents a fixed set of choices
2. $$xMin - the lower bound of the plot's independent variable
3. $$xMax - the upper bound of the plot's independent variable
4. $$title - passed to the PlotLabel option, the text to use to use for the plot's title
5. $$filling - whether or not to fill from the axis to the plot curve, either True or False
6. $$color - passed to the plot's ColorFunction argument, indicates the color to use for the line and filling
With this understanding of what the final output is, and what input variables need to be set, we can understand the beginning of the code.
Initializing the Form and Validating Form Input
Open a browser tab to examine the source code to PlotUserInterface.jsp:
http://localhost:8080/webMathematica/Examples/UserInterface/PlotUserInterface.jsp.txt
The first bit of code in the file is this:
<!-- Validate inputs and set to default if they are not set or not valid. -->
<msp:evaluate>
    functionChoices = {"Sqrt", "Sin", "Cos", "Exp" };
    If[!MSPValueQ[$$fn] || !MemberQ[functionChoices, $$fn],
        $$fn = First[functionChoices];
    ];

    colorChoices = {"AlpineColors", "GrayTones", "SouthwestColors"};
    If[!MSPValueQ[$$color] || !MemberQ[colorChoices, $$color],
        $$color = First[colorChoices];
    ];

    If[!MSPValueQ[$$xMin],
        $$xMin = "0";
    ];

    If[!MSPValueQ[$$xMax],
        $$xMax = "6";
    ];

    If[!MSPValueQ[$$title] || !StringQ[$$title],
        $$title = "Example Plot";
    ];

    (* Turn axis filling on if this is the first time
       the user has seen the page (indicated because
       the $$Submit value is not set). After this, if
       MSPValueQ[$$filling] is False, it means the
       checkbox is unchecked and needs to be off *)
       Remove[firstTime];
    If[MSPValueQ[$$Submit] =!= True,
        $$filling = "on";
    ];
</msp:evaluate>
Recall that when the visitor first visits the page, the browser does not send input variables because the form has not been submitted. Therefore an input variable like $$fn is not set, and MSPValueQ[$$fn] will be False. If the form has been submitted, then the input variable will be sent by the browser and webMathematica will initialize the corresponding variables. This table summarizes how $$fn would be initialized in the two cases:
While the user interface presents a fixed set of choices, remember that the page may be requested from programs other than the browser, and could therefore come from poorly written or even malicious programs making web requests, and for that reason we perform validation checks on the values of the input variables.
In this section, the logic is that if an input variable is either unset or does not have the expected form, we set the variable to a default value.
The handling of the checkbox is worth noting because in HTML it behaves a little differently than other values. One might naively expect that an HTML checkbox has either a value of true if checked or false if unchecked. In fact, if the checkbox is checked, the browser sends the input variable, but if the checkbox is unchecked, the browser does not send the input variable at all. This is summarized in the following table.

In our plot example, we would like the checkbox to be initially checked. Thus we need to find a way to distinguish the first two cases. We achieve this by noting that if the form is submitted, then the form's submit button is present as an input value. Thus we know if the page is being first visited if the $$Submit variable has no value.
Getting Input from a Text Field
Open a browser tab to examine the source code to PlotUserInterface.jsp:
http://localhost:8080/webMathematica/Examples/UserInterface/PlotUserInterface.jsp.txt
This bit of code generates the HTML input control with type="text", which the browser shows as a text field, similar to Mathematica's InputField control.
<!-- Here is the title input element -->
<label>Plot Title: </label>
<input name="title" type="text"
       value="<msp:evaluate>MSPValue[$$title,"Example Plot" ]</msp:evaluate>"
/>
The name attribute, set to "title" controls the name of the form input when the form is submitted; this will be made available by webMathematica as the $$title variable. The value attribute populates the contents of the input field initially. We use the MSPValue function to provide a default value. This is not necessary since our initialization and validation section described above already has guaranteed that $$title is set, but it doesn't hurt either.
Getting Input from a Dropdown Menu
Open a browser tab to examine the source code to PlotUserInterface.jsp:
http://localhost:8080/webMathematica/Examples/UserInterface/PlotUserInterface.jsp.txt
This code uses the HTMLSelect function to generate an HTML select control, which the browser shows as a dropdown menu, similar to Mathematica's PopupMenu control.
<!-- Drop-down menu to select plot function -->
<!-- In HTML this is called a select, in Mathematica its
    counterpart is a PopupMenu -->
<label>Plot Function: </label>
<msp:evaluate>
    HTMLSelect[functionChoices, functionChoices, "fn", SelectedValues -> $$fn]
</msp:evaluate>
The functionChoices list, set in the initialization and validation section described above, is used as the first and second parameters to HTMLSelect since we want both the option labels and the option values to be the same thing. The "fn" argument names the input variable, which is how $$fn becomes set to the selected value once the form is submitted. The option SelectedValues -> $$fn sets the initially-selected option. This will be the default value or the value that the user selected when the form was last submitted.
If you examine the page source, you can see the HTML generated by the HTMLSelect function, which will look something like this:
<select name='fn'>
 <option value='Sqrt' selected='selected'>Sqrt</option>
 <option value='Sin'>Sin</option>
 <option value='Cos'>Cos</option>
 <option value='Exp'>Exp</option>
</select>
You can easily write a static HTML select control that always selects the first element like this, but in order to initially select the last-selected value, you must write dynamic server-side code that puts the selected='selected' attribute on the correct option, and the HTMLSelect function does this for you.
Getting Input from Radio Buttons
Open a browser tab to examine the source code to PlotUserInterface.jsp:
http://localhost:8080/webMathematica/Examples/UserInterface/PlotUserInterface.jsp.txt
This code generates a series of radio button controls, similar to the RadioButton control in Mathematica, and dynamically selects the correct button using code inside an msp:evaluate tag.
<!-- Radio Buttons for colors -->
<input type="radio" name="color" value="AlpineColors"
       <msp:evaluate> If[$$color === "AlpineColors", "checked"]</msp:evaluate>
       />AlpineColors
<input type="radio" name="color" value="GrayTones"
       <msp:evaluate> If[$$color === "GrayTones", "checked"]</msp:evaluate>
       />GrayTones
<input type="radio" name="color" value="SouthwestColors"
       <msp:evaluate> If[$$color === "SouthwestColors", "checked"]</msp:evaluate>
       />SouthwestColors
The radio button is coded in HTML as an input with type="radio". It uses the same name and value scheme that other input types use. Notice that each radio button uses the same name of "color". By using the same name but assigning each radio button a different value, we make a control that lets the user set the input "color" to one of a number of choices. Notice that the way we handle radio buttons is essentially the same way we handle drop-down menus.
Getting Input from a Checkbox
Open a browser tab to examine the source code to PlotUserInterface.jsp:
http://localhost:8080/webMathematica/Examples/UserInterface/PlotUserInterface.jsp.txt
This code generates an HTML input control of type "checkbox" using the HTMLCheckbox function.
<!-- Checkbox for Filling  -->
<label>Fill to axis: </label>
<msp:evaluate>HTMLCheckbox["filling", MSPValueQ[$$filling]]</msp:evaluate>
The first argument to HTMLCheckbox is the name to use for the input. If the second argument evaluates to True, the checkbox will be initially checked, and unchecked otherwise. When the form is submitted, the variable corresponding to the name argument will be set if the checkbox was checked when the form was submitted, and not set to anything if the checkbox was unchecked. This is how HTML checkbox inputs work. For example, if the checkbox was checked when the form was submitted, $$filling may be set to "on" and MSPValueQ[$$filling] will be True. If the checkbox was unchecked when the form was submitted, $$filling will not be set; it will evaluate to $$filling and MSPValueQ[$$filling] will be False.
Getting Input from a Slider
Open a browser tab to examine the source code to PlotUserInterface.jsp:
http://localhost:8080/webMathematica/Examples/UserInterface/PlotUserInterface.jsp.txt
At this time there is no direct HTML support for the slider user control. In this example, we use one popular implementation, from the jQuery project, that works in modern browsers. For more information see http://jqueryui.com/slider/.
Note that in order for this example to work, we add these lines near the beginning of the JSP file in the HTML head section:
        <!-- Jquery   -->
        <link rel="stylesheet" href="http://code.jquery.com/ui/1.10.0/themes/base/jquery-ui.css" />
        <script src="http://code.jquery.com/jquery-1.8.3.js"></script>
        <script src="http://code.jquery.com/ui/1.10.0/jquery-ui.js"></script>
You may want to download these components and include them directly from your application.
This example also uses the following CSS style rules, also found in the HTML head section in the style element, to place the slider to the right of the slider value:
span.sliderlabel {
  width: 18px;
  display: inline-block;
}

div.slider {
   display: inline-block;
   width: 150px;
   border: 1px solid black;
}
This code sets up a slider in the HTML document:
<!-- Minimum Slider -->
<label> Plot Range Min: </label>
<input type="hidden" name="xMin" value="<msp:evaluate> MSPValue[$$xMin, "0"] </msp:evaluate>" />
<span id='xMinLabel' class="sliderlabel"><msp:evaluate> MSPValue[$$xMin, "0"]</msp:evaluate></span>
<div id="xMin" class="slider"></div>
<script>
$( "#xMin" ).slider({
step: 0.1,
value:parseFloat($("*[name=xMin]").val()),
min: -6,
max:6,
change: function( event, ui )
{
$("*[name=xMin]").val(ui.value);
$("#xMinLabel").text(ui.value);
}
});
</script>
The input element of type="hidden" will generate an input variable $$xMin when the form is submitted, and also serves as the place for the jQuery slider to both read the slider value and set the initial slider position and also to store the slider value as the user moves the slider control. Note that like the input field, we use the value attribute to set the initial value of xMin to the value of $$xMin, which is either the default value or the most recent user setting from when the form was submitted.
The HTML span element is used to show the numeric value of the setting, as visual feedback to the user about the current value of the slider. The jQuery code will update this value when the slider is moved. We add the class="sliderlabel" to the span and then add these CSS rules near the beginning of the file to set a fixed width for the label so that the two sliders line up one on top of each other:
span.sliderlabel {
  width: 18px;
  display: inline-block;
}
The HTML div element with id="xMin" is an initially blank area that the jQuery slider code will use to draw the slider control using Javascript code. We add the class="slider" attribute to the div and these associated CSS rules so that the slider appears on the same line as its label and its value:
div.slider {
   display: inline-block;
   width: 150px;
   border: 1px solid black;
}
The code inside the HTML script element is calling the jQuery slider implementation and passing its options. More information about this call can be found at http://jqueryui.com/slider/.