Model Center—Introduction
By default, Model Center starts with four windows (see following figure): (A) the Class Browser, (B) a class window, (C) the Component Browser, and (D) a window with parameter and variable views, and the Messages view.

Tooltips
Tooltips are the small rectangles with help messages that pop up while keeping the mouse cursor still over an item, for example, a button on the toolbar or a connection in the Diagram View.
In some views, such as the Diagram View, the tooltips can be disabled. To turn tooltips on or off for a certain view, open the Options dialog box by choosing Tools ▶ Options. The tooltip settings are located in the Model Center ▶ General view and are automatically saved when closing the dialog box and restored the next time Model Center is started.
In most dialog boxes, you can get help with items in the dialog box by right-clicking the title of the section containing the items and choosing What's This? from the popup menu.
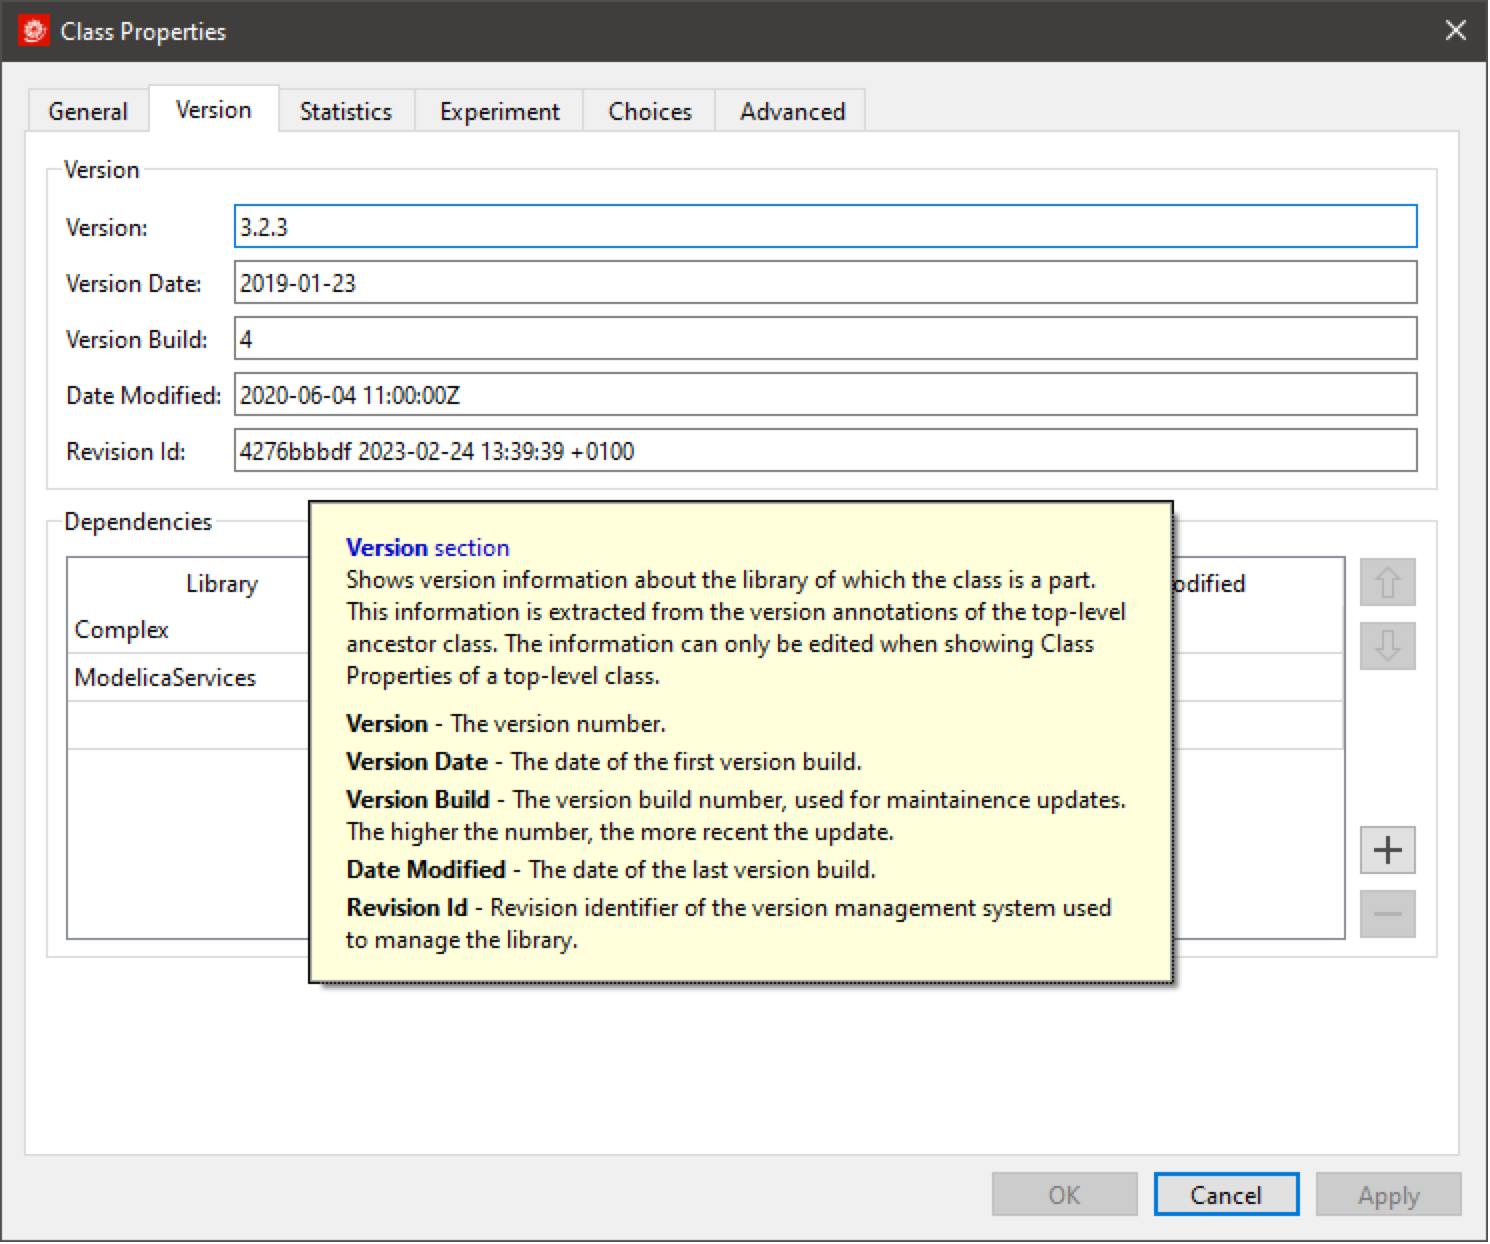
Showing a tooltip for the Version section of the Class Properties dialog.
Customizing the Windows
All Model Center windows, except the class window and the Documentation Center window, can be dragged and dropped within the main window or outside it as floating windows.
The window locations and sizes are saved when the application is closed and restored when the application is opened the next time. To reset all windows to the default configuration, choose View ▶ Reset Window Layout.
Window layouts are described in greater detail in the section Window Layout Management.
User Modes
System Modeler has a number of different user modes. The active user mode can be set using the drop-down box in the lower-right corner of the main window.
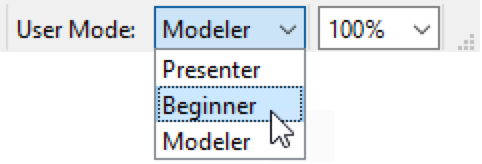
Changing user mode using the drop-down box in the status bar of the main window.
A user mode is a configuration of the graphical user interface (GUI) and affects the visibility of GUI elements, the presentation of models and the availability of tools. Each user mode can be further customized with respect to available tools in the tool bar, window locations, window sizes, grid visibility and level of detail in graphical views. These properties are saved and restored when toggling between user modes.
A user mode can be reset to to its default configuration by choosing Reset Window Layout from the View menu.
The Modeler user mode is the default user mode and gives access to all tools and features of System Modeler. This mode is targeted to experienced users doing more advanced modeling or development of new components and libraries.

A model shown in the Modeler user mode.
The Beginner user mode is targeted to users creating models using existing libraries. This user mode is suitable for drag-and-drop development of models. By default, the component browser is hidden and the number of tools available in the toolbar is limited in this view. Some dialog boxes are also simplified, with more advanced features removed.

A model shown in the Beginner user mode.
The Presenter user mode is by default very scaled down for use in presentations. It hides many of the views and toolbars, giving a clean view of the model itself. Also, the component names and parameter values normally visible in the graphical views are hidden and only shown on mouseover.

A model shown in the Presenter user mode.
Most of the settings that control the visibility of views, items and tools are reachable from the View menu. For instance, choose View ▶ Level of Detail to specify if component labels and/or parameters should be visible in the graphical layer, View ▶ Toolbars to choose which toolbars to enable and View ▶ Grid to toggle grid visibility on and off.
Version and License Details
The version of Model Center can be found by choosing About System Modeler from the Help menu.

The About System Modeler dialog box.
The dialog will also show the name of the licensee and the activation key. There is also a System Information button, which will show detailed information about System Modeler in a new dialog. This information is intended for sending to Wolfram technical support if technical issues arise.
Default Units for Icon and Diagram Views
The default units used in the icon and diagram views of a class window in Model Center can be configured in the Options dialog box. Open the Options dialog box by choosing Options from the Tools menu and click Icon and Diagram Views in the column to the left. The units setting is located under the General tab.
The default units setting for icon and diagram views.
Loading Classes
At any time you can load one or more Modelica files (*.mo, *.moe) in Model Center by choosing File ▶ Open. Alternatively, you can drop Modelica files anywhere on the Model Center window. Recently used files are available in the File ▶ Open Recent menu. Click one of the menu items to load the specified file or click the Clear Recently Opened item to clear the history of recently used files. The maximum number of items in the menu can be specified in the Global ▶ General view of the Options dialog box, accessible from the Tools menu.
As soon as Model Center is finished reading the contents of the files, the loaded classes will appear in the Class Browser.
Any attempts to redefine existing classes when loading a file will be detected and you will be given a chance to abort the operation. If you choose to proceed, the existing classes will be replaced with the class definitions in the file.

The Load and Replace warning dialog box.
Refreshing Classes
In some rare cases, it may be necessary to force a refresh of a class in Model Center. When refreshing a class, the class definition is refetched from the System Modeler kernel and all elements of the class, including child classes, are updated in Model Center.
To refresh a class, right-click its name in the Class Browser and choose Refresh from the popup menu, or if the class is open, right-click an empty area in a graphical view and choose Refresh from the menu.
Validating Classes
Click the Validate Class button on the toolbar to validate the class of the active class window or click the arrow next to it to choose a validation level (see Validation Levels). You may also right-click any class in the Class Browser and choose Validate from the menu. Note that it is not possible to validate read-only classes.
![]()
The Validate Class button on the Class Tools toolbar.
All syntactic and many semantic errors in the class will be detected and reported. Note that the semantic check cannot be performed if the class has syntax errors. A report of the semantic check is shown in the Translation view of the window at the bottom of Model Center.

The validation report of a friction model.
The Local Balance Report provides the information behind the local number of variables (denoted local number of unknowns in the Modelica specification) and local number of equations (denoted local equation size in the Modelica specification) reported for a model or instance. This information can be used to interpret local imbalance errors and to learn about the concepts by studying examples of locally balanced models.
Simulating Classes
Classes are simulated using Simulation Center. To start a simulation of the class in the active class window, click the Simulate Class button on the Class Tools toolbar. This will build and simulate the class in Simulation Center.
The Simulate Class button on the Class Tools toolbar.
By clicking the arrow next to the Simulate Class button, it is possible to set experiment settings such as start and stop time for the class. This is described in greater detail in the section on editing class properties. The same dropdown menu also lets you select the validation level used during build; see Validation Levels for details.
Simulation Center can also be started or brought into focus without creating an experiment by clicking the Simulation Center button on the Applications toolbar.
![]()
The Simulation Center button on the Applications toolbar.
For more information on simulation, please see the Simulation Center User Guide.
Validation Levels
When validating or building a class, Model Center applies one of three validation levels that control how strictly the model is checked.
Relaxed Validation performs the minimum checks needed to translate and simulate a model. It is appropriate for day-to-day modeling work and tolerates common patterns that are not strictly compliant with the Modelica specification.
Strict Validation enforces full compliance with the Modelica specification. It reports nonstandard and deprecated semantics, inconsistent units and symbolic-processing issues that Relaxed Validation would accept. This level is useful for library development and for ensuring that models are portable between Modelica tools.
Custom Validation uses the set of checks that you configure yourself in the Strictness page of the Options dialog. This lets you enable or disable individual checks independently of the Relaxed and Strict presets.
The level used by the Validate Class action is selected from the dropdown menu of the Validate Class button on the toolbar. The level used during the build phase of a simulation is selected separately from the dropdown menu of the Simulate Class button. Both selections are remembered across sessions.
To configure Custom Validation, choose Custom Validation Setup from either drop-down menu. This opens the Options dialog at the Strictness page, where settings are grouped into Translation Messages, Unit Checking, Modelica Compliance and Symbolic Processing. Each group contains controls for what should be reported and at what severity during Custom Validation.
Viewing Documentation for Classes
How to view, navigate and export the documentation for classes is described in the Documentation Center User Guide.
Copy Class as Wolfram Language Object
The Modelica class that is currently viewed in Model Center can be accessed in the Wolfram Language by a copy-and-paste operation. Click the Copy Class as Wolfram Language Object button on the Applications toolbar to copy the required information to the clipboard, switch to the Wolfram Language, and then paste the contents of the clipboard into the Wolfram Language.
The Copy Class as Wolfram Language Object button on the Class Tools toolbar.
Importing and Exporting Functional Mock-up Units (FMUs)
In System Modeler it is possible to export and import FMUs. An FMU implements a C interface defined by the Functional Mock-up Interface (FMI), which is an open and tool-independent standard for exchange of models between tools.
Undoing Mistakes
In the event of a mistake, you can undo the most recent actions performed. Choose Edit ▶ Undo to undo the very last undoable action you performed. If you later decide you did not want to undo a certain action, choose Edit ▶ Redo. Please note that it is not possible to undo all actions. The Undo and Redo operations can also be reached from the Standard toolbar.
![]()
The Undo and Redo buttons on the Standard toolbar.
Setting the Number of Undo Levels for Graphical Views
The maximum number of consecutive actions you can undo in the graphical views of a class is by default 100. This number can be changed to any number between 0 and 999. Open the Options dialog box by choosing Tools ▶ Options. The setting is available in the Model Center ▶ Icon and Diagram Views view and is automatically saved when closing the dialog box and restored the next time Model Center is started.
Installing Modelica Libraries from Library Archives
A System Modeler Archive (*.sma file) is the preferred form of distributing Modelica libraries for System Modeler. It allows Modelica libraries to be distributed as a single file and provides the means to automate the installation and configuration of Modelica libraries in System Modeler.
Modelica libraries for System Modeler are available in the Wolfram library store. The library store carries both free and commercial libraries and is reachable by clicking the Download Libraries button at the bottom of the Class Browser in Model Center. The library store is an online store and requires a web browser and an internet connection.
The Download Libraries button at the bottom of the Class Browser in Model Center.
Installing Libraries
System Modeler archive files are associated with Model Center and can be opened either by choosing Open from the File menu or by dropping the files anywhere on Model Center.
When opening an archive file with libraries, the Library Archive Installer is launched and the contents of the library archive are presented. A single library archive can contain multiple libraries. To start the library installation process, click the Install Libraries button.
Installing the BioChem library using the Library Archive Installer in Model Center.
It is common that libraries come with a license agreement. If so, you will be asked to read and accept the license agreement before the installation process starts. The license agreement for a library installed from a System Modeler Archive can at any time be accessed from the library's documentation page in the Documentation Center. See Viewing License Agreements of Installed Libraries for more information.
Once the installation process is finished, the libraries will automatically be loaded and configured to load at startup of System Modeler (unless the Load now and configure to load at startup option was unchecked). If any of the libraries in the library archive are commercial libraries that require activation, an activation dialog will be shown when they are loaded. See Activating Modelica Libraries for more information on the activation process.
During the configuration step, if libraries are configured to load at startup of System Modeler, a library conflict can arise. This happens if another library with the same Modelica name is also configured to load at startup. In this case, a dialog will appear that will let you resolve the conflicts. See Resolving Library Conflicts for details on library conflicts and how to resolve them.
If the library to be installed is a new version of a previously installed library, the library is updated to the new version.
Activating Modelica Libraries
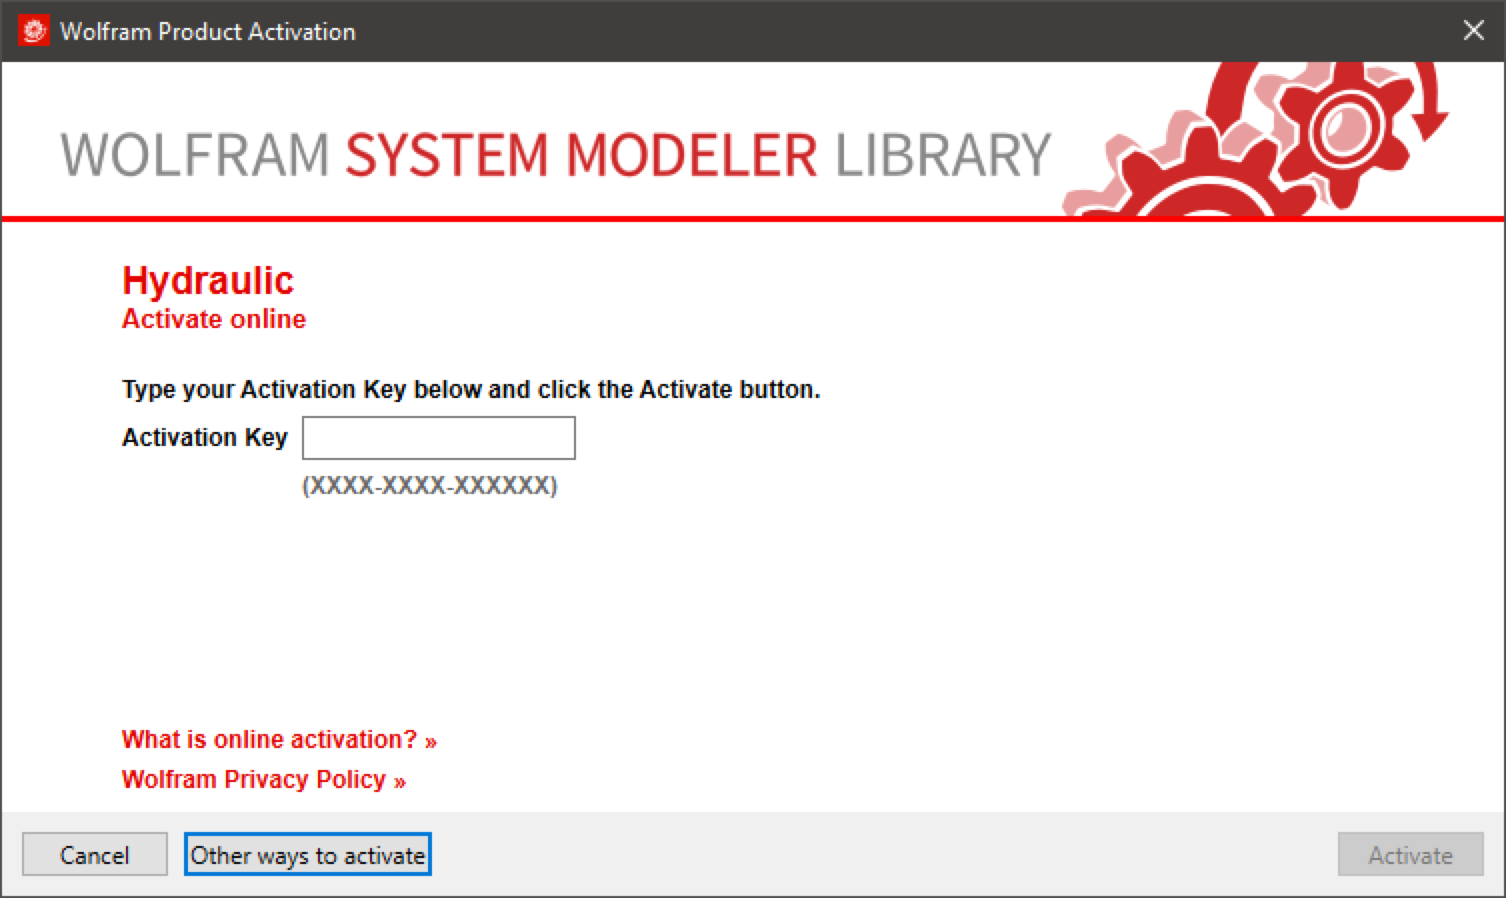
Commercial libraries need to be activated before they can be used in System Modeler. The activation process is initiated when the library is loaded. To activate a library, you need the activation key that you received when you purchased the library.

The System Modeler library activation dialog box.
Managing Modelica Libraries
It is possible to customize the set of libraries for use with System Modeler in the Modelica library manager. The Modelica library manager is available in the Options dialog box and is accessible from both Model Center and Simulation Center. Open the Options dialog box by choosing Options from the Tools menu and go to the Global ▶ Modelica Libraries section. In Model Center it is also possible to reach the library manager by clicking the Modelica Library Manager button at the bottom of the Class Browser.
The Modelica Library Manager button at the bottom of the Class Browser in Model Center.
You will find that the right-hand side of the dialog box lists all Modelica libraries currently configured for use with System Modeler. The settings are automatically saved when clicking the Apply button or closing the Options dialog and restored the next time System Modeler is started.
The Modelica Libraries view of the Options dialog box.
In the library manager, Modelica Libraries are divided up into bundled libraries, installed libraries, and custom path libraries. Libraries are listed in a tree view, where libraries that come with System Modeler are listed under the Bundled Libraries branch of the tree. These libraries cannot be uninstalled or removed. If you were to download and install libraries from the System Modeler Library Store, these libraries will be listed under an Installed Libraries branch (only visible if at least one library is installed). Custom path libraries are libraries that can be located anywhere on your computer and that can be added to the library manager by adding their location as a library path. These libraries appear under a branch named after the actual location of the library path.
Some libraries, such as the Modelica Standard Library, consist of a collection of libraries. To view all the libraries that are part of such a library, expand the branch of the tree representing the library.
Loading Libraries from the Library Manager
When accessing the library manager from Model Center it is possible to load any library listed in the library manager by right-clicking the item representing the library and choosing Load Library from the popup menu. As soon as Model Center is finished reading the contents of the library files, the loaded library will appear in the Class Browser. If the library is already loaded, it is reloaded from the file and the current loaded version of the library is replaced. Any unsaved changes of the currently loaded version of the library are lost.
Viewing License Agreements of Installed Libraries
Libraries that have been installed from a System Modeler Archive file usually come with a license agreement. A library's license agreement can be viewed from the library manager by right-clicking the item representing the library and choosing Show License Agreement.
Specifying Libraries to Load at Startup
A library whose checkbox is checked is automatically loaded at startup of System Modeler. By default, the Modelica standard library, the System Modeler IntroductoryExamples, and the System Modeler MathematicaExamples are configured to load at startup.
Whenever a new library is specified to load at startup, a dependency analysis and conflict analysis are performed. Any additional libraries required by the specified library are automatically selected to load at startup as well. To avoid a situation where conflicting libraries are loaded at startup, any conflicting libraries are automatically unchecked. If this happens a dialog will be shown with information on the libraries that were unchecked.
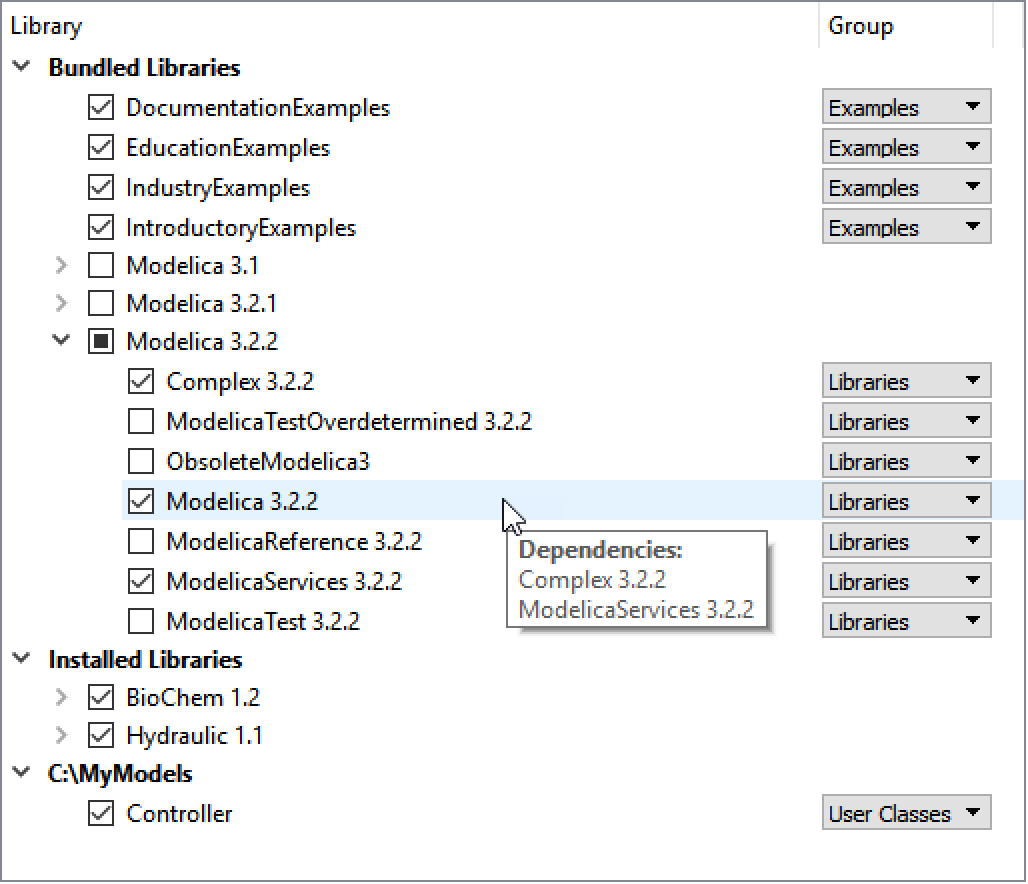
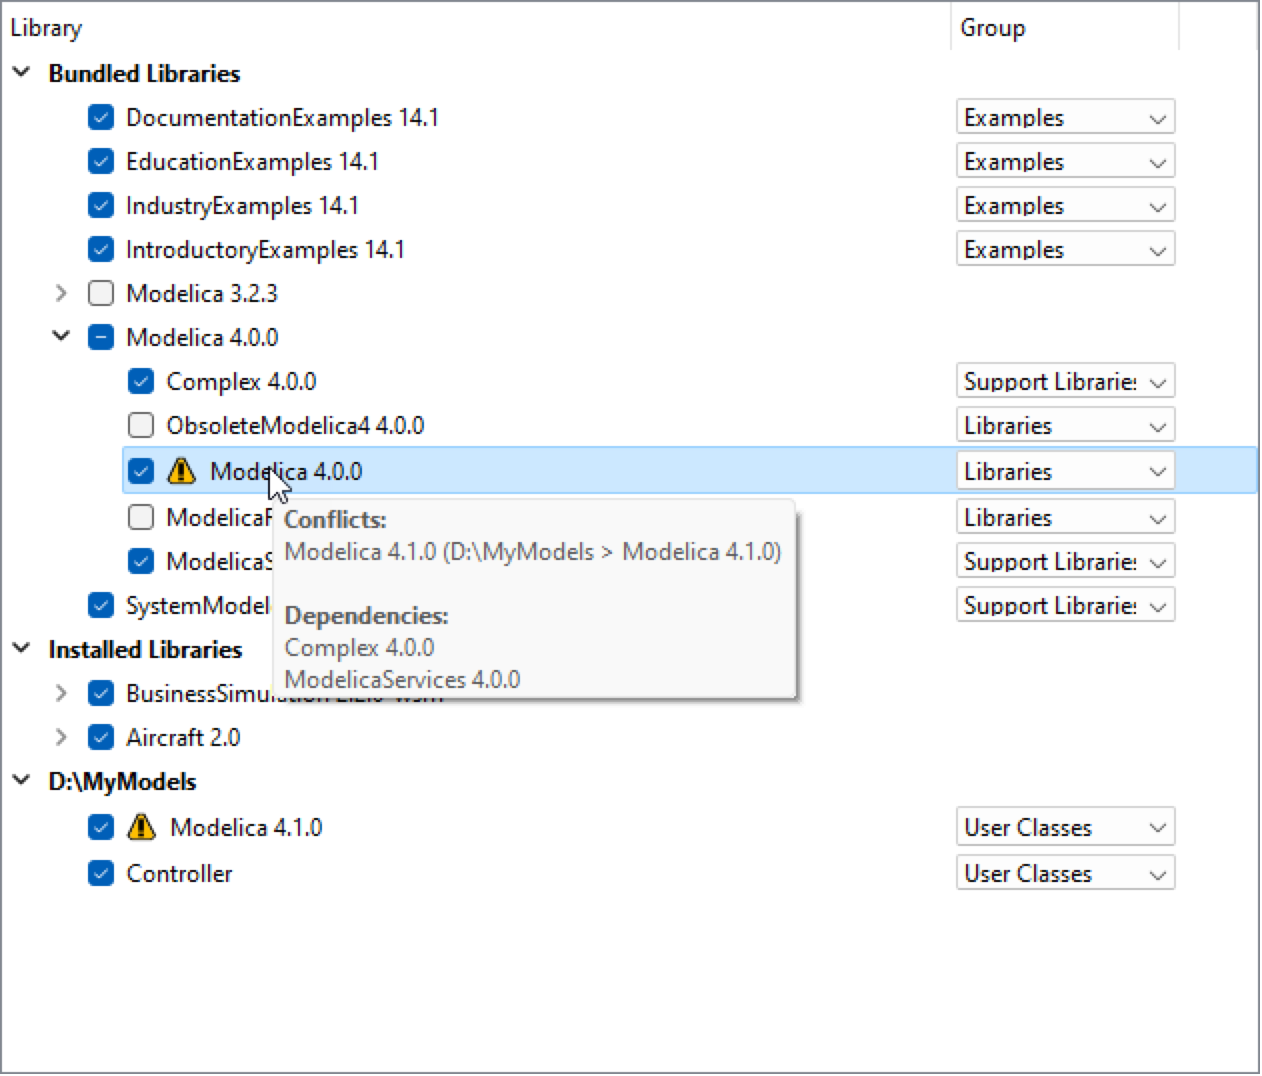
At any time, a library's dependencies on other libraries can be shown in the form of a tooltip. To activate the tooltip, move the mouse cursor on top of a library item and hold it still for a couple of seconds.
Showing the dependencies of the Modelica library in the library manager.
Changing the Group for a Library
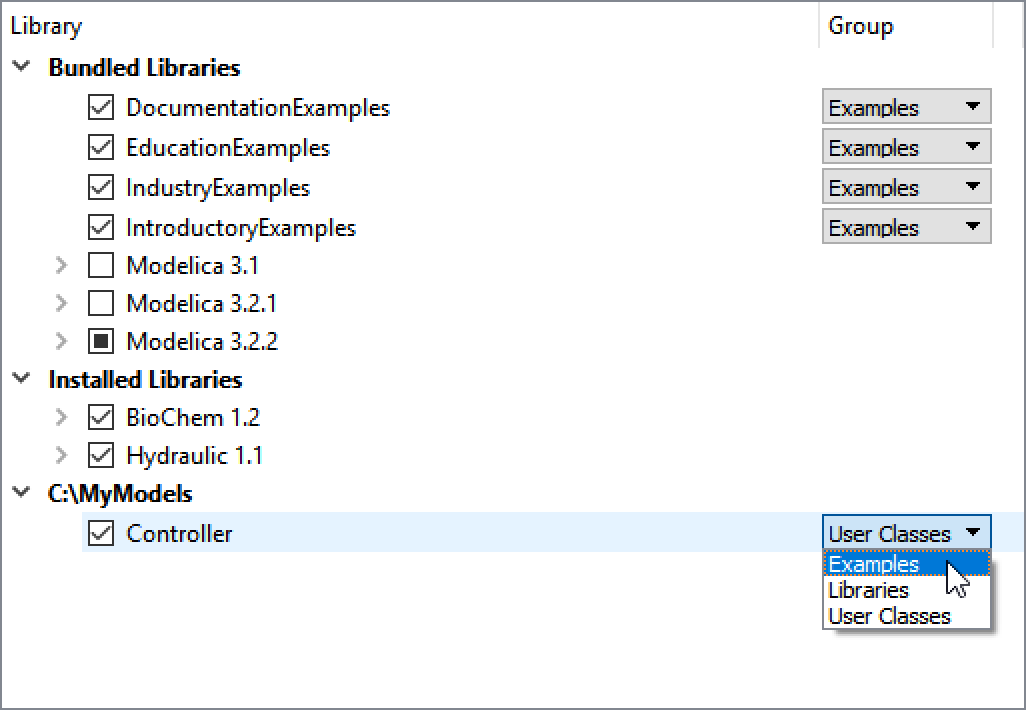
Each library in the library manager is associated with a group. This setting controls which section of the Class Browser the library appears in when loaded. To change the associated group for a library, click the corresponding drop-down box and choose a different group, or New Group to create a new group for the library.
Changing the group association for a library.
Loaded libraries can also be moved between groups or to a new group in the Class Browser (see the section on organizing libraries for how this is done in more detail).
Adding Custom Libraries
To add your own libraries or models, click the Add Library Path button and select the path containing your files. Once added, any Modelica libraries found within the path appear under a new branch of the tree and are loaded at startup. The folder search depth when adding a path is two levels, i.e. libraries located more than two folders down the folder hierarchy of the added path are not picked up.
As a convenience, all libraries discovered in custom library paths are automatically checked to load at startup. This may lead to library conflicts; see Resolving Library Conflicts.
Removing Custom Libraries
Libraries or models added using the Add Library Path button can be removed from the library manager by selecting the custom library path and clicking the Remove Library Path button. When removing a custom path, no files are deleted; the libraries are only removed from the library manager.
Uninstalling Libraries
Libraries that have been installed from a System Modeler Archive file can be uninstalled by selecting the item representing the library archive and clicking Uninstall Library Archive. All libraries part of the library archive will be unloaded and uninstalled, and the files of the libraries will be permanently deleted from the computer. This operation is not undoable; a warning will be issued before the uninstallation is performed.
Resolving Library Conflicts
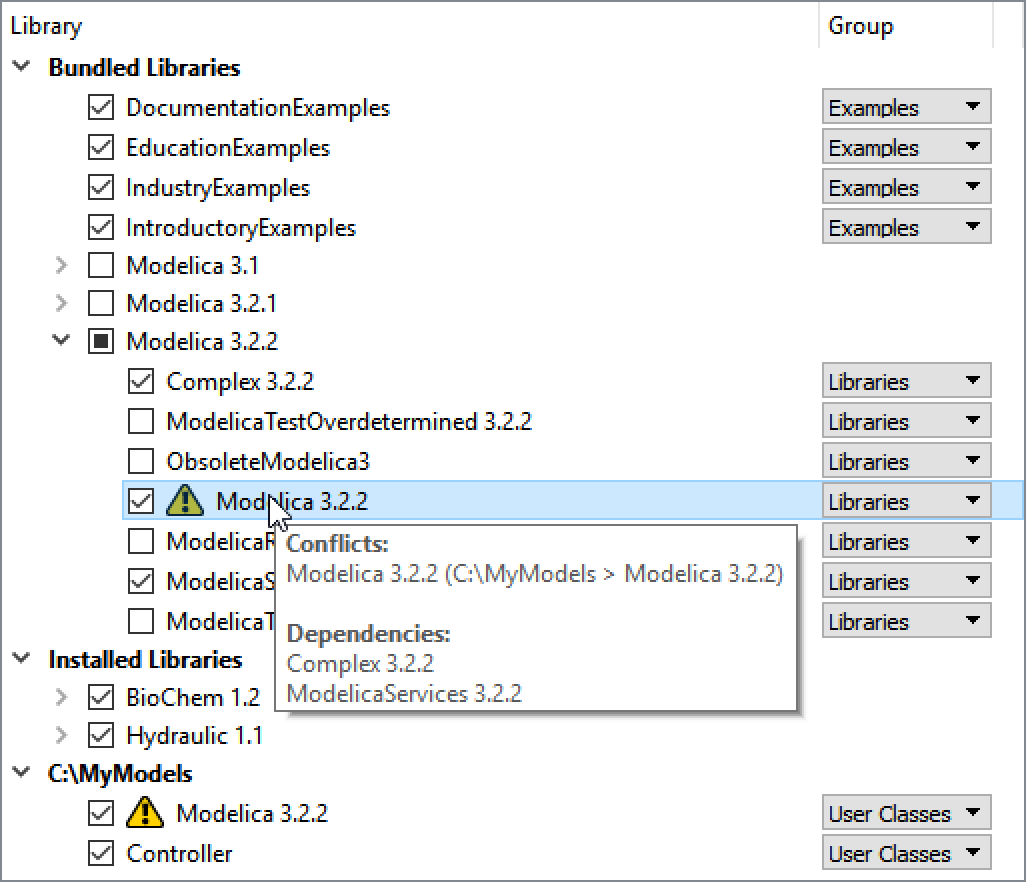
In some situations, such as when adding a custom library path or installing libraries from a System Modeler Library Archive, a library conflict may arise. A library conflict is when two or more libraries with the same Modelica name are specified to load at startup, for instance two different versions of the same library. A library conflict is shown in the form of a warning triangle icon next to the libraries in conflict.
To obtain information on exactly what other libraries are in conflict with a given library, place the mouse cursor on the library item and hold it still for a couple of seconds; a tooltip will appear. Resolve the conflict by unchecking all but one of the conflicting libraries.
Resolving a library conflict in the library manager.
Setting the Screen Resolution
To make the size of graphic objects on screen match their actual specified size, you need to set the screen resolution in the Options dialog box. Choose Options from the Tools menu and edit the Screen resolution (DPI) box in the Display view of the Icon and Diagram Views options.
For instance, the screen resolution (in dots per inches) for a monitor measuring 24 inches diagonally, and with a resolution of 1920x1080 pixels, equals
This leaves a screen resolution of approximately 92 dpi.
The setting is automatically saved when closing the dialog and restored the next time Model Center is started.