Model Center—Class Browser
The Class Browser is used to browse packages and components of libraries, and to perform operations on classes, such as renaming, saving, and more.
The Modelica Class Concept
In Modelica, classes are used to model systems. From a class it is possible to create any number of objects that are known as instances of that class. An instance of a class is also often referred to as a component. As a class is very general and does not give any information about what it defines, several kinds of specialized classes are available. The class specialization of a class specifies the constraints that apply to the class.
- Model. The model class is by far the most commonly used kind of class for modeling purposes. The only restriction is that a model may not be used in connections.
- Package. A package is primarily used to organize Modelica code and may only contain declarations of other classes and constants. No variable declarations are allowed within a package.
- Function. The function concept in Modelica corresponds to mathematical functions without external side effects and may be recursive.
- Connector. Connector classes are typically used as templates for connectors. A connector is a connection point used for communicating data between objects.
- Block. A block is a class for which the causality (whether the data-flow direction is input or output) of each of its variables is known.
- Type. Classes of specialization type are used to define custom types, extending a predefined type, enumeration, array of type, or a type extending from another type.
Browsing Classes
Modelica classes and their hierarchical organization are visualized using grouped tree views in the Class Browser. Classes are grouped into packages and components, where the items of each group are sorted alphabetically. Packages are represented as branches of the tree and components as leaves. To show the contents of a package, expand it by clicking the symbol to the left of its icon (or name if the package has no icon). Double-clicking also expands packages. Inside packages, items are ordered according to the specifications of the library developer. This is usually controlled with a package.order file or through declaration order.
Clicking the symbol to the left of an expanded package will show it as collapsed again, hiding its contents.

Browsing the Modelica Standard Library.
To view the contents of a package as a separate group within the Class Browser, right-click its name and choose View as Group. This can prove useful if you use components from more than one package when designing a model. By opening the packages of interest as separate groups, you can minimize the scrolling up and down needed in order to find the components.

Viewing the contents of two packages in separate group views.
The icon of a package or class can be copied to the clipboard as an image by right-clicking its name and choosing Copy Icon as Image.
It is possible to view balloon help (on-screen information) for a class by moving the mouse cursor over its icon and holding it still for a short period of time. The class name and description (if available) are shown.
Finding Classes
If you know the name of the class you are looking for, or parts of its name, you can use the search feature of the Class Browser to find it. This is especially useful if you do not know the exact location of the class. Type in the text to search for in the text box at the top of the Class Browser. Pattern-matching searching is supported using one or more * characters. A * character matches zero or more characters of any kind. For example, a search for analog*resistor will find all resistor classes located in the Modelica.Electrical.Analog.Basic package but filter out all resistors in other packages, such as Modelica.Electrical.MultiPhase.Basic and Modelica.Electrical.QuasiStationary.SinglePhase.Basic. To recall previous searches, press the up and down arrow keys while the search box is focused. The search history is preserved between sessions.
While typing, a short list of matching results will appear in a group below the search box, in the top of the Class Browser. To get a complete list of matching results, press Return or click the Find All button. The number of hits that the search resulted in is displayed within parentheses in the title bar of the group. If there is a single match for the entered search term, the button changes into Open, and clicking it or pressing Return will open the class in a new class window.
By default, all classes matching the name are shown in the results. To narrow your results further, you can apply filters. The three filters (besides All) available are: Examples, Components, and Connectors. The filters are activated by clicking them. For instance, if you only care about example models that can be simulated, click the Examples button, and all other classes will be removed from the results. While the Components filter will show only classes that can be used as components (connectors excluded) in models, the Connectors filter will list the classes that can be used as connector components.

Finding transformer classes the can be used as components using the search feature of the Class Browser.
You can go directly to the location of a class in the Class Browser by right-clicking components in the Component Browser or the Diagram View and choosing Go to Class in Class Browser in the popup menu.
Finding Examples in Libraries
To find all example models that can be simulated within a library (or sub-library), let us say Modelica.Mechanics, you can right-click the library item in the Class Browser and choose Find Examples in Mechanics. The operation will return all example models, in Modelica.Mechanics, and at any level below, as a search result. The same thing can be achieved by using the general search functionality by selecting the Examples filter and typing Modelica.Mechanics.* in the search text box.

Finding all example models within the Modelica.Mechanics library.
Copying Classes
Classes can be copied using drag-and-drop within the Class Browser or by using menus. The destination of the copy operation can be any other class as long as the class is not read-only. Drag the class you want and drop it on the class in which you want the copy to be created. To copy a class to the top level of the class hierarchy, drop the class on the item representing the root of the group.
Another way to copy a class is to right-click it and choose Copy. The class is copied to the clipboard and can be inserted to any number of classes by first selecting the class and then choosing Paste from the Edit menu.
A third way to create a copy of a class is to right-click it and choose Duplicate.
Once the class is dropped or a class is pasted using the menu, a confirmation dialog will be shown. The dialog also allows you to give the copy a new name and update the description of the class, if needed.

Copying the Modelica.Mechanics.Rotational.Components.BearingFriction class.
Opening and Editing Classes
To open a class, right-click its name and choose Open from the popup menu. For classes that are not packages, double-clicking its name is a more convenient way. The class will appear in a new class window unless the class has already been opened, in which case its class window will become the active class window.
The default view of the class window when opening a class is determined by the class specialization. For example, the default view of a package is the Icon View, while the default view of a model is the Diagram View. The default view for a specific class can be overridden from the Class Properties dialog. See this section for more information on the Class Properties dialog and how to reach it.
In case the file in which the class is saved has the read-only attribute set, the class becomes read-only as well. A read-only class is still possible to open in a class window, but the class cannot be edited. All classes in the Modelica Standard Library and the IntroductoryExamples library are read-only.
Creating Classes
New classes are created either by using the popup menus of the Class Browser or the File menu. Choose New Class from the popup menu that appears when right-clicking in an empty area of the Class Browser, or choose New Class from the File menu. This will open a dialog box in which you will be able to specify the attributes of the class.
If you want to insert the new class into an existing class, you can right-click the parent class in the Class Browser and choose New Class from the popup menu. The Insert into text box of the dialog box will then be filled in automatically for you.

The different sections of the dialog box are described in detail below.
- General. Specifies general information about the class, such as the specialization, name, and description.
- Specialization. The drop-down menu provides a selection of different class specializations, which specify the constraints that are applied to the class. For more information about class restrictions, see the section on the Modelica class concept. If you select Enumeration as the class specialization, the dialog will allow you to specify enumerators and their corresponding descriptions. To add a new item to the enumeration, select an empty field in the Enumerator column and start writing. Remove items by selecting a row and clicking the button with a minus sign, and rearrange by clicking on the up and down arrow buttons.
- Description (optional). The optional description input field is where the class can be described. The class description, if specified, appears along with the name of the class as a balloon help for the class in the Class Browser.
- Insert into (optional). Specifies the location for the class as the name of a parent class. If no parent class is specified, the class will be created at the top level of the class hierarchy. If you create a class using the File menu, the Insert into text box will be empty. Creating the class using the popup menu of the Class Browser will insert the class in the class currently selected in the Class Browser (if any).
- Extends (optional). The Extends field specifies the base classes to inherit from. Multiple base classes can be specified by using a comma to separate them. In many situations it is convenient to declare a base class with a general interface that is extended when creating more specialized classes. You will see that this is a common practice in the Modelica Standard Library, where for example almost all two pin analog electrical components inherit the Modelica.Electical.Analog.Interfaces.OnePort class. If you do not know the full path to the class you want to extend, you can use the Class Browser to search for the class and then drag it from the Class Browser and drop it on the text box. See this section for more information on how to find classes using the search functionality of the Class Browser.
- Icon. Specifies the icon to be used for the class. Click the icon to change it. The chosen icon can be further customized once the class has been created. The set of icons available to choose from is determined by the specified class specialization. Uncheck this section to create a class without an icon. If one or more base classes are specified in the Extends field of the General section, the icon is inherited from the base classes and cannot be changed.
- Final. Declaring a class final prevents it from being modified from the outside using modifications.
- Partial. The partial property is used to indicate that a class is incomplete such that it cannot be instantiated. A partial class can only be used as a base class.
- Encapsulated. An encapsulated class represents an independent unit of code. All dependencies outside the class must be explicitly stated using import statements.
Renaming Classes
A class can be renamed at any time from the Class Browser by right-clicking the class and choosing Rename from the popup menu, or by selecting the class and pressing the F2 key. It is also possible to rename the class from the Class Properties dialog.
When renaming a class, all references to the renamed class within its own library are updated automatically. Other non-read-only libraries, using the library of the renamed class, are listed in the dialog. By default, references to the class in these libraries are also updated, unless a library is explicitly unchecked.
A library LibraryA, is considered to be using the library LibraryB Version 1.0 if it contains the following annotation: uses(LibraryB(version="1.0")). A uses annotation is automatically inserted into a library by System Modeler when an operation is performed that makes one library dependent on another, for instance, when dropping a component from one library onto a model in another. The only requirement is that the library from which the component was dropped has a declared version. See this section for more information on how to view and edit the version or dependencies (uses annotations) of a library.

Renaming the class Resistor within the library Modelica, updating references to the class in all libraries that are using Modelica.
When the renaming operation is completed, a list of all classes that were modified (if any) due to references to the renamed class is shown.
Renaming a class will often change in what file the class is saved. If that is the case, a dialog will be shown warning about this:

Warning that renaming the class will change where it is saved.
Clicking the Rename and Save button will perform the rename and immediately save the class in the new location. If the class contains references to external files, these references may need to be updated after the rename has been performed. Examples of such references include:
Deleting Classes
To delete a model or any other class, select it by clicking its name and choose Edit ▶ Delete, or right-click the name of the class in the Class Browser and choose Delete from the popup menu. No files are deleted when deleting a class, but any unsaved changes will be lost. Moreover, if you have more than one class associated with the same file, for instance a package named Electrical containing a class named Resistor, deleting the Resistor class and then saving the package will remove the deleted class Resistor from the file.
When deleting a top-level class, for instance Modelica, the class is unloaded; no files are deleted or affected.
When deleting or unloading a class, all references to the class in other classes will become unresolved. As a consequence, the components of the class will no longer be graphically visible in Model Center. Classes with references to the deleted class will not be modified; however, it will be impossible to simulate them until the unresolved references have been addressed.
Editing Properties of Classes
The properties of a class, such as its name, description, and so on, can be viewed and edited from the Class Properties dialog box. The Class Properties dialog box is reached by right-clicking the name of a class in the Class Browser and choosing Properties from the popup menu.
The dialog box is divided into four tabs:
- Choices. Allows you to specify predefined values that can be chosen by users when the class is representing a primitive type or when it is being used as a replaceable class.
- Advanced. Gives you control over more advanced class settings, such as function inlining, preferred class view, etc.

- General: Class. Specifies general information about the class, such as name and description. Each property is described in more detail below.
- Name. Identifies the class. If the class can be renamed, it can be done by clicking the Edit button next to its name. For information on how references are automatically updated when a class is renamed, see the section on renaming classes.
- Specialization. Specifies the constraints that are applied to the class. For more information about class specializations, see the section on the Modelica class concept. Note that the class specialization cannot be edited from the dialog box. If you need to change the specialization, it can be done in the Modelica Text View of the class. If the class specialization is enumeration, the dialog box will allow editing of enumerators and their corresponding descriptions. To add a new item to the enumeration, select an empty field in the Enumerator column and start writing. Remove items by selecting a row and clicking the button with a minus sign, and rearrange by clicking on the up and down arrow buttons.
- Description. This field contains an optional short description of the class. If present, the class description appears along with the name of the class as a balloon help for the class in the Class Browser.
- Defined in. The Defined in field states the path to where the class is defined. The path cannot be edited from the dialog box. See the section on copying classes for information on how to copy a class from one location to another.
- Partial. The partial property is used to indicate that a class is incomplete such that it cannot be instantiated on its own. A partial class can only be used as a base class.
- Encapsulated. An encapsulated class represents an independent unit of code. All dependencies outside the class must be explicitly stated using import statements.
- Version: Version. The Version section shows version information about the library of which the class is a part. This information is extracted from the version annotations of the top-level ancestor class. The information can only be edited when showing the Class Properties of a top-level class.
- Version Date. The date of the first version build. Stored in the class using a versionDate annotation.
- Version Build. The version build number that is used for maintenance updates. The higher the number, the more recent the update. Stored in the class using a versionBuild annotation.
- Version: Dependencies. The Dependencies section lists all dependencies of the library of which the class is a part. This information is extracted from the uses annotation of the top-level ancestor class. The dependencies can only be edited when showing the Class Properties of a top-level class.
- Statistics. Shows statistics about how many classes and components this class contains and how many components are inherited.
- Experiment: Solver Settings. The solver settings section specifies which solver settings, e.g. start and stop time, to use when simulating the class. Values in gray text are default values or values inherited from base classes. Such values can be overridden by specifying new values. More information on these settings can be found here. The section includes the following properties:
- Solver. Solver used to solve the dynamic system. There are five different solver choices: DASSL: a variable step size and variable order solver that uses a backward differentiation formula method. CVODES: A variable step size and variable order solver that uses a backward differentiation formula method. The added benefit of CVODES is that it supports forward sensitivity analysis. For more information on CVODES, see https://github.com/llnl/sundials. Explicit Euler, Heun's Method and Runge Kutta (RK4): Fixed-step solvers suitable for real-time simulations. The step size is controlled by the Interval length setting, which also controls the number of output values in the simulation result.
- Experiment: Output. The output section shows which output settings to use when simulating the class. Values in gray text are default values or values inherited from base classes. Such values can be overridden by specifying new values.
- Choices: Choices Annotation. The choices annotation for a class associates a set of predefined values or redeclarations with the class. The choices are typically presented to the user in the form of a drop-down box or menu in different contexts. For instance, if a Modelica class extending the Integer type is created for the purpose of representing the number of engines of an airplane, a choices annotation specifying the most common values (1, 2, 3 and 4) could be created, while still allowing other values. With a choices annotation, each choice can also be given a more informative description that is shown to the user rather than just the value.
- Advanced: Function Inlining. Provides control over the inlining of functions during compilation. This setting is only available for classes defining a function. The standard Modelica annotations Inline, LateInline and InlineAfterIndexReduction are used to store this setting in the class.
- Advanced: Quantity Configuration. The type of quantity (absolute or relative) represented by this type. The type of quantity is by default inherited from the base type or derived from the unit parameter of the type. The default value can be overridden by specifying an explicit value. The setting is only available for types derived from the predefined type Real, as no other type can have a unit. The standard Modelica annotation absoluteValue is used for the quantity configuration.
- Advanced: Preferred Class View. Specifies the class view to be shown when the class is opened. If None, the class view shown is determined by the class specialization. The standard Modelica annotation preferredView is used to store this setting in the class.
- Advanced: Default Component Configuration. These settings are automatically applied to any component created with this class using drag and drop from the Class Browser.
- Name. The name that components of the class should be given when created. If a component with the specified name already exists, this setting will be disregarded and an autogenerated name will be used instead. The standard Modelica annotation defaultComponentName is used to store this setting in the class.
Editing Type Parameters for Classes
Predefined types (Real, Integer, Boolean, String) and enumeration types in Modelica have a number of parameters that are used to further customize the type. To view or edit these parameters for a class derived from such a type, right-click the class in the Class Browser and choose View Type Parameters or Edit Type Parameters.
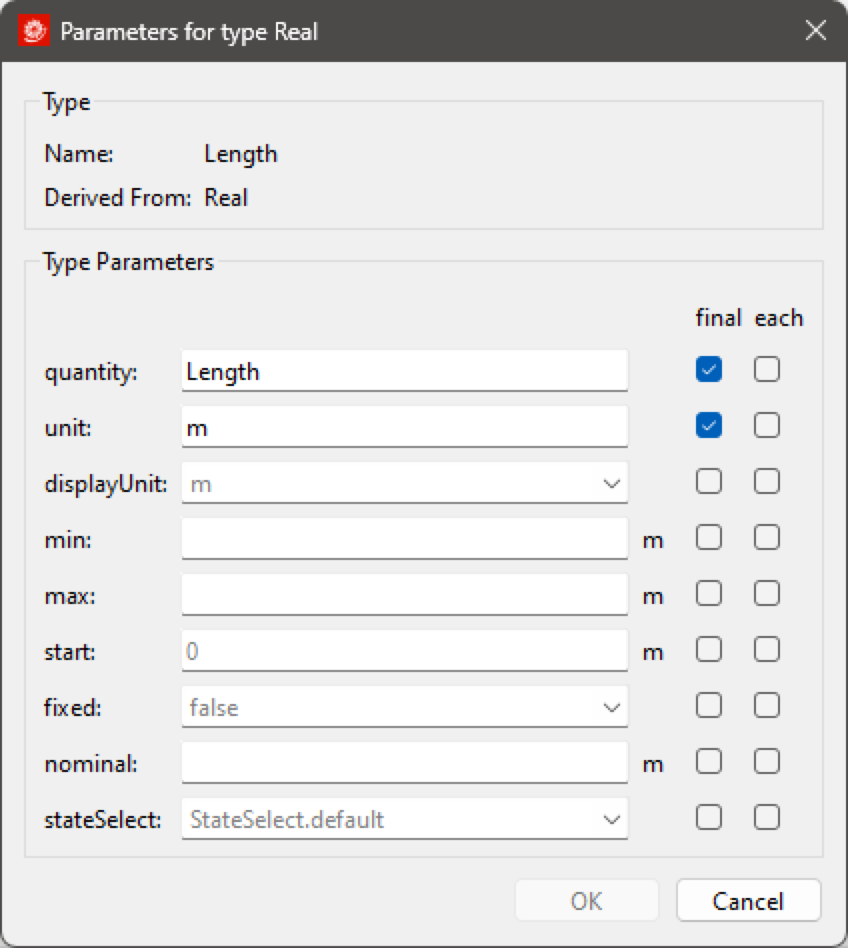
Viewing the type parameters for the class Modelica.Units.SI.Length.
The Type Parameters dialog can also be reached from the Class Properties dialog.
The parameters shown in the dialog box depend on the derived type of the class. In the preceding example, you can see the type parameters of the class Length, which is derived from the predefined type Real.
If the value of a parameter is shown in gray, it means the value is specified somewhere else. In this example, it would be inside the predefined type Real. These values can be overridden in any class deriving from Real, or in any instance of such a class.
If a new value is specified for any of the type parameters, the value can be made final by checking the final checkbox next to it. This makes it impossible to override the value in any other context, such as in a class that is derived from Length, or a parameter of type Length.
Likewise, the each prefix can be applied to a parameter by checking the corresponding each checkbox. For arrays, the each prefix allows you to specify a value that is assigned to each element of the array, rather than a value that is assigned to the array as a whole. For non-array parameters, the each prefix has no effect.
For further information about type parameters, please see the digital book Modelica by Example, bundled with System Modeler and accessible from Documentation Center, under Resources.
Editing Library Units
System Modeler comes with an extensive set of predefined units out of the box. Nevertheless, it is not practical to cover them all. System Modeler allows you to define new units and quantities and to specify the preferred units for a specific quantity. The unit configuration is done on a library level and will become available to all classes within that library as well as to all models making use of that library. The unit configuration is stored as a Modelica annotation in the top-level class of the library.
To open the Library Units dialog, right-click the top-level package of a library in the Class Browser and choose Edit Library Units from the popup menu.

Customizing preferred units (display units) for a library.
The Library Units dialog has two sections: Display Units and Unit Definitions, where the former section allows you to customize preferred units for a quantity and the latter section consists of a button that, when clicked, opens a second dialog that allows you to manage unit definitions for the library.
Clicking the View all quantities or the View all units links will open Documentation Center with a page showing a summary of all quantities, or all units, available for use in the library. These pages include quantities and units not only defined for the library, but also units and quantities pulled in from other libraries used by the library, and from the System Modeler default units and quantities.

Managing units definitions for a library.
From this dialog, you can add, edit and remove unit definitions. There are two possible options when defining new units: defining a base unit or defining a derived unit. If the unit can be described in terms of an already available unit, a derived unit is the right choice.
Saving Classes
To save the class of the active class window, choose File ▶ Save.
When a class is saved for the first time, a dialog box is shown, letting you choose a location for the class. If the class is located within an unsaved package, you will be asked to save the complete package instead.
If you are saving a package for the first time, a dialog box is shown, letting you choose whether to save in a directory structure or a single file.

Dialog with alternatives for saving a package.
If you choose Save in directory structure, you choose a directory where the class will be saved. In that location, a directory structure for your package will be created, placing each class in a separate file. This choice is recommended if you are developing a library or larger package, or if the package will be worked on by multiple people. Following is an illustration of what this choice results in for one example package.

Saving a package in a directory structure.
If you choose Save in single file, the complete package and all the classes in it will be saved in a single file called NameOfTheModel.mo. This choice is recommended for small and simple packages.
Classes can also be saved using the Class Browser. Right-click the name of the class and choose Save from the popup menu.
Controlling Save Locations
Once a package or model has been saved, adding, renaming or otherwise changing classes inside it will automatically choose where each class is saved. A new class added to a parent class saved in a single file will save the new class in the same file. A new class added to a parent class saved in a directory structure will save the new class in a new file just for that class. This default behavior is enough for the vast majority of use cases.
For more advanced control of how classes are saved, a manual split or merge operation can be applied at any level in a package hierarchy. To change how a package is saved, choose File ▶ Split/Merge and Save or right-click the class in the Class Browser and choose Split/Merge and Save. This will bring up a dialog, letting you choose between saving in a directory structure or a single file, the same as when first saving a package. Choosing Save in this dialog will apply the operation recursively for all child classes and save each of them.
Similar to renaming classes, this changes the save location of classes, and references to external files may need to be updated. See more details in the section on renaming classes.
Saving Complete Definitions
At times it can be useful to save a complete definition of a class, including all classes used by it, to a single file. This has the benefit that the saved class becomes independent of other files and libraries.
To save a complete definition of the class of the active class window, choose File ▶ Export ▶ Total Model. Complete definitions of classes can also be saved using the Class Browser. Right-click the name of the class and choose Export ▶ Total Model from the popup menu.
The result of the operation is an SMA file (System Modeler Archive). Opening this file in Model Center will load and open the class window of the model.
Changing the Order of Classes
When classes in the Class Browser are sorted by declaration order, the order in a package can be changed by dragging and dropping classes. If a class is dropped in between other classes, the class is moved to the dropped position. If a class is dropped on top of another class, a copy of the class is created; see the section on copying classes.
Creating Library Archives
A System Modeler Archive is a file that contains either a complete model definition or libraries. It allows models and libraries to be distributed with all their resources in a single file. This section describes how to create library archives. For information on how to save a complete model definition in a System Modeler Archive file, see the section on saving complete definitions.
Start by either right-clicking a library in the Class Browser and choosing Export ▶ Library Archive, or by selecting Create Library Archive (SMA)... from the Tools menu.
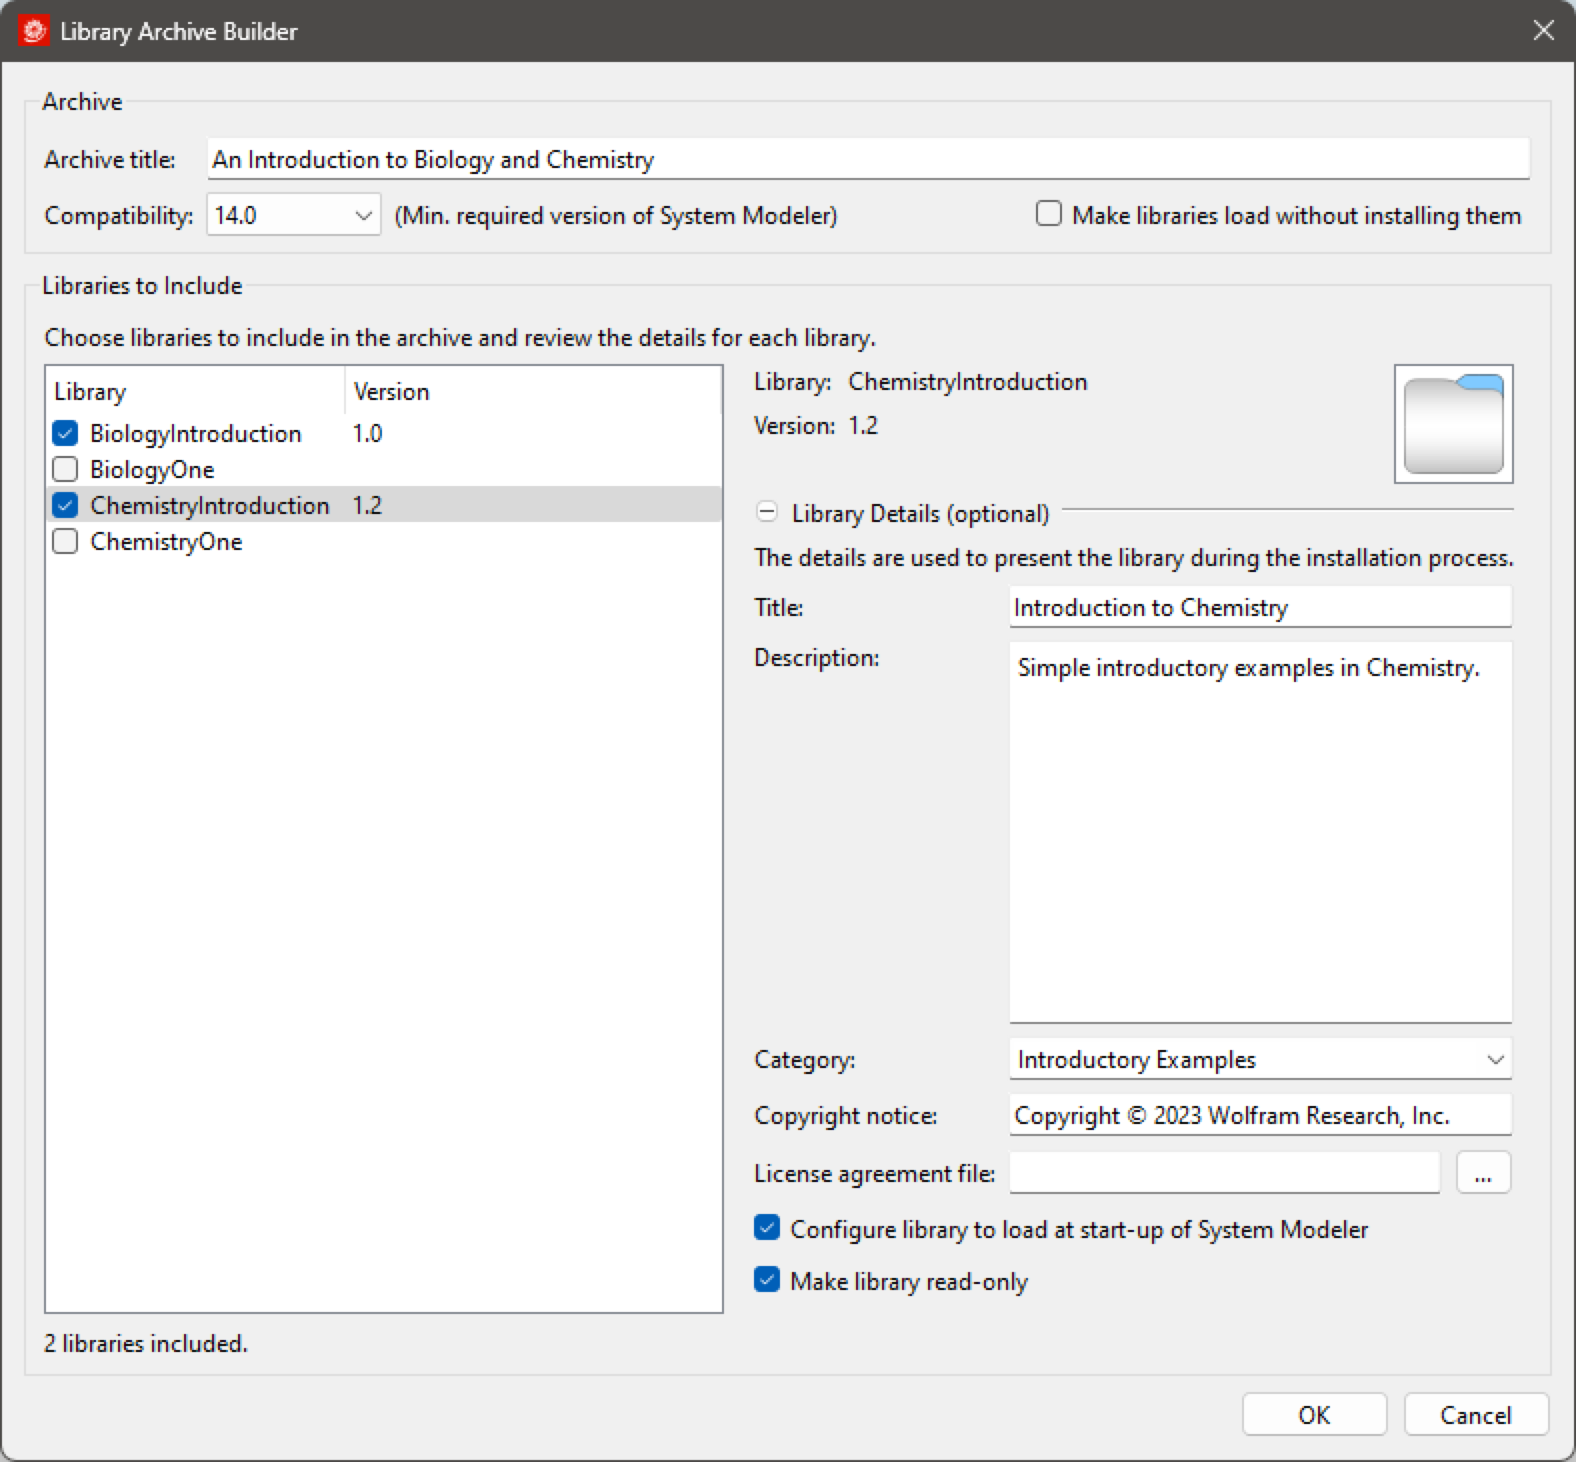
Building a System Modeler archive file with two libraries.
The dialog for building library archives consists of two sections: the Archive section and the Libraries to Include section.
The Archive section lets you specify a title for the collection of libraries, the lowest version of System Modeler required to install the libraries, and whether you want the libraries to be installed (and loaded) or only temporarily loaded when the archive file is opened in System Modeler (option Make libraries load without installing them).
The Libraries to Include section is where you specify what libraries to include in the archive (left side) and the details for each library (right side). The library details (right side) are collapsed by default. All details are optional.
The library title and description are by default the name and description of the Modelica package representing the library. You can change these if you want to alter the presentation of the libraries in the Library Archive Installer.
The library category (only available when the option Make libraries load without installing them is not checked) specifies under which group the library will appear in the Class Browser in Model Center. It is possible to specify a custom category if none of the predefined ones are suitable. Note that custom groups were introduced in System Modeler Version 13.3. If installing a library with a custom group in versions lower than 13.3, the library will end up under the Libraries group.
A copyright and a library license agreement file can also be specified for each library. The library license agreement file can be either a plain text file or an HTML file. If such a file is specified, its contents are shown to any user attempting to install the library. For the installation process to complete, the user must agree to what is said in the license agreement.
The last two options for each library are whether the library should be configured to always load when System Modeler is started and whether the library files (*.mo files) should be made read only when installed. These options are only available when the option Make libraries load without installing them is not checked.
When ready, click the OK button to select a name for the file and start the build process. The progress is shown in the Messages view.
For libraries saved in a package.mo structure (recommended), all files recursively found inside the folder of the main package.mo file are included in the archive. For libraries saved in a single file, the .mo file and all files found at the same level as the .mo file are included in the archive if they are referenced by the library.
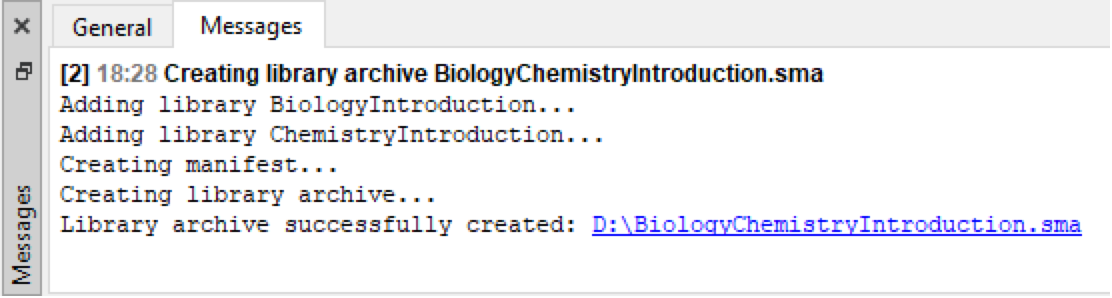
Successful build of a System Modeler library archive file.
Reloading Libraries
It is possible, at any time, to reload the libraries that have been specified to automatically load at the startup of System Modeler (see the section on managing Modelica libraries) by a simple mouse click. This is useful if you have loaded a total model that has replaced one or more class definitions, for instance the Modelica Standard Library, and you wish to restore the original class definitions. Note that reloading is not possible for unsaved classes and the reload option in the popup menu becomes visible only when the target class has been saved.
To reload all startup libraries, choose Reload Libraries from the File menu. To reload a specific library, right-click the library in the Class Browser and choose Reload.
Organizing Libraries
Libraries configured in the Modelica Libraries view in the Options dialog can be organized in named groups in the Class Browser. There is a set of predefined groups to choose from, such as Examples and Libraries, but new custom groups can be created as well.
To move a library to a group, either drag the library and drop it on the group, or right-click the library and choose Show in Group followed by the name of an existing group or New Group from the popup menu. If New Group is chosen, a new group with the name of your choice is created for the library.
Custom groups can be deleted by clicking their X button. Libraries still present in the group when removed are moved to any of the predefined groups.
Switching Modelica Standard Library Versions
System Modeler is shipped with multiple versions of the Modelica Standard Library (MSL). The Class Browser provides a way to quickly switch between these versions. Simply right-click the Modelica package and, in the popup menu, choose Version and then one of the alternatives. System Modeler will unload the currently loaded version of MSL and load the chosen version.

If you want to permanently switch MSL version, it can be done from the Modelica library manager (see the section on managing Modelica libraries).
Converting a Class to Use a More Recent Version of a Library
Sometimes a library contains Modelica conversion scripts that can be applied to convert classes using it to a more recent version of the library. Conversion scripts are needed when incompatible changes have been introduced between versions of a library, for instance, when one or more components of the library have been renamed or moved.
An example of a library that provides conversion scripts is the Modelica Standard Library (MSL). System Modeler is shipped with multiple versions of MSL. If you have a class or library that has declared that it uses an older version of MSL, you can convert it to use the currently loaded version (if more recent).
When System Modeler detects that such a conversion is possible, a message will be output in the Messages view with a link that can be clicked to perform the conversion.

An offer to convert to a more recent version of a library.
For a conversion to be considered, the following must be fulfilled:
- The library used must provide a conversion from the version declared by the class to a more recent version.
When one or more conversions are possible for a class, the conversion scripts can also be applied from the Class Browser. Right-click the class and choose Convert to Use a More Recent Version of a Library followed by the conversion.
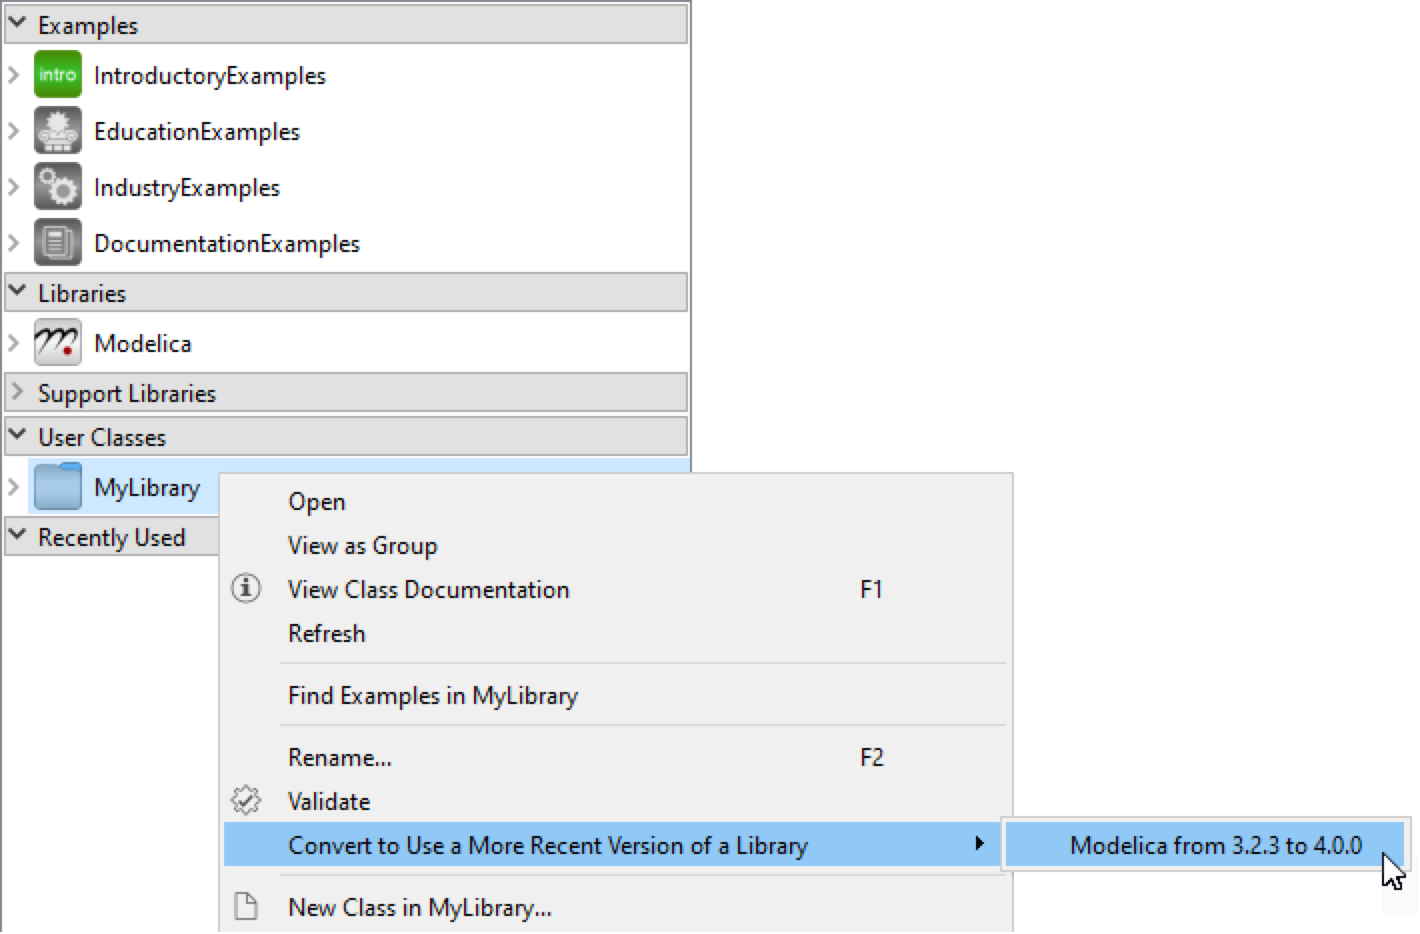
Converting a class to use a more recent version of a library.
Customizing the Class Browser
The Class Browser can be customized by editing the settings found in the Options dialog box. The Options dialog box can be reached from the Tools menu. All of the Class Browser settings except the tooltip setting are found in the Model Center ▶ Class Browser view. The setting to enable or disable tooltips is located in the Model Center ▶ General view. All settings available in the dialog box are automatically saved when closing the dialog box and restored the next time Model Center is started.

The Class Browser view of the Options dialog box.
The Class Browser section of Options dialog contains a number of choices:
- Show protected classes. Specifies whether or not protected classes should be shown in the Class Browser.
- Show recently used item list. Specifies whether or not recently used items, and the number of recently used items, should be shown in the Class Browser.
- Arrange items by. Specifies whether items representing Modelica classes or constants are arranged by name or by their order of declaration in the Class Browser.
- Limit the number of hits during real-time search to. Specifies the maximum number of search hits shown while typing a search pattern in the Class Browser.
Class Browser Tools
At the bottom of the Class Browser there is a small toolbar with three buttons for downloading Modelica libraries from the Wolfram Store and for quick access to various settings of the Class Browser.
The bottom of the Class Browser holds a small toolbar.
The leftmost button, labeled Download Libraries, will open a web browser and take you to the Wolfram Store. From there, you can download free libraries and buy commercial libraries that you might need in your modeling work.
Clicking the second rightmost button lets you choose the sorting order of classes in the Class Browser. Classes can either be sorted by declaration order or by their name (in ascending order). Search results and classes located under Recently Used or at the top hierarchical level are not affected by this option.
Clicking the rightmost button in the toolbar opens the Modelica Libraries view of the Options dialog box. This view allows you to manage your Modelica libraries in the product, e.g. specify which libraries to load at start-up, add or remove custom libraries, and handle installed library archives. For more information, see the section on managing Modelica libraries.