Model Center—Variable Views
| Default Visibility of Variables | Editing Variables |
| Sorting Variables | Lifting Variables |
| Grouping Variables | Adding Variables |
| Renaming Variables | Removing Variables |
| Go to Variable in Modelica Text View |
The bottom area of the model editor shows one or several tabs dedicated to viewing and editing parameters, variables and constants of the class in the active class window. Parameters and constants are variables with a restricted variability in Modelica. Here, the term variable will be used for all three of them, unless it is necessary to distinguish between them. If no component is selected, the variables of the class will be shown. To show the variables of a specific component, select the component in the Icon View, the Diagram View or the Component Browser.
The number and names of the tabs shown can vary between classes. Each variable can specify a tab and group in which it should appear. Variables that do not specify a tab or group appear in a default group under the General tab. For details on assigning a tab and group to a variable, see Grouping Variables.
For models that have replaceable components or replaceable classes, these appear under the General tab unless otherwise specified. Replaceable components and replaceable classes are considered to be parameters to the model, and hence most of what is said about variables in the sections below also applies to replaceable components and replaceable classes.
Variables, parameters and constants can be shown in specialized tabs by opening the Variables view, Parameters view or Constants view in the View menu. In these views, all variables, parameters and constants are listed unconditionally, effectively ignoring any visibility and tab/group configurations. The visibility of the tabs can also be controlled from the popup menu shown when right-clicking any of the tabs.
Hovering over the name of a variable in the variable views shows a tooltip containing the type of the variable, its name and any declaration prefixes. For array variables, the number of dimensions and their sizes are included as well.
Default Visibility of Variables
The following determines whether or not a variable is visible in the variable views (the dedicated Parameters, Variables and Constants views excluded).
- Parameters are always shown in the General view under the Parameters group unless a different tab or group has explicitly been specified for them in the Add Variable or Component Properties dialog.
- Variables are shown in the General view under the Initialization group if they have an initial value. A variable without an initial value is only shown if the Show in Variable Views option has been enabled for it in the Add Variable or Component Properties dialog.
- Constants are shown either if they are declared within a package, or if the Show in Variable Views option has been enabled for them in the Add Variable or Component Properties dialog.
The following exceptions to these conditions exist (here the term variables means variables of any variability: parameters, variables and constants).
- Variables that have the outer attribute set are never shown, as their values are determined by their matching inner variables.
- When viewing a class that extends one or more classes, variables declared as final in any of the extended classes (base classes) are not shown.
- When viewing variables of a selected component, variables declared as final are not shown unless they were made final in the class of the active class window.
For more information on how to declare a variable outer, final or protected, see this section.
Sorting Variables
The variables in a view can be sorted by name or declaration order. By default, they are sorted by declaration order.
To sort by name, right-click an empty area of the view and choose Arrange by ▶ Name from the popup menu.

Sorting the variables by name.
Grouping Variables
Variables listed in the variable views can be moved to a different tab and group by clicking their names and choosing Show in Group from the popup menu. All existing tabs and groups are listed in submenus. Click an existing entry or choose Show in Group ▶ New Group to create a new tab or group.
By default, only parameters, variables with an initial value, replaceable components and replaceable classes appear in the variable views. To make a constant, or a variable without an initial value, appear, locate it in the Component Browser and right-click its name. Choose Properties, and in the dialog that is shown, ensure Show in Variable Views is checked. You can specify the tab and group, and for variables, also whether to show its value or initial value (start value in Modelica code).
Groups can be renamed or moved to a different tab by clicking the group's name where it appears as a divider above its variables. This opens a dialog where you can edit the group name, choose an existing tab or type a new tab name to move the group there. You can also specify an image that is shown next to the group's variables. Renaming is only available for groups whose members are all declared locally; groups that contain inherited members cannot be renamed, since the group name is shared with the base class that declares them.
Adding Images to Groups
Groups can have an image displayed alongside their variables. Typically, such an image illustrates what the variables in the group represent. Clicking the image expands it to its actual size; clicking again collapses it.
To add or change a group image, click the group name to open the Group Properties dialog. In the Group Image section, either type a Modelica URI into the Link to external image file field or click Browse... to choose an image file from disk.
The resulting Modelica URI has the form modelica://ClassName/Path/image.png, with the path relative to the directory containing the class's Modelica (.mo) file. The class must therefore already be saved to a file, and the image must reside on the same drive or volume as that file.
When editing a class that inherits from a base class, any group image defined on the base class appears as gray placeholder text in the field. Leave the field in that state to keep the inherited image, enter a different URI to override it locally or clear the field back to the placeholder to remove a local override and restore the inherited image.
Renaming Variables
A variable can be renamed by clicking its name and choosing Rename from the popup menu.
Note that for a variable name to be clickable in the variable views, the current class window view must not be the Modelica Text View. Also, for the rename operation to be enabled, the currently open class must be the class in which the variable is declared and the same class must not be read only.
See the section Renaming Components in the Component Browser chapter for more information on the rename component operation.
Go to Variable in Modelica Text View
Sometimes it can be useful to see the full declaration of a variable in Modelica code. In the variable views, this can be achieved by clicking the name of the variable and choosing Go to Variable in Modelica Text View in the popup menu. This will take you straight to the Modelica Text View of the class in which the variable is declared, with the line of code featuring the declaration selected.
Note that for a variable name to be clickable in the variable views, the current class window view must not be the Modelica Text View.
Editing Variables
Before attempting to edit a variable, make sure that either the Icon View or Diagram View is the active view of the class window. Editing in the variable views is disabled while editing the class in the Modelica Text View. For read-only classes, variable values can still be edited but the changes cannot be saved. This makes it possible to test different scenarios with the example models provided in read-only libraries without worrying about changing the library permanently.
Variables have several editable attributes. If the value of an attribute appears as gray text, it indicates that the value is a default value. A default value is specified somewhere else but can be overridden by a new value. To go to the source of a default value, click the arrow next to the edit icon and chose Open Class Specifying Default Value. This will open the class in which the default value is specified.

Opening the class the default value comes from.
All attributes of variables that can be edited directly in the variable views are explained in detail following. Other attributes and properties of a variable can be edited in the Component Properties dialog. This dialog can be opened by clicking the name of the variable and choosing Properties. The dialog is described in more detail in this section.
Note that the attributes available in the variable views will depend on the type of the variable. For instance, a variable of type String has only the attribute value.
- Value. Specify a value to give the variable a constant value throughout the simulation or set the value of a parameter. If the class contains alternatives for this value through choices annotations or enumerations, these choices will be shown in a drop-down box for easy selection.
- Initial Value. The initial value of the variable (corresponding to the variable's start value in Modelica code), by default zero or an array of zeros.
- Fixed. If set to false (default setting for variables), the simulation tool (solver) is free to use another initial value than the one specified, if necessary in order to solve the systems of equations. If set to true (default setting for state variables), the initial value of the variable is fixed to the value specified in the Initial Value box. Note that state variables have the fixed attribute set to true as the default setting. This does not conform to standard Modelica, but since System Modeler allows an overdetermined system of equations as an initial condition, it is more intuitive with the fixed attribute set to true for state variables.
- State Select. This attribute provides manual control over the selection of state variables for numerical solution of equation systems. The column is only shown in the Variables view, which can be shown by choosing View ▶ Variables. The alternatives are as follows:
- default. Select the variable as a state variable if appropriate, meaning that the variable is likely to be selected as a state variable if its derivative appears in the model. This is the default setting.
- Description. A short one-line description of the variable. Note that this attribute can only be edited for variables that are declared in the class of the active class window. Editing is disabled if one or more components are selected.
Editing a Variable for Several Components at Once
On some occasions, you may find it useful to set an attribute of a variable for several components at once. This is possible as long as the components are of the same type. Select the components whose variables you wish to edit. For those variable attributes that are the same for all components, the values will be shown in the value text boxes. If the values differ, the text boxes will show "No Common Value". When typing in a new value for a variable or editing an existing value, all of the selected components will be affected. Components that inherit from the same base class can be selected and the variables from the base class edited in the same way.
Editing Using Dialogs
Values of variables can be viewed and edited using dialogs by clicking the edit icon next to the input field. If the edit icon resembles a square with an arrow, a specially adapted dialog exists for viewing and editing the value of that variable, such as a color selector for variables specifying a color, a file selector for variables specifying a file or an array editor for array variables.
An input field with the special edit icon.
The type of special editing dialog that is shown is determined by the variable's type and value, and if the variable has any associated standard Modelica annotations requesting a specific type of editing dialog. See further down for a list of all special editing dialogs provided by System Modeler and how to make them available for a variable.
If no specially adapted dialog exists for a variable, a general text input dialog will be shown when the edit icon is clicked. In this case, the icon resembles a paper with text.
An input field with the general text edit icon.
The general text input dialog can also be brought up for variables that have a specially adapted dialog by clicking the arrow next to the icon and choosing Edit Text from the drop-down menu.
The following special editing dialogs exist:
- Function call editor. An editor for specifying the arguments to a function call. Available if the current value of the variable is a function call to an existing non-built-in function. The function call editor is explained in more detail in the Editing Function Calls section.
- Save file selector. A file selector for specifying a file to save data to. Available if saveSelector is present in the variable's associated Dialog annotation, the variable's type is a String scalar, and the variable's current value is not a function call to an existing non-built-in function.
- Load file selector. A file selector for specifying a file to load data from. Available if loadSelector is present in the variable's associated Dialog annotation, the variable's type is a String scalar, and the variable's current value is not a function call to an existing non-built-in function.
- Directory selector. A directory selector for specifying a directory location. Available if directorySelector is present in the variable's associated Dialog annotation, the variable's type is a String scalar, and the variable's current value is not a function call to an existing non-built-in function.
- Color selector. A color selector for picking a color. The color is returned as a vector of three values in the range [0, 255], representing the values of the colors Red, Green and Blue. Available if colorSelector=true is present in the variable's associated Dialog annotation, the variable's type is an Integer vector or Real vector, and the variable's current value is not a function call to an existing non-built-in function.
- Serial port selector. An editor for selecting a serial port. Available if __Wolfram_serialPortSelector=true is present in the variable's associated Dialog annotation, the variable's type is a String scalar, and the variable's current value is not a function call to an existing non-built-in function.
- Array editor. An editor for viewing and editing an array in the form of a table. Available if the variable is an array that does not fulfill the requirements for the color selector mentioned above, and the variable's current value is not a function call to an existing non-built-in function. The array editor is explained in more detail in the Editing Arrays section.
- Record editor. An editor for viewing and editing the values of record members. Available if the variable's type is a record and the current value of the variable is either a record constructor call or not set. The record editor is explained in more detail in the Editing Records section.
- Component redeclaration editor. An editor for viewing and editing the parameters of a component redeclaration. Available if the variable is a replaceable component. The component redeclaration editor is explained in more detail in the Redeclaring and Configuring Replaceable Classes section.
- Class redeclaration editor. An editor for viewing and editing the parameters of a class redeclaration. Available if the variable is a replaceable class that has been defined using a short class definition. The class redeclaration editor is explained in more detail in the Redeclaring and Configuring Replaceable Classes section.
Making Variables Final
To prevent further modification of a variable, it can be made final. It will still be possible to modify the variable in the class in which it is made final, but not from any class creating a component (instance) of that class or extending that class.
To make a variable final, click the arrow next to the edit icon of the variable. In the menu that is shown, click final. A check mark to the left of final is an indication that the variable is final.
Making the resistance of a Resistor component final.
Sometimes the final menu item is disabled and cannot be clicked. It happens when a variable is implicitly final. For instance, if you have a model with a resistor component and you make the resistor component final, everything inside the resistor component will also become final. When viewing a variable of the resistor component, you will not be able to change its final property, as the final property is applied to the resistor as a whole.
To change the final property of a resistor, or any other component that is not present in the variable views, locate the component in the Diagram View or the Component Browser and right-click it. In the menu that is shown, click the final item to toggle the final property of the component. Just as for variables, the final menu item may be disabled for a component if the component is implicitly final.
Editing Type Parameters for a Variable
Predefined types (Real, Integer, Boolean, String) and enumeration types in Modelica have a number of parameters that are used to further customize the type. To view or edit these parameters for a variable of such a type, click the variable name in the variable view and choose View Type Parameters or Edit Type Parameters.
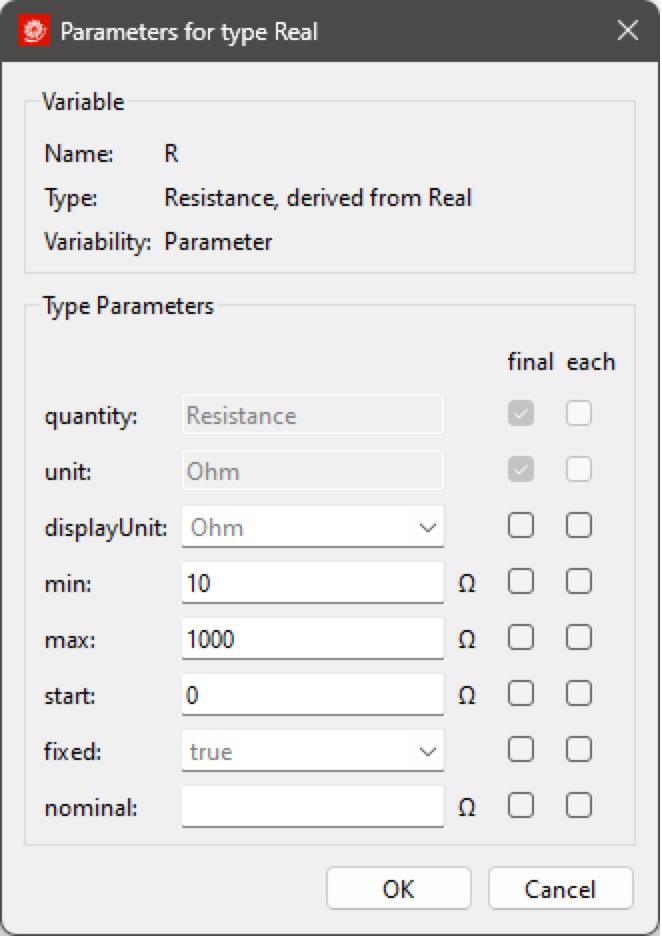
Editing the type parameters for the parameter R in a resistor component.
The Type Parameters dialog can also be reached from the Component Properties dialog.
The parameters shown in the dialog box depend on the type and variability of the variable. In the preceding example, you can see the type parameters of the parameter R in a resistor component of type Modelica.Electrical.Analog.Basic.Resistor. The type of the parameter R is Resistance (Modelica.Units.SI.Resistance), which is derived from the predefined type Real.
If the value of a parameter is shown in gray, it means the value is specified somewhere else. In this example, it would be inside one of the extended classes Resistance or Real. These values can be overridden for the parameter R as long as they are not declared with a final prefix inside Resistance or Real. For more information on how to change the type parameters of a class, see the section Editing Type Parameters for a Class.
Any of the parameter values can also be made final by checking the final checkbox next to it. This ensures that the value can never be overridden in any other context.
Likewise, the each prefix can be applied to a parameter by checking the corresponding each checkbox. For arrays, the each prefix allows you to specify a value that is assigned to each element of the array, rather than a value that is assigned to the array as a whole. For non-array parameters, the each prefix has no effect.
For further information about type parameters, please see the digital book Modelica by Example, bundled with System Modeler and accessible from Documentation Center, under Resources.
Changing the Display Unit
All physical variables in a Modelica model should be declared with a unit. The unit attribute of a variable is the unit used in all equations, and the equations are only correct for those particular units. However, it is possible to change the unit displayed to you as a user in the graphical user interface by changing the displayUnit attribute.
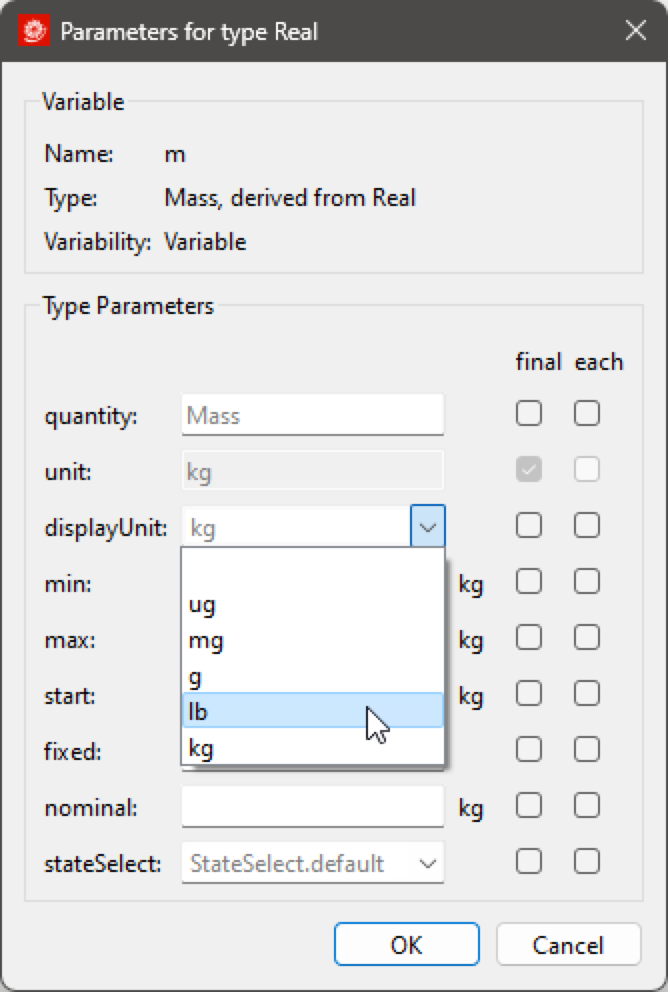
As an example, say you have a model with a component of type Modelica.Mechanics.Translational.Components.Mass, and you wish to display its mass (parameter m) in the unit "lb" rather than the default unit "kg". To do this, click the mass component, go to the variable view, find the parameter m and click the kg button. This opens up a dialog that will let you change the displayUnit attribute.

Setting the displayUnit to lb instead of kg for a variable of type Modelica.Units.SI.Mass.
When you click lb in the drop-down list and click OK, the value in the Value field in the variable views is converted from kilograms to pounds in the graphical user interface. At the same time, a short piece of Modelica code, namely displayUnit="g", is added to the parameter m in component mass1 in the text view of the model.
displayUnit="g" has been added to parameter m in component mass1.
Only existing and compatible units are present in the displayUnit drop-down list. It is still possible to specify another displayUnit by typing it. If the specified unit is not known, you will be asked to define it. See the section on Editing Library Units for more information on how to manage units.

The message in the Type Parameters dialog when an unrecognized displayUnit expression is specified.
It is worth noting that if a non-numeric value is entered in the Value field in the variable views, such as the name of another variable or an expression, the unit next to the Value field changes to the base unit. Only numerical literals are automatically converted in the graphical user interface.
Also, if the quantity is relative, such as a temperature difference, and the specified unit does not signify this (for instance "K" for Kelvin), you need to tell System Modeler this to ensure unit conversions are performed correctly. This can be done under the Advanced tab in the Component Properties dialog for a specific variable or for all variables of a specific type in the Class Properties of the type.

Specifying a type to have a relative unit under the Advanced tab in the Class Properties dialog.
For more in-depth information on units and how they are configured in System Modeler, see Units of Measurement Concepts and Configuration.
Editing Function Calls
If a variable is initialized using a function call, a special edit button is available next to its value input field. Clicking the button will open an editor that provides an overview of all the inputs of the function. The values for the inputs given in the function call are shown along with the name, unit and description for each input.
As default values for inputs are allowed in Modelica functions, inputs that were not given a value in the function call may still appear to have a value in the form of a default value. Default values are shown in a gray text color to make it possible to distinguish them from values specified in the function call.
Editing the arguments of a function call.
Editing Arrays
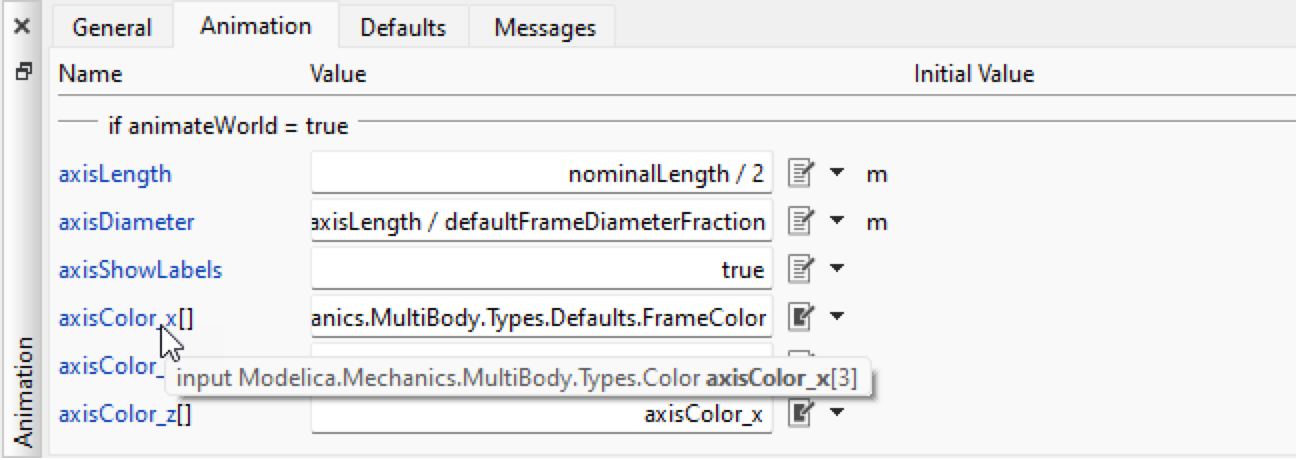
An array variable is recognized by the brackets following its names. The array's number of dimensions and their sizes are disclosed in the tooltip seen when hovering over the name with the mouse pointer.

Showing the tooltip for an array variable.
For array variables, clicking the special edit icon next to the value input field opens a dedicated array editor. The array editor consists of two synchronized views: a table view and an expression view. Either view can be used to edit the array. The expression view can be used to edit any array expression, but is mostly used to edit arrays constructed by non-literal expressions. The table view is an evaluated version of the expression view and is the preferred view to edit individual elements of an array.
Editing a vector of size 3 using the array editor.
When editing an array in one view, it may happen that the other view becomes disabled and an error message is displayed in the bottom left of the array editor dialog. This is an indication that the array is invalid, and the cause could be, for instance, an illegal expression in the expression view or a cell with an invalid value in the table view. Correcting the error will enable the other view again.
It is also possible to give a value to be assigned to each element of an array, rather than a value that is assigned to the array as a whole. How the value you specify is interpreted is determined by the each prefix (if enabled, the value is assigned to each element of the array). To enable the each prefix for a variable, click the edit icon next to the edit field of the variable and ensure that the each item in the popup menu has a check mark before it.
To edit the dimensions of an array, open the Component Properties by clicking or right-clicking the name of the variable and choosing Properties from the popup menu.
Editing Records
Record-type components are automatically identified in the variable views, and when a record is initialized using default values, submodifications or a record constructor call, it can be edited using a dedicated record editor by clicking the special edit icon next to its value input field.
Should the record be initialized with any other type of expression, the record editor will not be available until the value in the input field is cleared or changed into a record constructor call.
Records can also be edited by selecting the record component in the Diagram View or in the Component Browser.

Editing the contents of a record using the record editor.
Redeclaring and Configuring Replaceable Components
The component redeclaration and configuration feature allows changing the type of a replaceable component used in a model. For a component's type to be replaceable, the component must have the replaceable property set. This property can be set from the Component Properties dialog. Replaceable components in your model are shown as parameters.
The use of replaceable components is a powerful way of making models configurable on a component level. Model Center also automatically provides assistance in finding compatible components when redeclaring a replaceable component.
Replaceable components that are assignable, such as an integer or a record, can be redeclared using a popup menu available by clicking the name of the component, or by right-clicking the component in Component Browser or in the Diagram View (if the component is visualized there).

A replaceable record component, cellData, with available redeclaration choices shown in the popup menu.
Non-assignable components, such as a block or model, can also be redeclared using a drop-down menu in the variable view.

A replaceable model component, surface, with available redeclaration choices shown in the drop-down menu.
To change the type of a replaceable component, choose one of the items in the drop-down menu. Each item represents a compatible type. For a type to be compatible, it should extend the constraining type of the replaceable component declaration.
In the example above, the component specifying the surface type and characteristics is replaceable, making it possible to change the surface type by just a couple of mouse clicks. The Modelica code for a replaceable surface component could look something like this:
[image]
The specific surface models should all extend the BaseSurface model and initialize the temperature to a more appropriate value. The explicit constrainedby clause guarantees that the constraining class will not change after a component redeclaration.
The component can often be customized further by clicking the edit icon to the right of the value field. This will open up the Parameterization of Component Redeclaration dialog, in which you will find all parameters that can be configured for the component.

Customizing a component redeclaration by modifying the component's parameters.
Any changes to the parameters will appear as a list of modifications following the name of the component when closing the dialog.

A replaceable component redeclared and customized.
The full component redeclaration, with all modifications, can be edited as text by clicking the arrow next to the edit icon and choosing Edit Text from the drop-down menu.

Selecting Edit Text from the drop-down menu to edit a component redeclaration as text.
For more information on replaceable components, component redeclarations and model reusability in general, see the tutorial on Reusable and Configurable Models.
Redeclaring and Configuring Replaceable Classes
The class redeclaration and configuration feature allows switching out complete classes used in a model. This makes it easier to quickly reconfigure parts of your model. For a class to be replaceable, it must have the replaceable property set. This property can be set from the Class Properties dialog. Replaceable classes in your model are shown as parameters.

A replaceable class shown as a parameter, with available redeclaration choices shown in the drop-down menu.
To redeclare a replaceable class, choose one of the items in the drop-down menu. Each item represents a compatible class. For a class to be compatible, it should extend the constraining type of the replaceable class declaration.
In the example above, the Modelica type of the four tires in a car model is a replaceable class, making it possible to change all tires of the car with just a couple of mouse clicks. The Modelica code for a replaceable Tire class could look something like this:
[image]
The specific Tire models should all extend the BaseTire model and initialize the parameters according to their physical counterpart. The explicit constrainedby clause guarantees that the constraining class will not change after a class redeclaration.
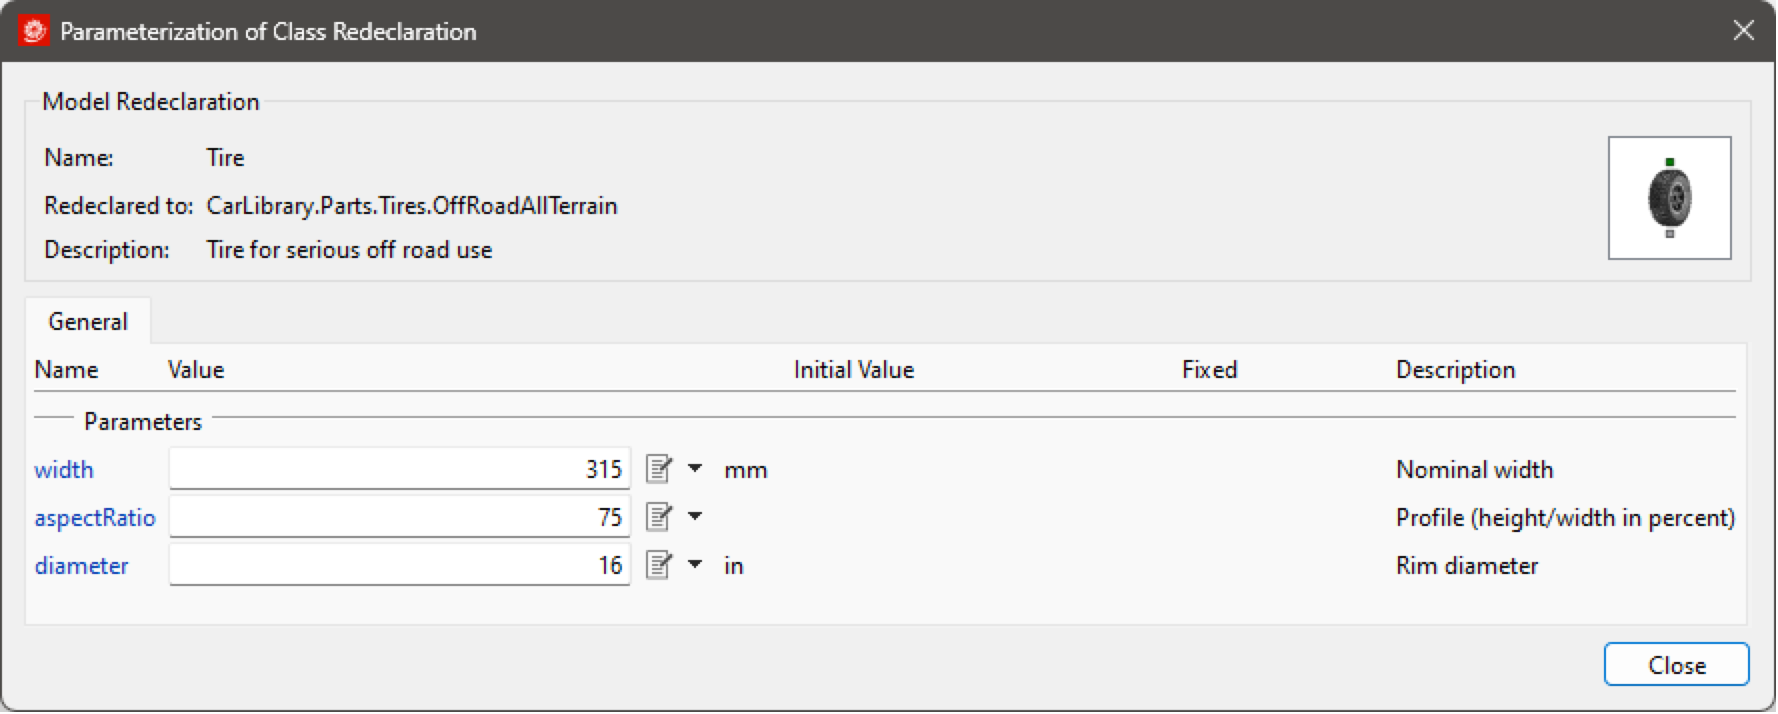
The chosen class can often be customized further by clicking the edit icon to the right of the value field. This will open up the Parameterization of Class Redeclaration dialog, in which you will find all parameters that can be configured for the class.
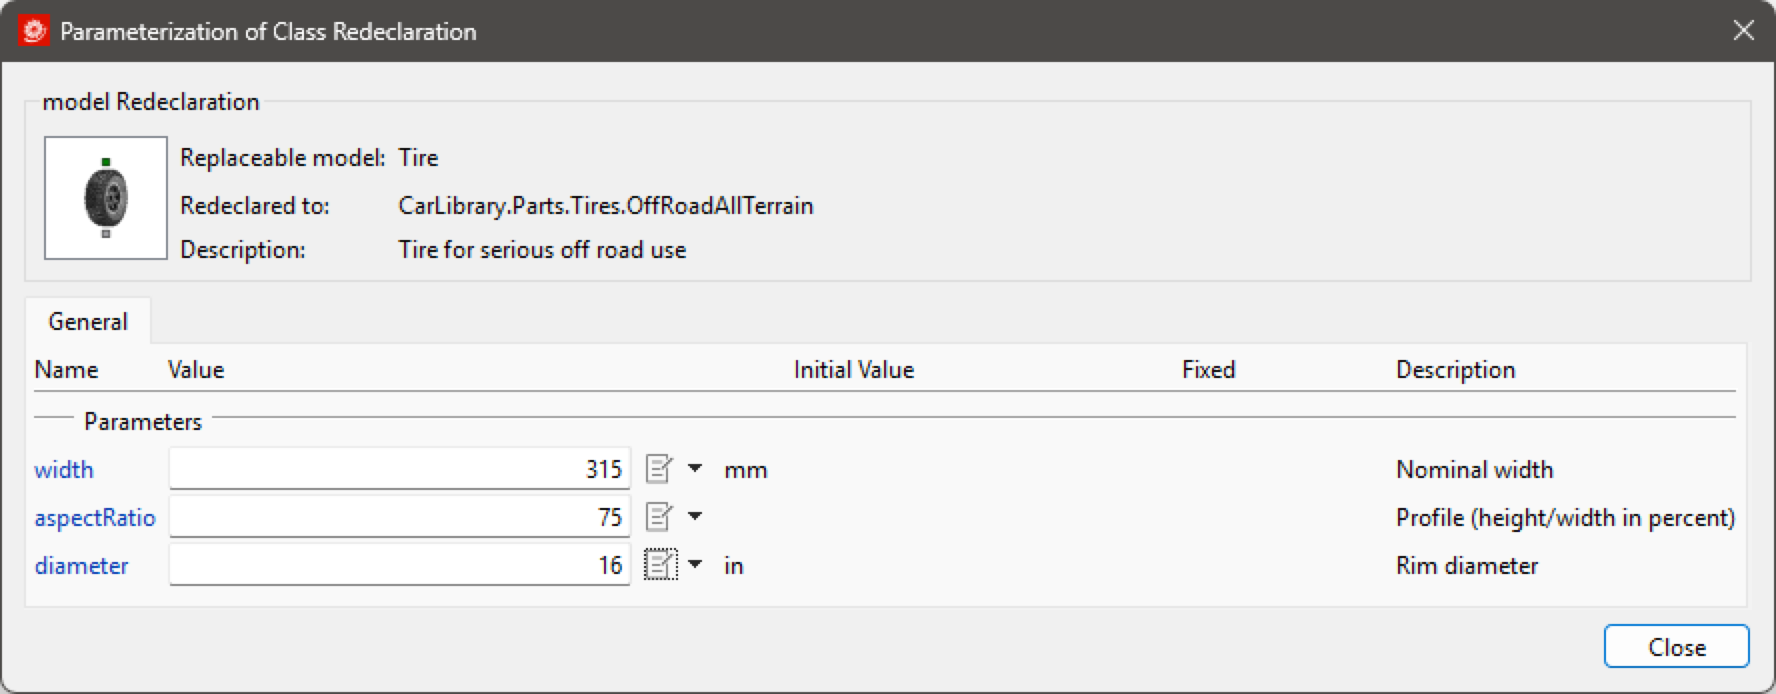
Customizing a class redeclaration by modifying its parameters.
Any changes to the parameters will appear as a list of modifications following the name of the class when closing the dialog.

A replaceable class redeclared and customized.
The full class redeclaration, with all modifications, can be edited as text by clicking the arrow next to the edit icon and choosing Edit Text from the drop-down menu.
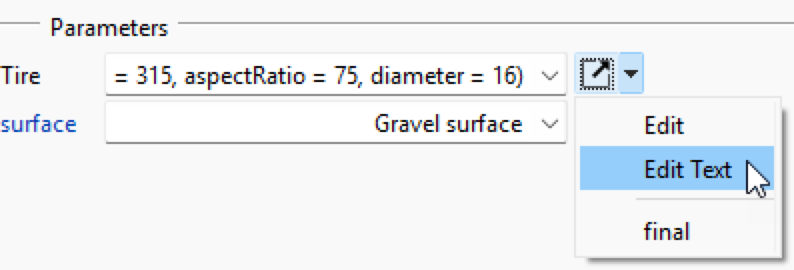
Selecting Edit Text from the drop-down menu to edit a class redeclaration as text.
For more information on replaceable classes, class redeclarations and model reusability in general, see the tutorial on Reusable and Configurable Models.
Lifting Variables
When building hierarchical models, a parameter, variable, constant or initial value of a variable that is of importance for the behavior of the model may be located somewhere deep down in a component of your model. To simplify the configuration of your model, variables and their values can be lifted up to the top level of your model. The operation does not modify any other model except your top-level model.
When lifting a variable, a new variable with the same name and variability will be created in your top-level model with a binding to the lifted variable, effectively changing the value of the lifted variable whenever the value of the top-level variable is changed. Lifting an initial value of a variable as a parameter allows the initial value of a variable at a lower hierarchical level to be specified as a parameter at the top level.
To perform the lift operation, select the component that contains the variable to be lifted and click or right-click its name in the variable view. Depending on the variability of the variable, the popup menu shown will have different choices. Click the menu item that matches your need.

Lifting the parameter J inside a DCMotor component to the top-level model.
Adding Variables
To add a variable to a model, click the floating + button in the lower-right corner of the variable view, use the Insert menu, or right-click an empty area of the variable view to bring up a popup menu from which you can choose to add a variable, parameter or constant.
The button in the variable views used for adding parameters, variables or constants.
The dialog box that appears is the common dialog box for adding variables of any kind of variability.

Adding a continuous variable of the SI unit type ElectricCurrent to a resistor model.
The dialog box is divided into two views.
- General. In this view you specify the variability, type, dimensions, name, value and description of the variable.
To add the variable, click the Add button. The variable will appear in the Component Browser. If the Variables view is visible, the variable will appear there as well. The dialog box will remain open to let you add more variables. To close it, click the Close button.
The sections of the dialog box are described in more detail following.
- Unspecified (default). For variables of type Real, the variability (continuous or discrete) will be determined by the context in which the variable is used. The variability will be discrete for variables of type Boolean, Integer, String and enumeration.
- Discrete. Discrete variables are piecewise constant with respect to simulation time and may only be changed by events during simulation.
- Initial Value (optional). The initial value for the variable. Only applicable for continuous and discrete variables.
- General: Type. Specifies the type of the variable. Note that the SI unit and non-SI unit types are only available if the Modelica Standard Library is loaded.
- Other. Custom type. If you do not know the full path of the type, you can search for it using the Class Browser and then drag the type from the Class Browser and drop it in the text box. See this section for information on how to use the Class Browser to find types and other classes.
- General: Show in Variable Views. Specifies whether the variable should be visible in the variable views (variables with an initial value, and parameters are always visible).
- Show. Specifies whether the value or the initial value should be shown for continuous and discrete variables in the variable views.
- Protected. Access to the variable is restricted to the class in which it is declared and to classes inheriting that class. Clear this checkbox to make the component accessible from all classes. This property is not available for variables declared in connectors, as only public sections are allowed in connectors.
- Replaceable. Allows modifications of the variable in form of redeclarations. See this section for information on how to change the type of a component by using redeclaration modifications.
- Flow. Applies only to variables declared in connector classes. The flow property specifies whether the sum of the quantity should sum to zero when connected. Select this checkbox for variables specifying a flow quantity such as current, fluid, force, etc. Clear this checkbox for variables specifying potential (non-flow) quantities, such as voltage, pressure, position, etc.
- Stream. Applies only to variables declared in connector classes. A stream variable describes a quantity that is carried by a flow variable. The value of the stream variable is the specific property inside the component close to the boundary, assuming that matter flows out of the component into the connection point.
Removing Variables
To remove a variable of a class, click its name and choose Delete from the popup menu.
If multiple variables are to be deleted, this can be done more quickly using the Component Browser, which allows multiple components to be selected at once. For information on how to remove components, see this section.