WOLFRAM SYSTEM MODELER
GettingStartedA step-by-step guide to building your first model with BioChem |
|
Information
This guide gives a short introduction to the BioChem library, which consists of components for modeling and simulation of metabolic pathways. Here you will learn how to use the library to compose metabolic and signaling pathways with predefined substances and reactions, as well as developing customized reactions.
See also documentation of the library and related SystemModeler features.
About the Library
BioChem can be used in any Modelica tool that uses the Modelica Standard Library (MSL) version 3.2 or newer. In this manual, Wolfram SystemModeler is used for the examples.
Version History
The first version of the library was created by Emma Larsdotter Nilsson at Linköping University. The library was then further developed by Erik Ulfhielm at Linköping University.
All versions since then (versions 1.0 and newer) have been updated by Wolfram MathCore. The ambition with these updates has been to get a cleaner and more user-friendly library, as well as facilitating the possibility to import and export models from and to SBML.
Basic Idea of the Library
The design idea behind the BioChem library was to create a general purpose Modelica library for modeling, simulating, and visualizing biological and biochemical systems.
The classes implemented in the library describe substances and reactions that can take place in-between these substances in a diverse number of biochemical pathways.
Building your First Model
Every BioChem model needs at least one compartment, one reaction, and two substances. These can be found in the sub-libraries BioChem.Compartments, BioChem.Reactions, and BioChem.Substances, respectively.
In this example we will implement a reversible Michaelis–Menten reaction between two substances, as illustrated in the image below.
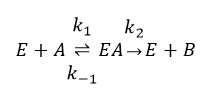
A reversible, enzymatic Michaelis–Menten reaction between one substrate (A) and one product (B). The enzyme works as a catalyst.
Creating a New Model
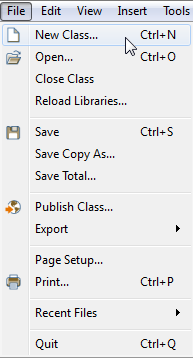
Creating a new model.
First we need to create a new model. This is done by choosing File ▶ New Class, as illustrated in the screenshot above. This will open a dialog box in which you can specify your model in terms of e.g. model name and description. You will also need to extend a compartment to be able to control the environment of the reaction, as shown in the screenshot below. The compartment is important as many reactions refer to e.g. the compartment volume. After clicking OK, a new model will be created and its (empty) diagram window will be opened.
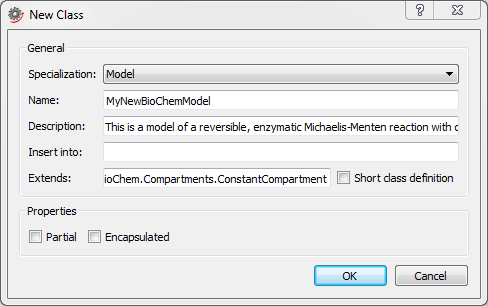
Creating a new model inheriting the properties of a compartment with constant volume.
Adding the Reaction
The next step is to add a reaction. In this case, we will use a reversible Michaelis–Menten reaction, which can be found in the BioChem.Reactions.MichaelisMenten package. The package contains four different types of uni-uni Michaelis–Menten reactions, as shown in the screenshot below.
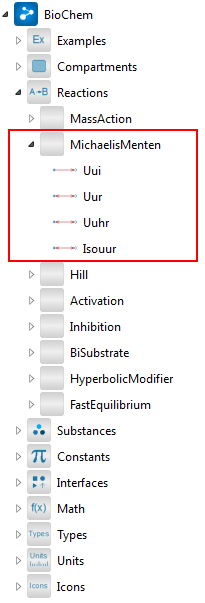
Finding the Uur reaction in the Class Browser.
After locating the model named Uur in the Libraries section of the Class Browser, adding the reaction to our model is a simple matter of dragging and dropping the model onto the diagram view. This creates an instance of the model, named uur.
The reaction contains parameters for stoichiometry, Michaelis–Menten constants, and maximum velocities. These parameters can be found and modified under the tabs Stoichiometry and General in the browser below the diagram view.
Adding Substances
We are now ready to start adding the substances that will be part of the reaction. As expected, these are found in BioChem.Substances. The package contains four types of substances: AmbientSubstance, BoundarySubstance, SignalSubstance, and Substance. In this case, we will use the latter.
Drag and drop two substances onto the diagram view and rename them A and B, respectively. Connect the substances to the reaction component using the connection tool, as illustrated in the figure below.
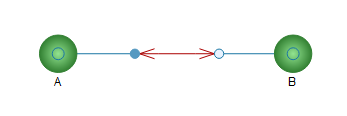
Diagram view after adding and connecting the substances.
Simulating the Model
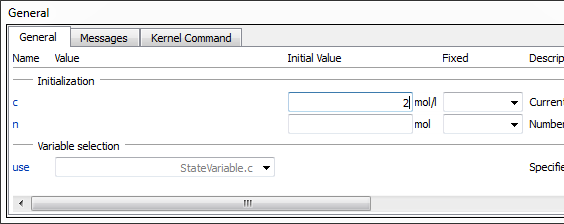
The model is now ready for simulation. However, all substance concentrations have the default initial value of 1 mol/l, so we will have to change one of them. Without this modification, the reaction will be in equilibrium from the beginning. The modification is done by selecting one of the substances, e.g. substance A, and then changing the initial value for c in the variables window. In this case, we will set the initial value to 2 mol/l, as shown in the image below.
Clicking the Simulate Class button in the toolbar will simulate the model and take you directly to Simulation Center. Simulation Center allows you to plot any parameter or variable, for example substance concentrations and reaction rates. This screenshot shows a plot of the two concentrations from a simulation with initial concentration 2 mol/l for substance A.
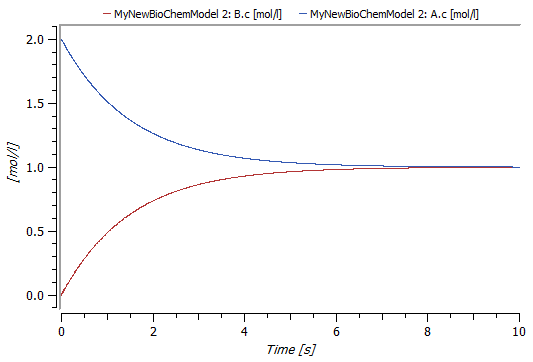
Plot of the concentrations A.c and B.c after a 10-second simulation.
Building Reactions with Custom Reaction Kinetics
The BioChem library contains more than 200 ready-made reactions. However, sometimes you might need to create a customized reaction. In this case, you can use the predefined base classes, found in BioChem.Interfaces.Reactions. This library contains base classes for reactions with any combination of substrates and products.
Building a New Reaction
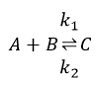
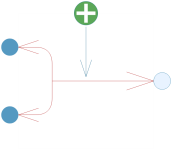
Reversible reaction with two substrates, A and B, and one product, C.
To build a reversible bi-uni reaction with an activator, as illustrated in the figure above, we will create a model that extends BioChem.Interfaces.Reactions.Bur and BioChem.Interfaces.Reactions.Modifiers.Activator.
model MyBiUniReaction "Example of a reaction skeleton"
  extends BioChem.Interfaces.Reactions.Modifiers.Activator;
  extends BioChem.Interfaces.Reactions.Bur;
end MyBiUniReaction;
In the reaction templates, substrate connectors are denoted s1, s2, ..., sn and product connectors are denoted p1, p2, ..., pn for n number of substrates and products. In this case, we are using the Bur base class. The name indicates that the reaction is a bi-uni reversible reaction, i.e. it will have two substrates, denoted s1 and s2, and one product, denoted p1. The activator connector is denoted a1. Furthermore, an icon is inherited for the reaction. The icon is shown in the image below.
Icon for the reversible bi-uni reaction with an activator.
The next step is to define an equation for the reaction rate (unit mol/s), denoted rr in all reactions. Suppose we would like to implement the reaction

where [a1], [s1], [s2], and [p2] denote the concentration of the respective substance and product, V is the compartment volume, and k1 and k2 are reaction rate constants. The concentrations and volume are already available in the connectors, while the rate constants and the reaction law need to be declared.
model MyBiUniReaction "Example of a reaction skeleton"
  extends BioChem.Interfaces.Reactions.Modifiers.Activator;
  extends BioChem.Interfaces.Reactions.Bur;
  parameter BioChem.Units.ReactionCoefficient k1=1;
  parameter BioChem.Units.ReactionCoefficient k2=1;
equation
  rr=k1*a1.c*s1.c^nS1*s2.c^nS2*s1.V-k2*p1.c^nP1*p1.V;
end MyBiUniReaction;
By now, the reaction component is ready to be used in other models. Let's build a new model with our new component and three built-in substance components. The diagram and the result of a two-second simulation are shown below.
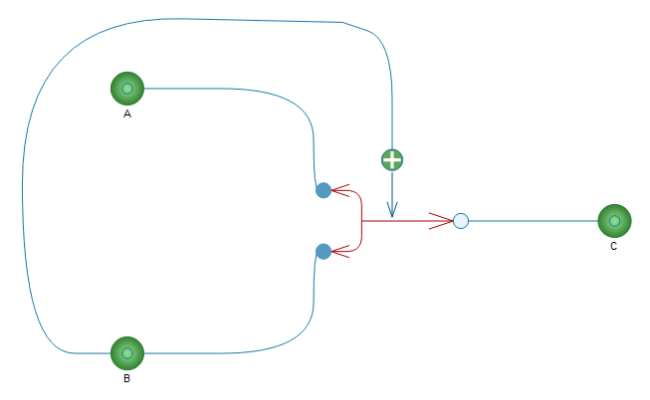
Bi-uni reaction with activation.
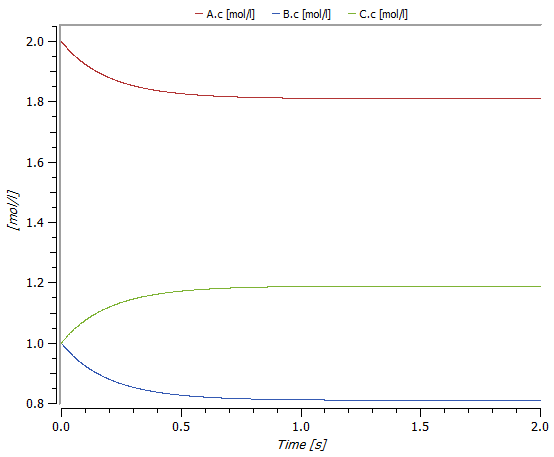
Plot of the concentrations A.c, B.c, and C.c after a two-second simulation with initial concentration 2 mol/l for substance A and 1 mol/l for substances B and C.
Creating a Multi-Compartment Pathway
Using the pathway we created in the previous section, we will now create a multi-compartment pathway. The first thing we will do is connect an outer connection point to the product C. Connection points are found in BioChem.Interfaces.Nodes, and in this case we will use BioChem.Interfaces.Nodes.SubstanceConnector and connect it according to the diagram below.

Simple pathway with outer connector connected to the product C.
As the pathway inherits the icon from the compartment model, it already has a basic icon consisting of a box with a green frame. It is possible to add graphics to the icon layer, but for now we will use this standard icon, as shown below.
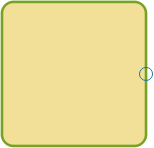
Icon view of the example pathway.
The model we have created can now be used to build a larger multi-compartment model, as illustrated in the diagram below. Remember that in order to define a volume for substance D this new model must also extend the compartment class, as shown earlier for the first model. Simulation results from this pathway are shown in the plot below.
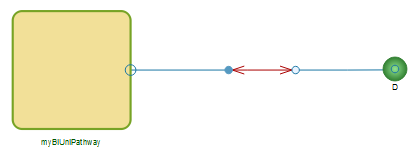
A multi-compartment model.

Concentration of substance D in the outer compartment and substance A in the inner compartment. Simulation stop time is two seconds.
After this tutorial on how to create some simpler models using the BioChem library, you should now be able to continue on your own and further explore the capabilities of the library.
Wolfram Language
In[1]:=
SystemModel["BioChem.Documentation.GettingStarted"]
Out[1]:=