Setup and Getting Started
| Setup for Excel Users | Setup for Administrators (Wolfram Enterprise Private Cloud) |
| Setup for Developers |
Wolfram CloudConnector for Excel is a plugin in Excel that calls a Wolfram Cloud through the web. This tutorial is divided into sections that outline the installation process for Excel users and developers. If you are using an Enterprise Private Cloud (EPC), an administrator can install extra tools to aid development.
Setup for Excel Users
For CloudConnector for Excel to work, you must download and install the plugin. You can download the plugin here.
Once it is installed, you will have direct access to the plugin within Excel, but you may need to change some preference settings for correct operation with a Wolfram Cloud. These settings can be changed by clicking the Wolfram tab and clicking the Preferences button. The most important settings are the Cloud Base and the Default Cloud Account.
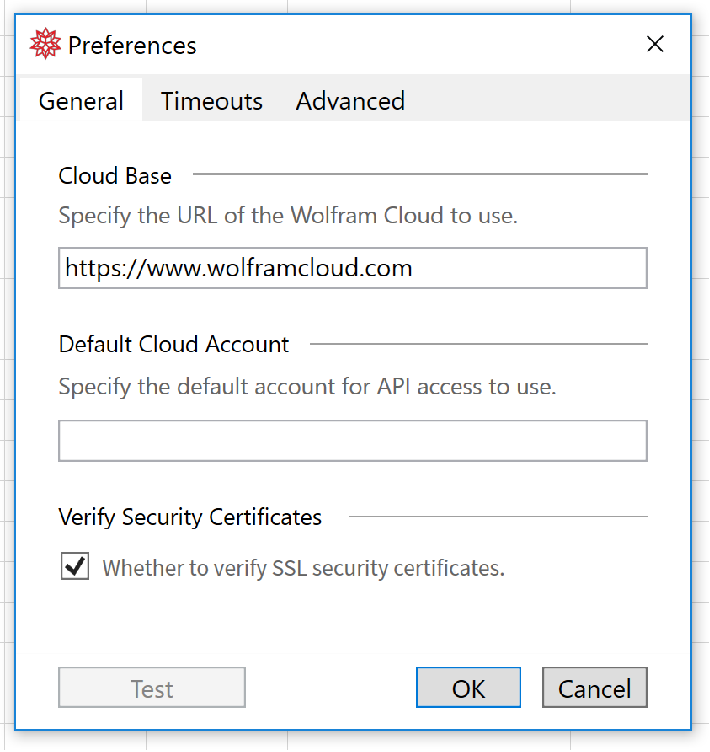
The Default Cloud Account avoids the need to specify the cloud account in each Wolfram API call. It is useful if the majority of your APIs are from a single account. However, it can be left unset, in which case the cloud account must be given for each call. See Calling Wolfram APIs > API Name for more details.
The Cloud Base, by default, points to the Public Cloud. If you are connecting to an EPC, you will need to change the Cloud Base to the URL of the EPC.
See the Preferences section for more information.
Signing In
Using the Wolfram function requires you to be signed into the Wolfram Cloud. Additionally, some Wolfram APIs require you to be signed in for access. Signing in requires a cloud account. You can sign in by clicking the "Signed Out" button in the Wolfram tab.

See the Cloud Accounts section for more information.
Testing a Wolfram API in a Worksheet
You can verify operation of the CloudConnector by using one of the example APIs.
One of the example APIs is as follows:
=WolframAPI("/Documentation/Example/AddTwo",Parameter("x",10),Parameter("y",55))
If this API has been successful, the result should show 65 in the cell. If you are connecting to an EPC, it is possible that this API has not been installed and therefore will not work correctly. Your administrator will tell you if the examples have been installed.

See the Example Wolfram APIs section for more examples.
Setup for Developers
Before using this section, please follow the instructions in the Setup for Excel Users section, which contains setup instructions for the CloudConnector for Excel plugin.
You will need a Cloud Account to be able to deploy Wolfram APIs.
Cloud Notebook
To deploy a Wolfram API from a Cloud notebook, you can use a web browser to sign into a Wolfram Cloud. Then open a Cloud notebook, and you should be able to deploy APIs to the Wolfram Cloud you are signed into.
Desktop Environment
To deploy a Wolfram API from the Wolfram Desktop Environment, you can use CloudConnect to sign in. If the target cloud is a Enterprise Private Cloud, you must first set the Cloud Base:
CloudConnect will now sign you in so that you can deploy Wolfram APIs:
Deploying the Introspector API
Most features of the CloudConnector work without any changes to your cloud account. However, the Insert API Call feature requires deployment of an API. This API is secure and only returns parameter names and their interpreter types of a given API.
Run the following code to install the Introspector API:
Deploying and Testing an API
These instructions will guide you through deploying a Wolfram API, testing through a web request and running in Excel.
Run the following to deploy a Wolfram API to the Wolfram Cloud:
This APIFunction has a single parameter, "x". This parameter has an Interpreter type, Integer, and the function returns the factorial of the given parameter.
Once deployed, this API will live on your cloud account with the name "MyFirstAPIFunction". You can test correct operation through the URLRead function:
Confirming correct operation at this point will minimize points of failure when running Wolfram APIs within Excel.
In Excel, you can write the following formula to fully verify operation of the created Wolfram API:
=WolframAPI("MyFirstAPIFunction",Parameter("x",10))

If you get a result like this, your API has been deployed correctly.
If the Default Cloud Account is not set to your account, you will need to include your Cloud ID at the front of your API name. See Calling Wolfram APIs > API Name for more details:
=WolframAPI("/{CloudID}/MyFirstAPIFunction",Parameter("x",10))
Setup for Administrators (Wolfram Enterprise Private Cloud)
There is a Configuration notebook for administrators of Wolfram Enterprise Private Cloud. The only function of the Configuration notebook is to create a documentation account and install a number of Wolfram APIs under this account. These are the APIs used in the Example Wolfram APIs section. If this setup is not carried out, the Cloud Connector for Excel will function properly, however, users will not be able to verify its operation and follow the documentation.
Typically, the Configuration notebook can be downloaded from the Cloud Connector for Excel resources page.
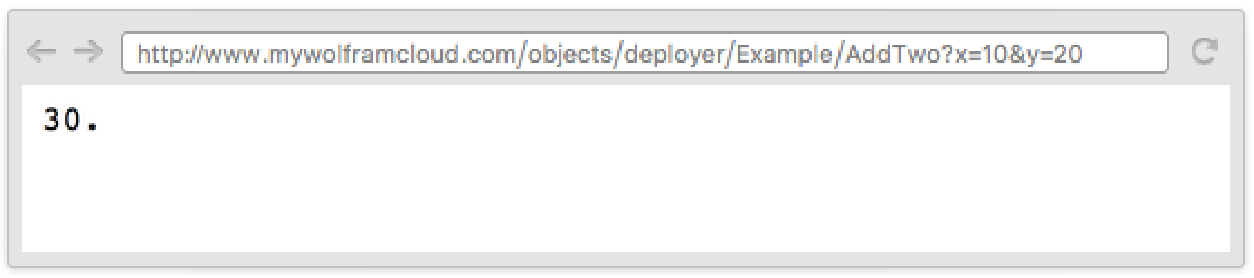
Testing an API from a Browser
Once the Configuration notebook has been used, a browser can test that the example APIs are installed and functioning correctly.
Enter the URL https://www.mywolframcloud.com/objects/Documentation/Example/AddTwo?x=10&y=20, and a value of 30 should be returned. Note that the correct cloud base and cloud account for the installation should be used.
To confirm full operation for all users, please run through the Setup for Excel Users and Setup for Developers sections.