Textual Input and Output

Forms of Input and Output
Here is one way to enter a particular expression:
Here is another way to enter the same expression:
With a notebook front end, you can also enter the expression directly in this way:
The Wolfram Language allows you to output expressions in many different ways.
In Wolfram System notebooks, expressions are by default output in StandardForm:
OutputForm uses only ordinary keyboard characters and is the default for textbased interfaces to the Wolfram Language:
InputForm yields a form that can be typed directly on a keyboard:
FullForm shows the internal form of an expression in explicit functional notation:
FullForm[expr]
the internal form of an expression
InputForm[expr]
a form suitable for direct keyboard input
OutputForm[expr]
a twodimensional form using only keyboard characters
StandardForm[expr]
the default form used in Wolfram System notebooks
Some output forms for expressions.
Output forms provide textual representations of Wolfram Language expressions. In some cases these textual representations are also suitable for input to the Wolfram Language. But in other cases they are intended just to be looked at, or to be exported to other programs, rather than to be used as input to the Wolfram Language.
TraditionalForm uses a large collection of ad hoc rules to produce an approximation to traditional mathematical notation:
TeXForm yields output suitable for export to TeX:
MathMLForm yields output in MathML:
CForm yields output that can be included in a C program. Macros for objects like Power are included in the header file mdefs.h:
FortranForm yields output suitable for export to Fortran:
TraditionalForm[expr]
traditional mathematical notation
TeXForm[expr]
output suitable for export to TeX
MathMLForm[expr]
output suitable for use with MathML on the web
CForm[expr]
output suitable for export to C
FortranForm[expr]
output suitable for export to Fortran
Output forms not normally used for Wolfram Language input.
"Low-Level Input and Output Rules" discusses how you can create your own output forms. You should realize however that in communicating with external programs it is often better to use the Wolfram Symbolic Transfer Protocol (WSTP) to send expressions directly than to generate a textual representation for these expressions.
Exchange textual representations of expressions.
Exchange expressions directly via WSTP.
Two ways to communicate between the Wolfram System and other programs.
How Input and Output Work
convert from a textual form to an expression
Processing
do computations on the expression
Output
convert the resulting expression to textual form
Steps in the operation of the Wolfram Language.
When you type something like x^2 what the Wolfram Language at first sees is just the string of characters x, ^, 2. But with the usual way that the Wolfram Language is set up, it immediately knows to convert this string of characters into the expression Power[x,2].
Then, after whatever processing is possible has been done, the Wolfram Language takes the expression Power[x,2] and converts it into some kind of textual representation for output.
The Wolfram Language reads the string of characters x, ^, 2 and converts it to the expression Power[x,2]:
This shows the expression in Fortran form:
FortranForm is just a "wrapper": the value of Out[2] is still the expression Power[x,2]:
It is important to understand that in a typical Wolfram Language session In[n] and Out[n] record only the underlying expressions that are processed, not the textual representations that happen to be used for their input or output.
If you explicitly request a particular kind of output, say by using TraditionalForm[expr], then what you get will be labeled with Out[n]//TraditionalForm. This indicates that what you are seeing is expr//TraditionalForm, even though the value of Out[n] itself is just expr.
The Wolfram Language also allows you to specify globally that you want output to be displayed in a particular form. And if you do this, then the form will no longer be indicated explicitly in the label for each line. But it is still the case that In[n] and Out[n] will record only underlying expressions, not the textual representations used for their input and output.
This sets t to be an expression with FortranForm explicitly wrapped around it:
The result on the previous line is just the expression:
But t contains the FortranForm wrapper, and so is displayed in FortranForm:
Wherever t appears, it is formatted in FortranForm:
The Representation of Textual Forms
Like everything else in the Wolfram System, the textual forms of expressions can themselves be represented as expressions. Textual forms that consist of onedimensional sequences of characters can be represented directly as ordinary Wolfram System strings. Textual forms that involve subscripts, superscripts, and other twodimensional constructs, however, can be represented by nested collections of twodimensional boxes.
onedimensional strings
InputForm
,
FullForm
, etc.
twodimensional boxes
StandardForm
,
TraditionalForm
, etc.
Typical representations of textual forms.
This generates the string corresponding to the textual representation of the expression in InputForm:
FullForm shows the string explicitly:
Here are the individual characters in the string:
Here is the box structure corresponding to the expression in StandardForm:
Here is the InputForm of the box structure. In this form the structure is effectively represented by an ordinary string:
If you use the notebook front end for the Wolfram System, then you can see the expression that corresponds to the textual form of each cell by using the Show Expression menu item.
Here is a cell containing an expression in StandardForm.

1.gif

Here is the underlying representation of that expression in terms of boxes, displayed using the Show Expression menu item.

2.gif

ToString[expr,form]
create a string representing the specified textual form of expr
ToBoxes[expr,form]
create a box structure representing the specified textual form of expr
Creating strings and boxes from expressions.
The Interpretation of Textual Forms
ToExpression[input]
create an expression by interpreting strings or boxes
Converting from strings or boxes to expressions.
This takes a string and interprets it as an expression:
Here is the box structure corresponding to the textual form of an expression in StandardForm:
ToExpression interprets this box structure and yields the original expression again:
In any Wolfram System session, the Wolfram System is always effectively using ToExpression to interpret the textual form of your input as an actual expression to evaluate.
If you use the notebook front end for the Wolfram System, then the interpretation only takes place when the contents of a cell are sent to the kernel, say for evaluation. This means that within a notebook there is no need for the textual forms you set up to correspond to meaningful Wolfram System expressions; this is only necessary if you want to send these forms to the kernel.
FullForm
explicit functional notation
InputForm
onedimensional notation
StandardForm
twodimensional notation
The hierarchy of forms for standard Wolfram System input.
Here is an expression entered in FullForm:
Here is the same expression entered in InputForm:
And here is the expression entered in StandardForm:
Built into the Wolfram System is a collection of standard rules for use by ToExpression in converting textual forms to expressions.
These rules define the grammar of the Wolfram System. They state, for example, that x+y should be interpreted as Plus[x,y], and that xy should be interpreted as Power[x,y]. If the input you give is in FullForm, then the rules for interpretation are very straightforward: every expression consists just of a head followed by a sequence of elements enclosed in brackets. The rules for InputForm are slightly more sophisticated: they allow operators such as +, =, and ->, and understand the meaning of expressions where these operators appear between operands. StandardForm involves still more sophisticated rules, which allow operators and operands to be arranged not just in a onedimensional sequence, but in a full twodimensional structure.
The Wolfram System is set up so that FullForm, InputForm, and StandardForm form a strict hierarchy: anything you can enter in FullForm will also work in InputForm, and anything you can enter in InputForm will also work in StandardForm.
If you use a notebook front end for the Wolfram System, then you will typically want to use all the features of StandardForm. If you use a textbased interface, however, then you will typically be able to use only features of InputForm.
When you use StandardForm in a Wolfram System notebook, you can enter directly twodimensional forms such as x2 or annotated graphics. But InputForm allows only onedimensional forms.
If you copy a StandardForm expression whose interpretation can be determined without evaluation, then the expression will be pasted into external applications as InputForm. Otherwise, the text is copied in a linear form that precisely represents the two-dimensional structure using !(). When you paste this linear form back into a Wolfram System notebook, it will automatically "snap" into twodimensional form.
ToExpression[input,form]
attempt to create an expression assuming that input is given in the specified textual form
Importing from other textual forms.
StandardForm and its subsets FullForm and InputForm provide precise ways to represent any Wolfram System expression in textual form. And given such a textual form, it is always possible to convert it unambiguously to the expression it represents.
TraditionalForm is an example of a textual form intended primarily for output. It is possible to take any Wolfram System expression and display it in TraditionalForm. But TraditionalForm does not have the precision of StandardForm, and as a result there is in general no unambiguous way to go back from a TraditionalForm representation and get the expression it represents.
Nevertheless, ToExpression[input,TraditionalForm] takes text in TraditionalForm and attempts to interpret it as an expression.
This takes a string and interprets it as TraditionalForm input:
In StandardForm the same string would mean a product of terms:
When TraditionalForm output is generated as the result of a computation, the actual collection of boxes that represent the output typically contains special Interpretation objects or other specially tagged forms that specify how an expression can be reconstructed from the TraditionalForm output.
The same is true of TraditionalForm that is obtained by explicit conversion from StandardForm. But if you edit TraditionalForm extensively, or enter it from scratch, then the Wolfram System will have to try to interpret it without the benefit of any additional embedded information.
Short and Shallow Output
When you generate a very large output expression in the Wolfram Language, you often do not want to see the whole expression at once. Rather, you would first like to get an idea of the general structure of the expression, and then, perhaps, go in and look at particular parts in more detail.
The functions Short and Shallow allow you to see "outlines" of large Wolfram Language expressions.
Short[expr]
show a oneline outline of expr
Short[expr,n]
show an nline outline of expr
Shallow[expr]
show the "top parts" of expr
Shallow[expr,{depth,length}]
show the parts of expr to the specified depth and length
Showing outlines of expressions.
This generates a long expression. If the whole expression were printed out here, it would go on for 23 lines:
This gives a oneline "outline" of t. The <<>> indicates the number of terms omitted:
When the Wolfram Language generates output in a textual format such as OutputForm, it first effectively writes the output in one long row. Then it looks at the width of text you have asked for, and it chops the row of output into a sequence of separate "lines". Each of the "lines" may of course contain superscripts and builtup fractions, and so may take up more than one actual line on your output device. When you specify a particular number of lines in Short, the Wolfram Language takes this to be the number of "logical lines" that you want, not the number of actual physical lines on your particular output device.
Here is a fourline version of t. More terms are shown in this case:
Short works in other formats too, such as StandardForm and TraditionalForm. When using these formats, linewrapping is determined by the notebook interface when displaying the output rather than by the kernel when creating the output. As a result, setting the number of lines generated by Short can only approximate the actual number of lines displayed onscreen.
You can use Short with other output forms, such as InputForm:
Short works by removing a sequence of parts from an expression until the output form of the result fits on the number of lines you specify. Sometimes, however, you may find it better to specify not how many final output lines you want, but which parts of the expression to drop. Shallow[expr,{depth,length}] includes only length arguments to any function, and drops all subexpressions that are below the specified depth.
Shallow shows a different outline of t:
This includes only 10 arguments to each function, but allows any depth:
Shallow is particularly useful when you want to drop parts in a uniform way throughout a highly nested expression, such as a large list structure returned by Trace.
Here is the recursive definition of the Fibonacci function:
This generates a large list structure:
You can use Shallow to see an outline of the structure:
Short gives you a less uniform outline, which can be more difficult to understand:
When generated outputs in the notebook interface are exceedingly large, the Wolfram Language automatically applies Short to the output. This user interface enhancement prevents the Wolfram Language from spending a lot of time generating and formatting the printed output for an evaluation which probably generated output you did not expect.
Typically, an assignment like this would have a semicolon at the end:
The buttons in the user interface allow you to control how much of the output you see. The size threshold at which this behavior takes effect is determined by the byte count of the output expression. That byte count can be set in the Preferences dialog of the notebook interface, which is opened by the Set Size Limit button.
StringOriented Output Formats
"text"
a string containing arbitrary text
Text strings.
The quotes are not included in standard Wolfram System output form:
In input form, the quotes are included:
You can put any kind of text into a Wolfram Language string. This includes nonEnglish characters, as well as newlines and other control information. "Strings and Characters" discusses in more detail how strings work.
StringForm["cccc``cccc",x1,x2,]
output a string in which successive `` are replaced by successive xi
StringForm["cccc`i`cccc",x1,x2,]
output a string in which each `i` is replaced by the corresponding xi
Using format strings.
In many situations, you may want to generate output using a string as a "template", but "splicing" in various Wolfram Language expressions. You can do this using StringForm.
This generates output with each successive `` replaced by an expression:
You can use numbers to pick out expressions in any order:
The string in StringForm acts somewhat like a "format directive" in the formatted output statements of languages such as C and Fortran. You can determine how the expressions in StringForm will be formatted by wrapping them with standard output format functions.
You can specify how the expressions in StringForm are formatted using standard output format functions:
You should realize that StringForm is only an output format. It does not evaluate in any way. You can use the function ToString to create an ordinary string from a StringForm object.
StringForm generates formatted output in standard Wolfram System output form:
In input form, you can see the actual StringForm object:
This creates an ordinary string from the StringForm object:
StringForm allows you to specify a "template string", then fill in various expressions. Sometimes all you want to do is to concatenate together the output forms for a sequence of expressions. You can do this using Row.
Row[{expr1,expr2,}]
give the output forms of the expri concatenated together
Row[list, s]
insert s between successive elements
Spacer[w]
a space of w points that can be used in Row
Invisible[expr]
a space determined by the physical dimensions of expr
Output of sequences of expressions.
Row prints as a sequence of expressions concatenated together:
Row also works with typeset expressions:
Row can automatically insert any expression between the displayed elements:
Spacer can be used to control the precise spacing between elements:
Column[{expr1,expr2,}]
a leftaligned column of objects
Column[list,alignment]
a column with a specified horizontal alignment ( Left , Center , or Right )
Column[list,alignment,s]
a column with elements separated by s x-heights
Output of columns of expressions.
This arranges the two expressions in a column:
Defer[expr]
give the output form of expr, with expr maintained unevaluated
Interpretation[e,expr]
give an output which displays as e, but evaluates as expr
Output of unevaluated expressions.
Using text strings and functions like Row, you can generate pieces of output that do not necessarily correspond to valid Wolfram Language expressions. Sometimes, however, you want to generate output that corresponds to a valid Wolfram Language expression, but only so long as the expression is not evaluated. The function Defer maintains its argument unevaluated, but allows it to be formatted in the standard Wolfram System output form.
Defer maintains 1+1 unevaluated:
The Defer prevents the actual assignment from being done:
When the output of Defer is evaluated again, which might happen by modifying the output or by using copy and paste, it will evaluate normally.
The following output was copied from the previous output cell into an input cell:
It is also possible to produce output whose appearance has no direct correlation to how it evaluates by using Interpretation. This method is effectively used by the Wolfram System when formatting some kinds of outputs where the most readable form does not correspond well to the internal representation of the object. For example, Series always generates an Interpretation object in its default output.
Although this output displays as y, it will evaluate as x:
Copying and pasting the previous output will reference the value earlier assigned to x:
Output Formats for Numbers
ScientificForm[expr]
print all numbers in scientific notation
EngineeringForm[expr]
print all numbers in engineering notation (exponents divisible by 3)
AccountingForm[expr]
print all numbers in standard accounting format
Output formats for numbers.
These numbers are given in the default output format. Large numbers are given in scientific notation:
This gives all numbers in scientific notation:
This gives the numbers in engineering notation, with exponents arranged to be multiples of three:
In accounting form, negative numbers are given in parentheses, and scientific notation is never used:
NumberForm[expr,tot]
print at most tot digits of all approximate real numbers in expr
ScientificForm[expr,tot]
use scientific notation with at most tot digits
EngineeringForm[expr,tot]
use engineering notation with at most tot digits
Controlling the printed precision of real numbers.
Here is to 30 decimal places:
This prints just 10 digits of :
This gives 12 digits, in engineering notation:
option name
default value
DigitBlockInfinity
maximum length of blocks of digits between breaks
NumberSeparator{","," "}
strings to insert at breaks between blocks of digits to the left and right of a decimal point
NumberPoint"."
string to use for a decimal point
NumberMultiplier"[Times]"
string to use for the multiplication sign in scientific notation
NumberSigns{"-",""}
strings to use for signs of negative and positive numbers
NumberPadding{"",""}
strings to use for padding on the left and right
SignPaddingFalse
whether to insert padding after the sign
NumberFormatAutomatic
function to generate final format of number
ExponentFunctionAutomatic
function to determine the exponent to use
Options for number formatting.
All the options in the table except the last one apply to both integers and approximate real numbers.
All the options can be used in any of the functions NumberForm, ScientificForm, EngineeringForm, and AccountingForm. In fact, you can in principle reproduce the behavior of any one of these functions simply by giving appropriate option settings in one of the others. The default option settings listed in the table are those for NumberForm.
Setting DigitBlock->n breaks digits into blocks of length :
You can specify any string to use as a separator between blocks of digits:
This gives an explicit plus sign for positive numbers, and uses | in place of a decimal point:
When the Wolfram Language prints an approximate real number, it has to choose whether scientific notation should be used, and if so, how many digits should appear to the left of the decimal point. What the Wolfram Language does is first to find out what the exponent would be if scientific notation were used, and one digit were given to the left of the decimal point. Then it takes this exponent, and applies any function given as the setting for the option ExponentFunction. This function should return the actual exponent to be used, or Null if scientific notation should not be used.
The default is to use scientific notation for all numbers with exponents outside the range to :
This uses scientific notation only for numbers with exponents of 10 or more:
This forces all exponents to be multiples of 3:
Having determined what the mantissa and exponent for a number should be, the final step is to assemble these into the object to print. The option NumberFormat allows you to give an arbitrary function which specifies the print form for the number. The function takes as arguments three strings: the mantissa, the base, and the exponent for the number. If there is no exponent, it is given as "".
This gives the exponents in Fortranlike "e" format:
You can use FortranForm to print individual numbers in Fortran format:
PaddedForm[expr,tot]
print with all numbers having room for tot digits, padding with leading spaces if necessary
PaddedForm[expr,{tot,frac}]
print with all numbers having room for tot digits, with exactly frac digits to the right of the decimal point
NumberForm[expr,{tot,frac}]
print with all numbers having at most tot digits, exactly frac of them to the right of the decimal point
Column[{expr1,expr2,}]
print with the expri left aligned in a column
Controlling the alignment of numbers in output.
Whenever you print a collection of numbers in a column or some other definite arrangement, you typically need to be able to align the numbers in a definite way. Usually you want all the numbers to be set up so that the digit corresponding to a particular power of 10 always appears at the same position within the region used to print a number.
You can change the positions of digits in the printed form of a number by "padding" it in various ways. You can pad on the right, typically adding zeros somewhere after the decimal. Or you can pad on the left, typically inserting spaces in place of leading zeros.
This pads with spaces to make room for up to 7 digits in each integer:
This creates a column of integers:
This prints each number with room for a total of 7 digits, and with 4 digits to the right of the decimal point:
In NumberForm, the 7 specifies the maximum precision, but does not make the Wolfram Language pad with spaces:
If you set the option SignPadding->True, the Wolfram Language will insert leading spaces after the sign:
Only the mantissa portion is aligned when scientific notation is used:
With the default setting for the option NumberPadding, both NumberForm and PaddedForm insert trailing zeros when they pad a number on the right. You can use spaces for padding on both the left and the right by setting NumberPadding->{" "," "}.
This uses spaces instead of zeros for padding on the right:
BaseForm[expr,b]
print with all numbers given in base b
Printing numbers in other bases.
This prints a number in base 2:
In bases higher than 10, letters are used for the extra digits:
BaseForm also works with approximate real numbers:
You can even use BaseForm for numbers printed in scientific notation:
"Digits in Numbers" discusses how to enter numbers in arbitrary bases, and also how to get lists of the digits in a number.
Tables and Matrices
Column[list]
typeset as a column of elements
Grid[list]
typeset as a grid of elements
TableForm[list]
print in tabular form
Formatting lists as tables and matrices.
Here is a list:
Grid gives the list typeset in a tabular format:
TableForm displays the list in a tabular format:
Grid and Column are wrappers which do not evaluate, but typeset their contents into appropriate forms. They are typesetting constructs and require a front end to render correctly.
Column is a shorthand for a Grid with one column:
The FullForm of a Grid or Column demonstrates that the head is inert:
All of these wrappers can be used to present any kind of data, including graphical data:
PaddedForm[Column[list],tot]
print a column with all numbers padded to have room for tot digits
PaddedForm[Grid[list],tot]
print a table with all numbers padded to have room for tot digits
PaddedForm[Grid[list],{tot,frac}]
put frac digits to the right of the decimal point in all approximate real numbers
Printing tables of numbers.
Here is a list of numbers:
Column displays the list in a column:
This aligns the numbers by padding each one to leave room for up to 20 digits:
In this particular case, you could also align the numbers using the Alignment option:
This lines up the numbers, padding each one to have room for 8 digits, with 5 digits to the right of the decimal point:
SpanFromLeft
span from the element on the left
SpanFromAbove
span from the element above
SpanFromBoth
span from the element above and to the left
Symbols used to represent spanning in Grid.
Grid takes a rectangular matrix as its first argument. Individual elements of the Grid can span across multiple rows, columns, or a rectangular subgrid by specifying the areas to be spanned. The spanning element is always specified in the upper left-hand corner of the spanning area, and the remaining area is filled in with the appropriate spanning symbols.
This shows a spanning row, where the spanning portion is filled in using SpanFromLeft:
Similarly, a column can be spanned using SpanFromAbove:
When specifying a rectangular spanning area, SpanFromBoth is used in every element which is both below and to the right of the spanning element:
option
default value
BackgroundNone
what background colors to use
BaselinePositionAutomatic
what to align with a surrounding text baseline
BaseStyle{}
base style specifications for the grid
FrameNone
where to draw frames in the grid
FrameStyleAutomatic
style to use for frames
Some options which affect the behavior of a Grid as a whole.
The Frame option can specify a frame around the entire Grid:
This uses FrameStyle to change the appearance of a frame:
This uses Background to specify a background color for the entire Grid:
The position of a Grid relative to its surroundings can be controlled using the BaselinePosition option:
This aligns the bottom of the grid with the baseline:
This sets the base style of the entire Grid to be the Subsection style:
Column is a shorthand for specifying a Grid with one column. Since the two functions are similar, the same options can be used for each one.
This sets some Grid options for Column:
option
default value
Alignment{Center,Baseline}
horizontal and vertical alignment of items
DividersNone
where to draw divider lines in the grid
ItemSizeAutomatic
width and height of each item
ItemStyleNone
styles for columns and rows
Spacings{0.8,0.1}
horizontal and vertical spacings
Some options which affect the columns and rows of a Grid.
The options for Grid which affect individual rows and columns all share a similar syntax. The options can be specified as {x,y} , where x applies to all of the columns and y applies to all of the rows; x and y can be single values, or they can be a list of values which represent each column or row in turn.
With no Alignment setting, elements align to the center horizontally and on the baseline vertically:
This changes the horizontal alignment of columns to be on the right:
This sets the horizontal alignment of each column separately:
When Background or ItemStyle options specify distinct settings for rows and columns, the front end will attempt to combine the settings where the rows and columns overlap.
This shows how the green row combines with columns of various colors:
This example shows how ItemStyle can combine styles specified in both rows and columns:
To repeat an individual row or column specification over multiple rows or columns, wrap it in a list. The repeated element will be used as often as necessary. If you wrap multiple elements in a list, the entire list will be repeated in sequence.
The red divider is repeated:
Here, red and black dividers are repeated in sequence:
The ItemSize and Spacings options take their horizontal measurements in ems and their vertical measurements in line heights based upon the current font. Both options also can take a Scaled coordinate, where the coordinate specifies the fraction of the total cell width or window height. The ItemSize option also allows you to request as much space as is required to fit all of the elements in the given row or column by using the keyword Full.
This makes all of the items 3 ems wide and 1 line height tall:
The same example in a new font size will show at a different size:
The buttons in this example will always be sized to be a quarter of the width of the cell:
The first and last settings for Spacings specify one-half of the top and bottom space:
option
default value
Alignment{Center,Baseline}
horizontal and vertical alignment of items
BackgroundNone
what background colors to use
BaseStyle{}
base style specifications for the item
FrameNone
where to draw frames around the item
FrameStyleAutomatic
style to use for frames
ItemSizeAutomatic
width and height of each item
Some options for Item.
Many of the settings which can be applied to entire rows and columns can also be applied individually to the elements of a Grid or Column by using the Item wrapper. Item allows you to change these settings at the granularity of a single item. Settings which are specified at the Item level always override settings from the Grid or Column as a whole.
This sets item-specific options for the lower left-hand element:
The Background setting for Item overrides the one for the Column:
Most of the options to Item take the same settings as their Grid counterparts. However, the Alignment and ItemSize options, which allow complex row and column settings in Grid, take only the {horizontal,vertical} setting in Item.
This specifies a larger item area and how the text should be aligned within it:
The width value of the ItemSize option is used to determine line breaking:
The ItemSize here specifies a minimum height of 2 line heights, but the item is larger:

Formatting Higher-Dimensional Data

Column supports one-dimensional data, and Grid supports two-dimensional data. To print arrays with an arbitrary number of dimensions, you can use TableForm.
Here is the format for a 2×2 array of elements a[i,j]:
Here is a 2×2×2 array:
And here is a 2×2×2×2 array:
In general, when you print an dimensional table, successive dimensions are alternately given as columns and rows. By setting the option TableDirections->{dir1,dir2,}, where the diri are Column or Row, you can specify explicitly which way each dimension should be given. By default, the option is effectively set to {Column,Row,Column,Row,}.
The option TableDirections allows you to specify explicitly how each dimension in a multidimensional table should be given:
TableForm can handle arbitrary "ragged" arrays. It leaves blanks wherever there are no elements supplied.
TableForm can handle "ragged" arrays:
You can include objects that behave as "subtables":
You can control the number of levels in a nested list to which TableForm goes by setting the option TableDepth.
This tells TableForm only to go down to depth 2. As a result {x,y} is treated as a single table entry:
option name
default value
TableDepthInfinity
maximum number of levels to include in the table
TableDirections{Column,Row,Column,}
whether to arrange dimensions as rows or columns
TableAlignments{Left,Bottom,Left,}
how to align the entries in each dimension
TableSpacing{1,3,0,1,0,}
how many spaces to put between entries in each dimension
TableHeadings{None,None,}
how to label the entries in each dimension
Options for TableForm.
With the option TableAlignments, you can specify how each entry in the table should be aligned with its row or column. For columns, you can specify Left, Center, or Right. For rows, you can specify Bottom, Center, or Top. If you set TableAlignments->Center, all entries will be centered both horizontally and vertically. TableAlignments->Automatic uses the default choice of alignments.
Entries in columns are by default aligned on the left:
This centers all entries:
You can use the option TableSpacing to specify how much horizontal space there should be between successive columns, or how much vertical space there should be between successive rows. A setting of 0 specifies that successive objects should abut.
This leaves 6 spaces between the entries in each row, and no space between successive rows:
None
no labels in any dimension
Automatic
successive integer labels in each dimension
{{lbl11,lbl12,},}
explicit labels
Settings for the option TableHeadings.
This puts integer labels in a 2×2×2 array:
This gives a table in which the rows are labeled by integers, and the columns by a list of strings:
This labels the rows but not the columns. TableForm automatically drops the third label since there is no corresponding row:
Styles and Fonts in Output
Style[expr,options]
print with the specified style options
Style[expr,"style"]
print with the specified cell style
Specifying output styles.
The second is shown in boldface here:
This shows the word text in font sizes from 10 to 20 points:
This shows the text in the Helvetica font:
Style allows an abbreviated form of some options. For options such as FontSize, FontWeight, FontSlant, and FontColor, you can include merely the setting of the option.
Options are specified here in a short form:
option
typical setting(s)
FontSize12
size of characters in printer's points
FontWeight"Plain"
or
"Bold"
weight of characters
FontSlant"Plain"
or
"Italic"
slant of characters
FontFamily"Courier"
,
"Times"
,
"Helvetica"
font family
FontColorGrayLevel[0]
color of characters
BackgroundGrayLevel[1]
background color for characters
A few options that can be used in Style.
If you use the notebook front end for the Wolfram System, then each piece of output that is generated will by default be in the style of the cell in which the output appears. By using Style[expr,"style"], however, you can tell the Wolfram System to output a particular expression in a different style.
Here is an expression output in the style normally used for section headings:
"Cells as Wolfram Language Expressions" describes in more detail how cell styles work. By using Style[expr,"style",options] you can generate output that is in a particular style, but with certain options modified.
Representing Textual Forms by Boxes
All textual and graphical forms in the Wolfram System are ultimately represented in terms of nested collections of boxes. Typically the elements of these boxes correspond to objects that are to be placed at definite relative positions in two dimensions.
Here are the boxes corresponding to the expression a+b:
DisplayForm shows how these boxes would be displayed:
DisplayForm[boxes]
show boxes as they would be displayed
Showing the displayed form of boxes.
This displays three strings in a row:
This displays one string as a subscript of another:
This puts two subscript boxes in a row:
"text"
literal text
RowBox[{a,b,}]
a row of boxes or strings a,b,
GridBox[{{a1,b1,},{a2,b2,},}]
a grid of boxes
a1b1
a2b2
SubscriptBox[a,b]
subscript ab
SuperscriptBox[a,b]
superscript ab
SubsuperscriptBox[a,b,c]
subscript and superscript
UnderscriptBox[a,b]
underscript
OverscriptBox[a,b]
overscript
UnderoverscriptBox[a,b,c]
underscript and overscript
FractionBox[a,b]
fraction
SqrtBox[a]
square root
RadicalBox[a,b]
b th root
Some basic box types.
This nests a fraction inside a radical:
This puts a superscript on a subscripted object:
This puts both a subscript and a superscript on the same object:
FrameBox[box]
render box with a frame drawn around it
GridBox[list,RowLines->True]
put lines between rows in a GridBox
GridBox[list,ColumnLines->True]
put lines between columns
GridBox[list,RowLines->{True,False}]
put a line below the first row, but not subsequent ones
Inserting frames and grid lines.
This shows a fraction with a frame drawn around it:
This puts lines between rows and columns of an array:
And this also puts a frame around the outside:
StyleBox[boxes,options]
render boxes with the specified option settings
StyleBox[boxes,"style"]
render boxes in the specified style
Modifying the appearance of boxes.
StyleBox takes the same options as Style. The difference is that Style is a high-level function that applies to an expression to determine how it will be displayed, while StyleBox is the corresponding low-level function in the underlying box structure.
This shows the string "name" in italics:
This shows "name" in the style used for section headings in your current notebook:
This uses section heading style, but with characters shown in gray:
If you use a notebook front end for the Wolfram System, then you will be able to change the style and appearance of what you see on the screen directly by using menu items. Internally, however, these changes will still be recorded by the insertion of appropriate StyleBox objects.
FormBox[boxes,form]
interpret boxes using rules associated with the specified form
InterpretationBox[boxes,expr]
interpret boxes as representing the expression expr
TagBox[boxes,tag]
use tag to guide the interpretation of boxes
ErrorBox[boxes]
indicate an error and do not attempt further interpretation of boxes
Controlling the interpretation of boxes.
This prints as x with a superscript:
It is normally interpreted as a power:
This again prints as x with a superscript:
But now it is interpreted as vec[x,2], following the specification given in the InterpretationBox:
If you edit the boxes given in an InterpretationBox, then there is no guarantee that the interpretation specified by the interpretation box will still be correct. As a result, the Wolfram Language provides various options that allow you to control the selection and editing of InterpretationBox objects.
option
default value
EditableAutomatic
whether to allow the contents to be edited
SelectableTrue
whether to allow the contents to be selected
DeletableTrue
whether to allow the box to be deleted
DeletionWarningFalse
whether to issue a warning if the box is deleted
BoxAutoDeleteFalse
whether to strip the box if its contents are modified
StripWrapperBoxesFalse
whether to remove StyleBox etc. from within boxes in TagBox[boxes,]
Options for InterpretationBox and related boxes.
TagBox objects are used to store information that will not be displayed but which can nevertheless be used by the rules that interpret boxes. Typically the tag in TagBox[boxes,tag] is a symbol which gives the head of the expression corresponding to boxes. If you edit only the arguments of this expression then there is a good chance that the interpretation specified by the TagBox will still be appropriate. As a result, Editable->True is effectively the default setting for a TagBox.
The rules that the Wolfram System uses for interpreting boxes are in general set up to ignore details of formatting, such as those defined by StyleBox objects. Thus, unless StripWrapperBoxes->False, a red x, for example, will normally not be distinguished from an ordinary black x.
A red x is usually treated as identical to an ordinary one:
String Representation of Boxes
The Wolfram Language provides a compact way of representing boxes in terms of strings. This is particularly convenient when you want to import or export specifications of boxes as ordinary text.
This creates a SuperscriptBox:
ToExpression interprets the SuperscriptBox as a power:
It is important to distinguish between forms that represent just raw boxes, and forms that represent the meaning of the boxes.
This corresponds to a raw SuperscriptBox:
This corresponds to the power that the SuperscriptBox represents:
The expression generated here is a power:
(input)
raw boxes
!(input)
the meaning of the boxes
Distinguishing raw boxes from the expressions they represent.
If you copy the contents of a StandardForm cell into another program, such as a text editor, the Wolfram System will generate a !() form where necessary. This is done so that if you subsequently paste the form back into the Wolfram System, the original contents of the StandardForm cell will automatically be re-created. Without the !, only the raw boxes corresponding to these contents would be obtained.
With default settings for options, !() forms pasted into Wolfram System notebooks are automatically displayed in twodimensional form.
"(input)"
a raw character string
"!(input)"
a string containing boxes
Embedding twodimensional box structures in strings.
The Wolfram Language will usually treat a () form that appears within a string just like any other sequence of characters. But by inserting a ! you can tell the Wolfram Language instead to treat this form like the boxes it represents. In this way you can therefore embed box structures within ordinary character strings.
The Wolfram Language treats this as an ordinary character string:
The \! tells the Wolfram Language that this string contains boxes:
You can mix boxes with ordinary text:
(box1,box2,)RowBox[box1,box2,]
box1^box2SuperscriptBox[box1,box2]
box1_box2SubscriptBox[box1,box2]
box1_box2%box3SubsuperscriptBox[box1,box2,box3]
box1&box2OverscriptBox[box1,box2]
box1+box2UnderscriptBox[box1,box2]
box1+box2%box3UnderoverscriptBox[box1,box2,box3]
box1/box2FractionBox[box1,box2]
@boxSqrtBox[box]
\@box1\%box2RadicalBox[box1,box2]
form` boxFormBox[box,form]
\*input
construct boxes from input
String representations of boxes.
The Wolfram Language requires that any input forms you give for boxes be enclosed within ( and ). But within these outermost ( and ) you can use additional ( and ) to specify grouping.
Here ordinary parentheses are used to indicate grouping:
Without the parentheses, the grouping would be different:
( and ) specify grouping, but are not displayed as explicit parentheses:
The inner ( and ) lead to the construction of a RowBox:
When you type aa+bb as input to the Wolfram System, the first thing that happens is that aa, +, and bb are recognized as being separate "tokens". The same separation into tokens is done when boxes are constructed from input enclosed in (). However, inside the boxes each token is given as a string, rather than in its raw form.
The RowBox has aa, +, and bb broken into separate strings:
Spaces around the + are by default discarded:
Here two nested RowBox objects are formed:
The same box structure is formed even when the string given does not correspond to a complete Wolfram Language expression:
Within () sequences, you can set up certain kinds of boxes by using backslash notations such as ^ and @. But for other kinds of boxes, you need to give ordinary Wolfram System input, prefaced by *.
This constructs a GridBox:
This constructs a StyleBox:
* in effect acts like an escape: it allows you to enter ordinary Wolfram Language syntax even within a () sequence. Note that the input you give after a * can itself in turn contain () sequences.
You can alternate nested * and (). Explicit quotes are needed outside of ():
!(input)
interpret input in the current form
!(form`input)
interpret input using the specified form
Controlling the way input is interpreted.
In a StandardForm cell, this will be interpreted in StandardForm, yielding a product:
The backslash backquote sequence tells the Wolfram Language to interpret this in TraditionalForm:
When you copy the contents of a cell from a notebook into a program such as a text editor, no explicit backslash backquote sequence is usually included. But if you expect to paste what you get back into a cell of a different type from the one it came from, then you will typically need to include a backslash backquote sequence in order to ensure that everything is interpreted correctly.
Converting between Strings, Boxes, and Expressions
ToString[expr,form]
create a string representing the specified textual form of expr
ToBoxes[expr,form]
create boxes representing the specified textual form of expr
ToExpression[input,form]
create an expression by interpreting a string or boxes as input in the specified textual form
ToString[expr]
create a string using OutputForm
ToBoxes[expr]
create boxes using StandardForm
ToExpression[input]
create an expression using StandardForm
Converting between strings, boxes, and expressions.
Here is a simple expression:
This gives the InputForm of the expression as a string:
In FullForm explicit quotes are shown around the string:
This gives a string representation for the StandardForm boxes that correspond to the expression:
ToBoxes yields the boxes themselves:
In generating data for files and external programs, it is sometimes necessary to produce twodimensional forms which use only ordinary keyboard characters. You can do this using OutputForm.
This produces a string which gives a twodimensional rendering of the expression, using only ordinary keyboard characters:
The string consists of two lines, separated by an explicit n newline:
The string looks right only in a monospaced font:
If you operate only with onedimensional structures, you can effectively use ToString to do string manipulation with formatting functions.
This generates a string corresponding to the OutputForm of StringForm:
InputForm
strings corresponding to keyboard input
StandardForm
strings or boxes corresponding to standard twodimensional input (default)
TraditionalForm
strings or boxes mimicking traditional mathematical notation
Some forms handled by ToExpression.
This creates an expression from an InputForm string:
This creates the same expression from StandardForm boxes:
In TraditionalForm these are interpreted as functions:
ToExpression[input,form,h]
create an expression, then wrap it with head h
Creating expressions wrapped with special heads.
This creates an expression, then immediately evaluates it:
This creates an expression using StandardForm rules, then wraps it in Hold:
You can get rid of the Hold using ReleaseHold:
SyntaxQ["string"]
determine whether a string represents syntactically correct Wolfram Language input
SyntaxLength["string"]
find out how long a sequence of characters starting at the beginning of a string is syntactically correct
Testing correctness of strings as input.
ToExpression will attempt to interpret any string as Wolfram Language input. But if you give it a string that does not correspond to syntactically correct input, then it will print a message, and return $Failed.
This is not syntactically correct input, so ToExpression does not convert it to an expression:
ToExpression requires that the string correspond to a complete Wolfram Language expression:
You can use the function SyntaxQ to test whether a particular string corresponds to syntactically correct Wolfram Language input. If SyntaxQ returns False, you can find out where the error occurred using SyntaxLength. SyntaxLength returns the number of characters which were successfully processed before a syntax error was detected.
SyntaxQ shows that this string does not correspond to syntactically correct Wolfram Language input:
SyntaxLength reveals that an error was detected after the third character in the string:
Here SyntaxLength returns a value greater than the length of the string, indicating that the input was correct so far as it went, but needs to be continued:
The Syntax of the Wolfram Language
The Wolfram Language uses various syntactic rules to interpret input that you give, and to convert strings and boxes into expressions. The version of these rules that is used for StandardForm and InputForm in effect defines the basic Wolfram Language. The rules used for other forms, such as TraditionalForm, follow the same overall principles, but differ in many details.
a
,
xyz
,
αβγ
symbols
"some text"
,
"α+β"
strings
123.456
,
3*^45
numbers
+
,
->
,
operators
(*comment*)
input to be ignored
Types of tokens in the Wolfram Language.
When you give text as input to the Wolfram Language, the first thing that the Wolfram System does is to break the text into a sequence of tokens, with each token representing a separate syntactic unit.
Thus, for example, if you give the input xx+yy-zzzz, the Wolfram System will break this into the sequence of tokens xx, +, yy, - and zzzz. Here xx, yy, and zzzz are tokens that correspond to symbols, while + and - are operators.
Operators are ultimately what determine the structure of the expression formed from a particular piece of input. The Wolfram Language involves several general classes of operators, distinguished by the different positions in which they appear with respect to their operands.
prefix
!xNot[x]
postfix
x!Factorial[x]
infix
x+y+zPlus[x,y,z]
matchfix
{x,y,z}List[x,y,z]
compound
x/:y=zTagSet[x,y,z]
overfix
OverHat[x]
Examples of classes of operators in the Wolfram Language.
Operators typically work by picking up operands from definite positions around them. But when a string contains more than one operator, the result can in general depend on which operator picks up its operands first.
Thus, for example, a*b+c could potentially be interpreted either as (a*b)+c or as a*(b+c) depending on whether * or + picks up its operands first.
To avoid such ambiguities, the Wolfram Language assigns a precedence to each operator that can appear. Operators with higher precedence are then taken to pick up their operands first.
Thus, for example, the multiplication operator * is assigned higher precedence than +, so that it picks up its operands first, and a*b+c is interpreted as (a*b)+c rather than a*(b+c).
The * operator has higher precedence than +, so in both cases Times is the innermost function:
The // operator has rather low precedence:
The @ operator has high precedence:
Whatever the precedence of the operators you are using, you can always specify the structure of the expressions you want to form by explicitly inserting appropriate parentheses.
Inserting parentheses makes Plus rather than Times the innermost function:
Extensions of symbol names
x_
,
#2
,
e::s
, etc.
Function application variants
e[e]
,
e@@e
, etc.
Powerrelated operators
e
,
e^e
, etc.
Multiplicationrelated operators
e
,
e/e
,
ee
,
ee
, etc.
Additionrelated operators
ee
,
e+e
,
ee
, etc.
Relational operators
e==e
,
ee
,
ee
,
ee
,
ee
, etc.
Arrow and vector operators
ee
,
ee
,
ee
,
ee
, etc.
Logic operators
ee
,
e&&e
,
ee
,
ee
, etc.
Pattern and rule operators
e..
,
e|e
,
e->e
,
e/.e
, etc.
Pure function operator
e&
Assignment operators
e=e
,
e:=e
, etc.
Compound expression
e;e
Outline of operators in order of decreasing precedence.
The table in "Operator Input Forms" gives the complete ordering by precedence of all operators in the Wolfram Language. Much of this ordering, as in the case of * and +, is determined directly by standard mathematical usage. But in general the ordering is simply set up to make it less likely for explicit parentheses to have to be inserted in typical pieces of input.
Operator precedences are such that this requires no parentheses:
FullForm shows the structure of the expression that was constructed:
Note that the first and second forms here are identical; the third requires explicit parentheses:
flat
x+y+zx+y+z
left grouping
x/y/z(x/y)/z
right grouping
x^y^zx^(y^z)
Types of grouping for infix operators.
Plus is a Flat function, so no grouping is necessary here:
Power is not Flat, so the operands have to be grouped in pairs:
The syntax of the Wolfram Language is defined not only for characters that you can type on a typical keyboard, but also for all the various special characters that the Wolfram Language supports.
Letters such as , , and from any alphabet are treated just like ordinary English letters, and can for example appear in the names of symbols. The same is true of letterlike forms such as , , and .
But many other special characters are treated as operators. Thus, for example, and are infix operators, while is a prefix operator, and and are matchfix operators.
is an infix operator:
is an infix operator which means the same as *:
Some special characters form elements of fairly complicated compound operators. Thus, for example, fx contains the compound operator with elements and .
The and form parts of a compound operator:
No parentheses are needed here: the "inner precedence" of is lower than Times:
Parentheses are needed here, however:
Input to the Wolfram Language can be given not only in the form of onedimensional strings, but also in the form of twodimensional boxes. The syntax of the Wolfram Language covers not only onedimensional constructs but also twodimensional ones.
This superscript is interpreted as a power:
xf is a twodimensional compound operator:
is part of a more complicated twodimensional compound operator:
The operator has higher precedence than +:
Operators without Builtin Meanings
When you enter a piece of input such as 2+2, the Wolfram Language first recognizes the + as an operator and constructs the expression Plus[2,2], then uses the builtin rules for Plus to evaluate the expression and get the result 4.
But not all operators recognized by the Wolfram Language are associated with functions that have builtin meanings. The Wolfram Language also supports several hundred additional operators that can be used in constructing expressions, but for which no evaluation rules are initially defined.
You can use these operators as a way to build up your own notation within the Wolfram Language.
The is recognized as an infix operator, but has no predefined value:
In StandardForm, prints as an infix operator:
You can define a value for :
Now is not only recognized as an operator, but can also be evaluated:
xyCirclePlus[x,y]
xyTildeTilde[x,y]
xyTherefore[x,y]
xyLeftRightArrow[x,y]
xDel[x]
xSquare[x]
x,y,AngleBracket[x,y,]
A few Wolfram Language operators corresponding to functions without predefined values.
The Wolfram Language follows the general convention that the function associated with a particular operator should have the same name as the special character that represents that operator.
\[Congruent] is displayed as :
It corresponds to the function Congruent:
x \[name] y
name [ x , y ]
\[name] x
name [ x ]
\[Leftname] x,y,\[Rightname]
name [ x , y , ]
The conventional correspondence in the Wolfram Language between operator names and function names.
You should realize that even though the functions CirclePlus and CircleTimes do not have builtin evaluation rules, the operators and do have builtin precedences. "Operator Input Forms" lists all the operators recognized by the Wolfram Language, in order of their precedence.
The operators and have definite precedenceswith higher than :
Some twodimensional forms without builtin meanings.
Subscripts have no builtin meaning in the Wolfram Language:
Most superscripts are interpreted as powers by default:
A few special superscripts are not interpreted as powers:
Bar and hat are interpreted as OverBar and OverHat:
Defining Output Formats
Just as the Wolfram Language allows you to define how expressions should be evaluated, so also it allows you to define how expressions should be formatted for output. The basic idea is that whenever the Wolfram Language is given an expression to format for output, it first calls Format[expr] to find out whether any special rules for formatting the expression have been defined. By assigning a value to Format[expr] you can therefore tell the Wolfram Language that you want a particular kind of expression to be output in a special way.
This tells the Wolfram Language to format bin objects in a special way:
Now bin objects are output to look like binomial coefficients:
Internally, however, bin objects are still exactly the same:
Format[expr1]:=expr2
define expr1 to be formatted like expr2
Format[expr1,form]:=expr2
give a definition only for a particular output form
Defining your own rules for formatting.
By making definitions for Format, you can tell the Wolfram Language to format a particular expression so as to look like another expression. You can also tell the Wolfram Language to run a program to determine how a particular expression should be formatted.
This specifies that the Wolfram Language should run a simple program to determine how xrep objects should be formatted:
The strings are created when each xrep is formatted:
Internally, however, the expression still contains xrep objects:
Prefix[f[x],h]
prefix form h x
Postfix[f[x],h]
postfix form x h
Infix[f[x,y,],h]
infix form x h y h
Prefix[f[x]]
standard prefix form f@x
Postfix[f[x]]
standard postfix form x//f
Infix[f[x,y,]]
standard infix form x~f~y~f~
PrecedenceForm[expr,n]
an object to be parenthesized with a precedence level n
Output forms for operators.
This prints with f represented by the "prefix operator" <>:
Here is output with the "infix operator" <>:
By default, the "infix operator" <> is assumed to have "higher precedence" than +, so no parentheses are inserted:
When you have an output form involving operators, the question arises of whether the arguments of some of them should be parenthesized. As discussed in "Special Ways to Input Expressions", this depends on the "precedence" of the operators. When you set up output forms involving operators, you can use PrecedenceForm to specify the precedence to assign to each operator. The Wolfram Language uses integers from 1 to 1000 to represent "precedence levels". The higher the precedence level for an operator, the less it needs to be parenthesized.
Here is treated as an operator with precedence 100. This precedence turns out to be low enough that parentheses are inserted:
When you make an assignment for Format[expr], you are defining the output format for expr in all standard types of Wolfram Language output. By making definitions for Format[expr,form], you can specify formats to be used in specific output forms.
This specifies the TeXForm for the symbol x:
The output format for x that you specified is now used whenever the TeX form is needed:
LowLevel Input and Output Rules
MakeBoxes[expr,form]
construct boxes to represent expr in the specified form
MakeExpression[boxes,form]
construct an expression corresponding to boxes
Lowlevel functions for converting between expressions and boxes.
MakeBoxes generates boxes without evaluating its input:
MakeExpression interprets boxes but uses HoldComplete to prevent the resulting expression from being evaluated:
Built into the Wolfram Language are a large number of rules for generating output and interpreting input. Particularly in StandardForm, these rules are carefully set up to be consistent, and to allow input and output to be used interchangeably.
It is fairly rare that you will need to modify these rules. The main reason is that the Wolfram Language already has builtin rules for the input and output of many operators to which it does not itself assign specific meanings.
Thus, if you want to add, for example, a generalized form of addition, you can usually just use an operator like for which the Wolfram Language already has builtin input and output rules.
This outputs using the operator:
The Wolfram Language understands on input:
In dealing with output, you can make definitions for Format[expr] to change the way that a particular expression will be formatted. You should realize, however, that as soon as you do this, there is no guarantee that the output form of your expression will be interpreted correctly if it is given as Wolfram Language input.
If you want to, the Wolfram Language allows you to redefine the basic rules that it uses for the input and output of all expressions. You can do this by making definitions for MakeBoxes and MakeExpression. You should realize, however, that unless you make such definitions with great care, you are likely to end up with inconsistent results.
This defines how gplus objects should be output in StandardForm:
gplus is now output using a subscripted :
The Wolfram Language cannot, however, interpret this as input:
This tells the Wolfram Language to interpret a subscripted as a specific piece of FullForm input:
Now the subscripted is interpreted as a gplus:
When you give definitions for MakeBoxes, you can think of this as essentially a lowerlevel version of giving definitions for Format. An important difference is that MakeBoxes does not evaluate its argument, so you can define rules for formatting expressions without being concerned about how these expressions would evaluate.
In addition, while Format is automatically called again on any results obtained by applying it, the same is not true of MakeBoxes. This means that in giving definitions for MakeBoxes you explicitly have to call MakeBoxes again on any subexpressions that still need to be formatted.
Break input into tokens.
Strip spacing characters.
Construct boxes using builtin operator precedences.
Strip StyleBox and other boxes not intended for interpretation.
Apply rules defined for MakeExpression.
Operations done on Wolfram Language input.
Generating Unstructured Output
The functions described in "Textual Input and Output Overview" determine how expressions should be formatted when they are printed, but they do not actually cause anything to be printed.
In the most common way of using the Wolfram Language you never in fact explicitly have to issue a command to generate output. Usually, the Wolfram Language automatically prints out the final result that it gets from processing input you gave. Sometimes, however, you may want to get the Wolfram Language to print out expressions at intermediate stages in its operation. You can do this using the function Print.
Print[expr1,expr2,]
print the expri, with no spaces in between, but with a newline (line feed) at the end
Printing expressions.
Print prints its arguments, with no spaces in between, but with a newline (line feed) at the end:
This prints a table of the first five integers and their squares:
Print simply takes the arguments you give, and prints them out one after the other, with no spaces in between. In many cases, you will need to print output in a more complicated format. You can do this by giving an output form as an argument to Print.
This prints the matrix in the form of a table:
Here the output format is specified using StringForm:
Print also allows mixing of text and graphics:
The output generated by Print is usually given in the standard Wolfram Language output format. You can however explicitly specify that some other output format should be used.
This prints output in Wolfram Language input form:
You should realize that Print is only one of several mechanisms available in the Wolfram Language for generating output. Another is the function Message described in "Messages", used for generating named messages. There are also a variety of lowerlevel functions described in "Streams and Low-Level Input and Output" which allow you to produce output in various formats both as part of an interactive session, and for files and external programs.
Another command which works exactly like Print, but only shows the printed output until the final evaluation is finished, is PrintTemporary.
Formatted Output
Ever since Version 3 of the Wolfram Language, there has been rich support for arbitrary mathematical typesetting and layout. Underlying all that power was a so-called box language, which allowed notebooks themselves to be Wolfram Language expressions. This approach turned out to be very powerful, and has formed the basis of many unique features in the Wolfram Language. However, despite the power of the box language, in practice it was awkward enough for users to access directly that few did.
Starting in Version 6, there is a higher-level interface to this box language which takes much of the pain out of using boxes directly, while still exposing all the same typesetting and layout power. Functions in this new layer are often referred to as box generators, but there is no need for you to be aware of the box language to use them effectively. In this tutorial, we will take a look at box generators that are relevant for displaying a wide variety of expressions, and we will show some ways in which they can be used to generate beautifully formatted output that goes beyond simple mathematical typesetting.

Styling Output

The Wolfram System front end supports all the usual style mechanisms available in word processors, for example including menus for changing font characteristics. However, it used to be very difficult to access those styling mechanisms automatically in generated output. Output continued to be almost universally plain 12 point Courier (or Times for those people using TraditionalForm). To address this, the function Style was created. Whenever you evaluate a Style expression, its output will be displayed with the given style attributes active.
You can wrap Style around any sort of expression. Here is an example that displays prime and composite numbers using different font weights and colors via Style.
There are hundreds of formatting options that you could apply with Stylesee the documentation for Style for a more complete listingbut there are a handful that are by far the most common, listed here.
Menu
Style[] option
Style[] directive
Format Size 14FontSize->1414
Format Text Color GrayFontColor->GrayGray
Format Face BoldFontWeight->BoldBold
Format Face ItalicFontSlant->ItalicItalic
Format Background Color YellowBackground->Yellow
Format FontFontFamily->"Times"
Format Style Subsection"Subsection"
Note that Style can be arbitrarily nested, with the innermost one taking precedence if there is a conflict. Here we wrap Style around the entire list to apply a new font to all elements of the list.
Another common thing to want is to have a portion of the output styled like text. It can look quite strange to have text appear in a font which is intended for use by code. For that purpose, we have a function Text which ensures that its argument will always be rendered in a text font. (Those of you familiar with Wolfram Language graphics will recognize the Text function as a graphics primitive, but that use does not conflict with this use outside of graphics.)
Style can be used to set up a region on the screen where any option is active, not just options related to fonts. Later in this tutorial, we will see how Style can even affect the display characteristics of other formatting constructs, like Grid or Tooltip.

Grid Layout

Using two-dimensional layout structures can be just as useful as applying style directives to those structures. In the Wolfram Language, the primary function for such layout is Grid. Grid has very flexible layout features, including the ability to arbitrarily adjust things like alignment, frame elements, and spanning elements. (Other tutorials go into Grid features in greater detail, but we will cover the highlights here.)
Look again at the Style example which displays prime and composite numbers differently.
To put this into a Grid, we first use Partition to turn this 100-element list into a 10×10 array. Although you can give Grid a ragged array (a list whose elements are lists of different lengths), in this case we give Grid a regular array, and the resulting display is a nicely formatted layout.
Notice that the columns are aligned on center, and there are no frame lines. It is an easy matter to change either of these using Grid options.
A complete description of all Grid options and their syntax is beyond the scope of this document, but it is possible to do some remarkable things with them. See the complete Grid documentation for complete details.
There are a few convenience constructs related to Grid. One is Column, which takes a flat list of elements and arranges them vertically. This would be slightly awkward to do with Grid. Here is a simple example, viewing the options of column in, well, a column.
What about laying out a list of things horizontally? In that case, the main question you need to ask is whether you want the resulting display to line wrap like a line of math or text would, or whether you want the elements to remain on a single line. In the latter case, you would use Grid applied to a 1×n array.
But notice in this example that the overall grid shrinks so that it fits in the available window width. As a result, there are elements of the grid which themselves wrap onto multiple lines. This is due to the default ItemSize option of Grid. If you want to allow the elements of a grid to be as wide as they would naturally be, set ItemSize to Full.
Of course, now the whole grid is too wide to fit on one line (unless you make this window very wide), and so there are elements in the grid which you cannot see. That brings us to the other horizontal layout function: Row.
Given a list of elements, Row will allow the overall result to word wrap in the natural way, just like a line of text or math would. This type of layout will be familiar to those of you who might have used the old (and now obsolete) SequenceForm function.
As you can see, Row does not leave space between elements by default. But if you give a second argument, that expression is inserted between elements. Here we use a comma, but any expression can be used.
If you resize the notebook window, you will see that Grid with ItemSize->Automatic continues to behave differently than Row, and each is useful in different circumstances.

Using Output as Input

This is a good time to point out that Style, Grid, and all other box generators are persistent in output. If you were to take a piece of output that had some formatting created by Style or Grid and reuse that as input, the literal Style or Grid expressions would appear in the input expression. Those of you familiar with the old uses of StyleBox and even functions like MatrixForm will find this a change.
Consider taking the output of this Grid command, which has lots of embedded styles, and using it in some input expression.
Notice that the grid is still a grid, it is still blue, and the elements are still bold or gray as before. Also notice that having literal Grid and Style in the expression interferes with what would have otherwise been adding a scalar to a matrix, and raising the result to a power. This distinction is very important, since you almost always want these composite structures to resist being interpreted automatically in some way. However, if you ever do want to get rid of these wrappers and get at your data, that is easy enough to do.

Special Grid Entries

To allow more flexible two-dimensional layout, Grid accepts a few special symbols like SpanFromLeft as entries. The entry SpanFromLeft indicates that the grid entry immediately to the left should take up its own space and also the space of the spanning character. There are also SpanFromAbove and SpanFromBoth. See "Grids, Rows, and Columns" for detailed information.
This approach can be used to create complicated spanning setups. Typing something like the following as an input would take a long time. Luckily you can create this table interactively by using Make Spanning and Split Spanning in the Insert Table/Matrix submenu. If you want to see what would be involved in typing this, evaluate the cell, which will show how it should be typed as input.
We have already seen how to apply things like alignment and background to a grid as a whole, or to individual columns or rows. What we have not seen though is how to override that for an individual element. Say you want your whole grid to have the same background, except for a few special elements. A convenient way to do that is to wrap each such element in Item, and then specify options to Item which override the corresponding option in Grid.
You could override this option with Style too, but the purpose of Item is to override it in a way that knows about the two-dimensional layout of Grid. Notice in the preceding output that whenever two of the yellow cells are next to each other, there is no blue space between them. That would be impossible to do with constructs other than Item.
The same thing goes for all Item options, not just Background. Consider the Frame option. If you want no frame elements except around certain specified elements, you might think that you have to wrap them in their own Grid with the Frame->True setting. (We will learn a much easier way to add a frame around an arbitrary expression in the next section.)
But notice that adjacent framed elements do not share their boundaries. Compare that with using Item, below, which has enough information to not draw more frame elements than are necessary. Notice now the frames of 2 and 11 meet at a single point, and how the frames of 2 and 3 share a single-pixel line, which in turn is perfectly aligned with the left frame of 13 and 23. That is the power of Item.

Frames and Labels

Adding a frame or a label to an expression can be done with Grid, but conceptually these are much simpler operations than general two-dimensional layout, and so there are correspondingly simpler ways to get them. For instance, Framed is a simple function for drawing a frame around an arbitrary expression. This can be useful to draw attention to parts of an expression, for instance.
Labeled is another such function, which allows labels to be placed at arbitrary locations around a given expression. Here we add a legend to the Grid example from the last section. (Spacer is just a function that is designed to leave empty space.)
Panel is yet another framing construct, which uses the underlying operating system's panel frame. This is different from Frame, as different operating systems might use a drop shadow, rounded corners, or fancier graphic design elements for a panel frame.
Note that Panel has its own concept of font family and size as well, so the contents of Grid change font family and size, and the Text changes font size. (Text has its own opinion about font family though, and so it remains in the Wolfram System's text font.) We will talk about this in some detail below in the section on the BaseStyle option.
Finally, we should point out that Panel itself has an optional second argument to specify one or more labels, which are automatically positioned outside the panel, and an optional third argument to give details of that position. See the documentation for Panel for more detail.

Other Annotations

The annotations mentioned so far have a very definite visual component. There are a number of annotations which are effectively invisible, until the user needs them. Tooltip for example does not change the display of its first argument, and only when you move the mouse pointer over that display is the second argument shown, as a tooltip.
Mouseover is another such function, but instead of displaying the result in a tooltip, it uses the same area of the screen that had been used for the display before you moved the mouse pointer over it. If the two displays are different sizes, then the effect can be jarring, so it is a good idea to use displays which are closer to the same size, or use the Mouseover ImageSize option to leave space for the larger of the two displays, regardless of which is being displayed.
Also similar to Tooltip are StatusArea and PopupWindow. StatusArea displays the extra information in the notebook's status area, typically in the lower-left corner, while PopupWindow will display extra information in a new window when clicked.
Finally, you can specify an arbitrary location for an annotation by using the pair Annotation and MouseAnnotation.
When using annotations that are triggered merely by moving the mouse pointer over a region of the screen, it is important to keep the user in mind. Moving the mouse is not something that should trigger a long evaluation or a lot of visual clutter. But used sparingly, annotations can be quite helpful to users.
Finally, note that all these annotations work perfectly well in graphics too. So you can provide tooltips or mouseovers to aid users in understanding a complicated graphic you have created. In fact, even visualization functions like ListPlot or DensityPlot support Tooltip. See the documentation for details.

Default Styles

As we saw in the section "Frames and Labels", constructs like Panel actually work much like Style, in that they set up an environment in which a set of default styles is applied to their contents. This can be overridden by explicit Style commands, but it can also be overridden for the Panel itself, through the BaseStyle option. BaseStyle can be set to a style or a list of style directives, just like you would use in Style. And those directives then become the ambient default within the scope of that Panel.
As we have already seen, Panel by default uses the dialog font family and size. But that can be overridden by using this BaseStyle option.
Actually, almost all of these box generators have a BaseStyle option. For instance, here is a grid in which the default font color is blue. Notice that the elements that were gray stay gray, since the inner Style wrapper trumps the outer Grid BaseStyle. (This is one of the principal characteristics of option inheritance, which is beyond the scope of this document to discuss.)

Default Options

Say you have an expression with multiple occurrences of the same box generator, like a Framed or a Panel, and you want to change all of them to have the same set of options. It might be cumbersome to go through and add the same set of options to every occurrence of that function. Thankfully, there is an easier way.
DefaultOptions is an option to Style which, when set to a list of elements of the form head->{opt->val,}. sets up an environment with the given options as the ambient default for the given box-generating head. Those options will be active throughout the Style wrapper, but only in any instances of the associated box generator.
Suppose you had an expression that contained some Framed items, and you wanted them all to be drawn with the same background and frame style.
Actually, that input is too short to see the advantage of this syntax. Say you had this same list, but specified manually.
Now inserting Background and FrameStyle options into every Framed wrapper is prohibitively time consuming, although you certainly could do it (or you could write a program to do it for you). But using DefaultOptions, you can effectively set up an environment in which all Framed wrappers will use your settings for Background and FrameStyle, thus.
This approach makes it easy to create structures that follow uniform style guidelines without having to specify those styles in more than one place, which makes for considerably cleaner code, smaller file sizes, and easier maintenance.

Mathematical Typesetting

No discussion of formatted output would be complete without at least a nod toward the formatting constructs that are unique to mathematical syntaxes.
We will not discuss these at length, but we will point out that these constructs do not have any built-in mathematical meaning in the kernel. For example, Superscript[a,b] will not be interpreted as Power[a,b], even though their displays are identical. So you can use these as structural elements in your formatted output without having to worry about their meaning affecting your display.

Using the Box Language

One final note. Those of you who are already familiar with the box language might occasionally find that these box generators get in the way of your constructing low level boxes yourselves, and inserting their display into a piece of output. That can be true for any layered technology where one abstraction layer attempts to hide the layers on which it sits. However, there is a simple loophole through which you can take boxes which you happen to know are valid, and display them directly in output: RawBoxes.
As with all loopholes, RawBoxes gives you added flexibility, but it also allows you to shoot yourself in the foot. Use with care. And if you are not yet familiar with the box language, perhaps you should not use it at all.
Grids, Rows, and Columns in the Wolfram Language

The Basic Constructs

The Wolfram Language provides a broad range of powerful constructs for laying out content on a screen or page. They are designed to be immediately useful for the beginner, yet also allow fine control over almost every aspect of their appearance.

These constructs can be placed into three families: constructs that appear within notebooks as typesetting structures, functions that generate graphics whose contents are arranged on a grid, and constructs that can appear inside grids to adjust details of formatting.

Grid, Column, and Row form the first family, referred to in this tutorial as the Grid family. The Grid family's defining characteristic is that it is a tightly integrated part of the Wolfram Language's typesetting system. This means that any expression whatsoever can appear as content, and that the construct itself can respond to changes such as window width or even the size of its elements. Like other typesetting constructs, the Grid family's members are inert constructs and do not evaluate to some other form.
A parallel set of constructsthe Graphics Grid familysupports features particularly useful when dealing with graphics. These constructs are GraphicsGrid, GraphicsColumn, and GraphicsRow. Though graphics can be used in the Grid family, the Graphics Grid family supports sizing and editing behavior more tailored to graphics. The Graphics Grid family has functions that take arguments and evaluate them into new graphics expressions, which means it is difficult to make the generated grid respond to changes in its environment, but easy to interactively add arbitrary annotation and additional graphics.
The final familythe Embedded Constructs familyconsists of constructs that are embedded within the grids themselves, and alter the grid's appearance from within. Item can be wrapped around elements in a grid in order to style the region in which they appear. SpanFromLeft, SpanFromAbove, and SpanFromBoth are used to create regions that span across multiple rows or columns.
Some very basic examples of all of these constructs follow.

Grid Family

Grid[{{expr11,expr12,},{expr21,expr22,},}]
an object that formats with the exprij arranged in a two-dimensional grid
Column[{expr1,expr2,}]
an object that formats with the expri arranged in a column, with expr1 above expr2, etc.
Row[{expr1,expr2,}]
an object that formats with the expri arranged in a row, potentially extending over several lines
The Grid family of 2D formatting constructs.
A grid of elements:
A column of elements:
A row of elements:

Graphics Grid Family

GraphicsGrid[{{g11,g12,},}]
generates a graphic in which the gij are laid out in a two-dimensional grid
GraphicsColumn[{g1,g2,}]
generates a graphic in which the gi are laid out in a column, with g1 above g2, etc.
GraphicsRow[{g1,g2,}]
generates a graphic in which the gi are laid out in a row
The Graphics Grid family of 2D graphics layout functions.
Display elements in a graphics grid:
Display elements in a graphics column:
Display elements in a graphics row:

Embedded Constructs Family

Item[expr,options]
displays with expr as the content, and with the specified options applied to the region containing expr
SpanFromLeft
indicates that the position is occupied by the contents on the left
SpanFromAbove
indicates that the position is occupied by the contents above
SpanFromBoth
indicates that the position is occupied from both above and left
Constructs with special meaning when they are embedded as elements within the Grid and Graphics Grid families.
Embed styling information around the element "a":
Span "a" across the first two columns:
Span "a" across the first two rows:
Span "a" across the first two columns and rows:

Classes of Functionality

Grid and related constructs allow considerable appearance customization, often with very little syntax. The tables below indicate the kind of functionality that is supported; it is explained in detail in later sections.

Options Syntax

A variety of options exist for adjusting the details of a grid's appearance. This section describes the common syntax shared by many of these options. This syntax provides a way to assign option values not only for the entire grid, but also for individual rows, columns, and even items.

The overall syntax for many options, such as Background, is based on forms like Background->{specx,specy}, where specx is itself a modular syntax that contains values for different columns, while specy contains values for the different rows.

spec
apply spec to all items
{specx}
apply specx at successive horizontal positions
{specx,specy}
apply speck at successive horizontal and vertical positions
{specx,specy,rules}
give rules for the items based on their i,j position in the array
General options syntax.
specx and specy may take two possible forms, as described below. The first form is just the rules for the desired value at a set of indices. The second form is based on giving a sequence of values in a list.
A set of rules specifying the index of a column and its desired background:
An equivalent list of background values to use for successive columns:

These two methods have different strengths, as described in "Using Rules" and "Using Lists".

Using Rules

Rules provide a direct and readable method to give a specific row or column a specific value.

Set the background for specific sets of columns:
Set the background for specific sets of rows:

When there are a large number of rows or columns, rules are a convenient way to set the properties of just a few of them.

Apply the option at a small number of the possible positions:

Rules can also be used to give values to specific grid elements or subregions. Note, however, that while conceptually similar, this following syntax is separate from the discussion of specx and specy.

Set the background of the element at position {3,3}:
Set the background of the region from element {1,1} to {3,3}:

Rules are an efficient way to specify the exceptions to the value that otherwise exists. However, they are less efficient when the intention is to manually specify a value for each piece of the grid.

Manually specify an alternating pattern using rules:

To achieve repetitive patterns, it is instead recommended to use the list syntax described in the next section.

Using Lists

Giving sequential values in a list is a compact and convenient way to specify large numbers of option values for adjacent rows or columns.

List the values to be used for successive columns:

Additionally, sublists can be used to denote cyclic use of values.

Specify that the list should be used cyclically:

These cyclic sublists can be padded at the beginning or end.

Give an initial set of values before the cyclic portion:
Give a final set of values:
Use defaults in the middle:

Because positions in the list correspond to positions in the grid, specifying a single value in the middle requires giving all previous values. To achieve this more directly, use rules as described in the section "Using Rules".

Make the fifth column red using the list syntax:
Use a rule to directly assign the background:

Using Both

It is possible to have the best of both worlds, using the list syntax for specifying repetitive portions of the grid while also using the rule syntax to specify exceptions.

Columns alternate between blue and green, except the first and last, which are red:
Use blue for all columns, except the first and fifth:
{s1,s2,,sn}
use s1 through sn; then use defaults
{{c}}
use c in all cases
{{c1,c2}}
alternate between c1 and c2
{{c1,c2,}}
cycle through all ci
{s,{c}}
use s, then repeatedly use c
{s1,{c},sn}
use s1, then repeatedly use c, but use sn at the end
{s1,s2,,{c1,
c2,},
sm,,
sn
}
use the first sequence of si at the beginning, then cyclically use the ci, then use the last sequence of si at the end
{s1,s2,,{},sm,,sn}
use the first sequence of si at the beginning and the last sequence at the end
{i1->v1,i2->v2,}
specify what to use at positions ik
{spec,rules}
use rules to override specifications in spec
Summary of syntax for specx and specy.

Columns, Rows, Gutters, and Items
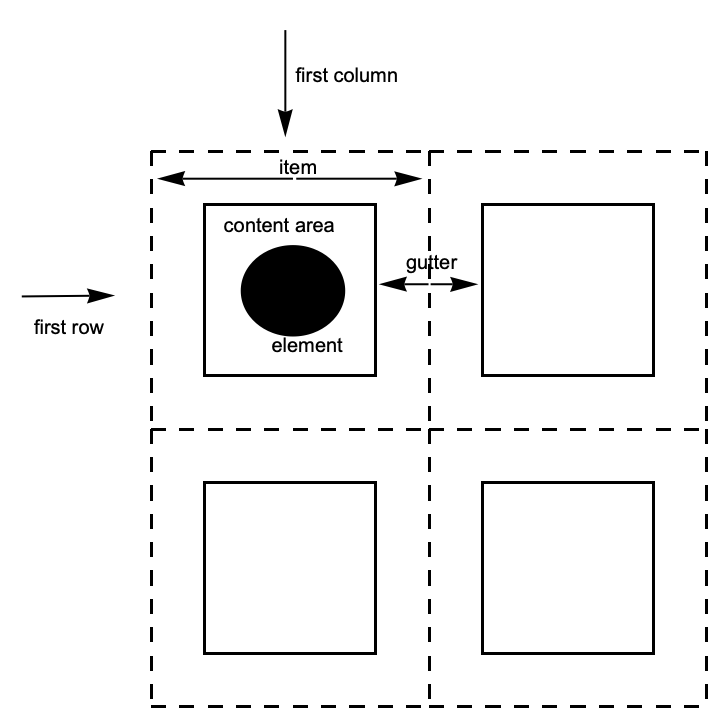
As introduced in the previous section, the Wolfram Language provides a flexible syntax for changing an option's value in different regions of a grid. This section provides context for that language and elaborates on the finer distinctions.
Vocabulary for grids.
column
vertical sequence of items
row
horizontal sequence of items
item
the region containing a grid element
gutter
the border between consecutive rows or columns
Different slices of a 2D grid.

Grid and GraphicsGrid follow the same conventions for describing the different possible slices of the grid. Column, GraphicsColumn, and GraphicsRow follow the same general conventions, except that they only deal in one of the two possible dimensions. Finally, Row does not participate in this system at all.

The World of Options

The following table identifies the slices each listed option can address. No option is valid for all constructs; refer to the key below to see which option can occur for a given construct.

Note that Row does not take any options.

Columns, Then Rows

To remember the syntax for options, the most important step is knowing that specific values for the columns are specified first, and values for rows are specified second.

opt->val
use val for all items
opt->{colspec,rowspec}
use colspec for columns, rowspec for rows
opt->{colspec}
use colspec for columns, defaults for rows
Option structure for Grid and GraphicsGrid.

In the Wolfram Language, options with a horizontal setting h and a vertical setting v are specified as opt->{h,v}. ImageSize and PlotRange are two common options that help establish this convention.

In a grid, these horizontal and vertical settings correspond to values for the columns and rows, respectively. This is because columns are stacked horizontally, and so their propertiessuch as width and locationcorrespond to the horizontal dimension. Rows are stacked vertically, and their properties correspond to the vertical dimension.

A graphic that is twice as long as it is tall:
In the following grid, each item is 2 "ems" wide and 1 "ex" tall:
Instead of a single width for all columns, a separate setting is given for each column:
Similarly, a different background color can be given at successive horizontal positions:

Gutters

Many Grid options deal with properties that can ultimately be associated with a column, row, or item in the grid.

However there are also options that deal with gutters between rows and columns.

Dividers
where to draw divider lines in the grid
Spacings
horizontal and vertical spacings
Options for the gutters between rows and columns.
A line that is not associated with any single row or column:
Compare this with a frame:

The syntax for Dividers and Spacings is exactly the same as for the other options. For a grid with n items in a particular direction, Dividers and Spacings can specify settings for the n+1 gaps between elements, starting before the first element and ending after the last element.

Items

The most granular level of description is the item. Each item in a grid can have its own value for options such as Background, Alignment, and Frame.

Item can be used to explicitly indicate the desired settings:
Alternatively, use the item's {i,j} index to assign it a value at the overall grid level:
A programmatically generated grid:
Give settings to an entire region of the grid:

Dividers and Frames

The Wolfram Language provides an extensive system for describing what dividers and frames should be drawn in a grid.
Dividers
draw dividers between columns or rows
Frame
put a frame around regions of the grid
FrameStyle
use an overall style for the lines
Options for drawing dividers and frames.
Use Frame to put lines on all four sides of a region or set of regions:
Highlight specific columns or rows:

Frame always draws a line on all four faces of the enclosed region. Dividers allows a finer level of control.

One result is that when using dividers, the resulting lines run in only a single direction.

This short form draws the center dividers:

Styling Dividers and Frames

FrameStyle sets the base style used for both Frame and Dividers:
Frame and Dividers allow styles as values:
In general, any line and color directive may be used, including Hue, Thickness, Dashing, Dotted, and others. Multiple directives may be combined with Directive.

Precedence

When conflicting styles are given, Dividers has precedence over Frame, and they have precedence over FrameStyle. Styles from Item take precedence over all others.

Dividers and frames are added together:
Styles from different sources are combined together:

Alignment and Positioning

Aesthetic grids often require use of alignment. The Wolfram Language has considerable support for different kinds of alignment in grids.
The Alignment option can be passed to the overall grid.
Align contents to the right:
It is possible to give different horizontal alignments to different columns, and different vertical alignments to different rows.
Align the first column to the right, and the second column to the left:
It is also possible to give different alignments to the individual items in the grid.
Set the element at position {1,1} to the left, and the element at position {1,2} to the right:
Alignment can also be set with Item. The specification for Item will take precedence:
It is possible to align on a decimal point, or any character.
Align on ".":
Positioning a grid within its enclosing environment can be achieved with BaselinePosition.
Default position:
Align the bottom of the grid to the baseline of the enclosing expression:
Align the grid so that the baseline of the {2,1} element is at the overall baseline:

Background and Style

Common Cases

When working with a collection of elements, Grid provides a way to set them against a uniform background.

Though an element can have its own background, awkward gaps result when you put elements together.

Grid and related functions place a background across the entire group of items in which the elements are contained.

With more sophisticated syntax, a variety of patterns is easy to achieve.

Alternate the backgrounds:
Highlight a row and column that intersect:
Embed the background with a particular item inside the grid:

Precedence of Overlapping Background Settings

Backgrounds given in the list syntax blend together upon intersection:
Backgrounds specifically asserted using indices take precedence:
Indexed columns take precedence over indexed rows:
Backgrounds specified with Item have the highest precedence:

Spanning and Nesting

Sophisticated partitioning of 2D space can be achieved by nested grid constructs and/or by using spanning elements.
As their name suggests, spanning elements allow an item to span multiple columns, rows, or both.
Span "a" across the first two columns:
Span "a" across the first two rows:
Span "a" across the first two columns and rows:
It is important to note that the spanning region must be rectangular; items that fail to fall within the rectangle will not be spanned, and will instead display the spanning character.
Spanning is only done in rectangular chunks:
While many layouts can be achieved using spanning elements, it is sometimes faster or more convenient to simply nest grid constructs:
Particularly with complex grids, it is often clearer to use Row and Column to create the specifically desired structures than to try to design a complicated system of spanning.

Sizing and Spacing

Sizing in Grid

Grid will typically not modify the size of its elements. Also, rows and columns are by default made as narrow as possible while accommodating the contents.

Notice in the above example that the second row is much taller than the first, the second column thinner than the first, and the sizes of the elements were not modified in any way.

If elements in the grid are interactively or dynamically changed, the size of the entire grid will automatically adjust as appropriate.

A useful exception is that Button will by default expand to fill the available space.

ItemSize can be used to override the default behavior.

Make all items the same size:
Specify widths and heights for individual columns and rows:

The units used for ItemSize are the typesetting units known as "exs" and "ems."

It is also possible to specify widths as a fraction of the enclosing area by using Scaled.

Make the first two columns each .3 of the page width:
Line Wrapping in Grid

Textual items will line wrap if the columns are too narrow. Notice that this forces the rows to be taller than the minimum specified.

With ItemSize->Automatic, textual items are wrapped at the page width:
With ItemSize->Full, line breaking is prevented:

Sizing in GraphicsGrid

GraphicsGrid will by default return a grid whose items are all the same size.

It will automatically choose an aspect ratio that is appropriate for the overall collection of elements.

Compare this with the equivalent Grid example, which does not impose either an overall size or an aspect ratio.

GraphicsGrid does not support an ItemSize option, but it does support ImageSize.

Requesting Input
The Wolfram Language usually works by taking whatever input you give, and then processing it. Sometimes, however, you may want to have a program you write explicitly request more input. You can do this using Input and InputString.
Input[]
read an expression as input
InputString[]
read a string as input
Input["prompt"]
issue a prompt, then read an expression
InputString["prompt"]
issue a prompt, then read a string
Interactive input.
Exactly how Input and InputString work depends on the computer system and the Wolfram Language interface you are using. With a textbased interface, they typically just wait for standard input, terminated with a newline. With a notebook interface, however, they typically get the front end to put up a "dialog box", in which the user can enter input.
In general, Input is intended for reading complete Wolfram Language expressions. InputString, on the other hand, is for reading arbitrary strings.
Messages
The Wolfram Language has a general mechanism for handling messages generated during computations. Many builtin Wolfram Language functions use this mechanism to produce error and warning messages. You can also use the mechanism for messages associated with functions you write.
The basic idea is that every message has a definite name, of the form symbol::tag. You can use this name to refer to the message. (The object symbol::tag has head MessageName.)
Quiet[expr]
evaluate expr without printing any messages
Quiet[expr,{s1::tag,s2::tag,}]
evaluate expr without printing the specified messages
Off[s::tag]
switch off a message, so it is not printed
On[s::tag]
switch on a message
Controlling the printing of messages.
As discussed in "Warnings and Messages", you can use Quiet to control the printing of particular messages during an evaluation. Most messages associated with builtin functions are switched on by default. If you want to suppress a message permanently, you can use Off.
This prints a warning message. Also, the front end highlights the extra argument in red:
This suppresses the warning message:
The message reappears with the next evaluation:
You can use On and Off to make global changes to the printing of particular messages. You can use Off to switch off a message if you never want to see it.
You can switch off the message like this:
Now no warning message is produced:
Although most messages associated with builtin functions are switched on by default, there are some which are switched off by default, and which you will see only if you explicitly switch them on. An example is the message General::newsym, discussed in "Intercepting the Creation of New Symbols", which tells you every time a new symbol is created.
s::tag
give the text of a message
s::tag=string
set the text of a message
Messages[s]
show all messages associated with s
Manipulating messages.
The text of a message with the name s::tag is stored simply as the value of s::tag, associated with the symbol s. You can therefore see the text of a message simply by asking for s::tag. You can set the text by assigning a value to s::tag.
If you give LinearSolve a singular matrix, it prints a warning message:
Here is the text of the message:
This redefines the message:
Now the new form will be used:
Messages are always stored as strings suitable for use with StringForm. When the message is printed, the appropriate expressions are "spliced" into it. The expressions are wrapped with HoldForm to prevent evaluation. In addition, any function that is assigned as the value of the global variable $MessagePrePrint is applied to the resulting expressions before they are given to StringForm. The default for $MessagePrePrint uses Short for text formatting and a combination of Short and Shallow for typesetting.
Most messages are associated directly with the functions that generate them. There are, however, some "general" messages, which can be produced by a variety of functions.
If you give the wrong number of arguments to a function F, the Wolfram Language will warn you by printing a message such as F::argx. If the Wolfram Language cannot find a message named F::argx, it will use the text of the "general" message General::argx instead. You can use Off[F::argx] to switch off the argument count message specifically for the function F. You can also use Off[General::argx] to switch off all messages that use the text of the general message.
The Wolfram Language prints a message if you give the wrong number of arguments to a builtin function:
This argument count message is a general one, used by many different functions:
Quietening Sqrt::argx suppresses the message issued by the Sqrt function but not by other functions.
This prints the Sin::argx message but not Sqrt::argx:
Quietening General::argx suppresses all messages that use General::argx.
Here, no argx messages are printed:
If F::tag message is not using General::tag, suppressing General::tag will not suppress F::tag. For example, turning off the General::targ message will not turn off the Entropy::targ message, because those two messages are not one and the same.
Entropy::targ is not the same as General::targ:
IdentityMatrix::targ is the same message as General::targ:
Entropy::targ message is still printed inside of Quiet:
If something goes very wrong with a calculation you are doing, it is common to find that the same warning message is generated over and over again. This is usually more confusing than useful. As a result, the Wolfram Language keeps track of all messages that are produced during a particular calculation, and stops printing a particular message if it comes up more than three times. Whenever this happens, the Wolfram Language prints the message General::stop to let you know. If you really want to see all the messages that the Wolfram Language tries to print, you can do this by switching off General::stop.
$MessageList
a list of the messages produced during a particular computation
MessageList[n]
a list of the messages produced during the processing of the n th input line in a Wolfram Language session
Finding out what messages were produced during a computation.
In every computation you do, the Wolfram Language maintains a list $MessageList of all the messages that are produced. In a standard Wolfram Language session, this list is cleared after each line of output is generated. However, during a computation, you can access the list. In addition, when the n th output line in a session is generated, the value of $MessageList is assigned to MessageList[n].
This returns $MessageList, which gives a list of the messages produced:
The message names are wrapped in HoldForm to stop them from evaluating:
In writing programs, it is often important to be able to check automatically whether any messages were generated during a particular calculation. If messages were generated, say as a consequence of producing indeterminate numerical results, then the result of the calculation may be meaningless.
Check[expr,failexpr]
if no messages are generated during the evaluation of expr, then return expr; otherwise return failexpr
Check[expr,failexpr,s1::t1,s2::t2,]
check only for the messages si::ti
Checking for warning messages.
Evaluating 1^0 produces no messages, so the result of the evaluation is returned:
Evaluating 0^0 produces a message, so the second argument of Check is returned:
Check[expr,failexpr] tests for all messages that are actually printed out. It does not test for messages whose output has been suppressed using Off.
In some cases you may want to test only for a specific set of messages, say ones associated with numerical overflow. You can do this by explicitly telling Check the names of the messages you want to look for.
The message generated by Sin[1,2] is ignored by Check, since it is not the one specified:
Message[s::tag]
print a message
Message[s::tag,expr1,]
print a message, with the expri spliced into its string form
Generating messages.
By using the function Message, you can mimic all aspects of the way in which builtin Wolfram Language functions generate messages. You can for example switch on and off messages using On and Off, and Message will automatically look for General::tag if it does not find the specific message s::tag.
This defines the text of a message associated with f:
Here is the function f:
When the argument of f is greater than 10, the message is generated:
This switches off the message:
Now the message is no longer generated:
When you call Message, it first tries to find a message with the explicit name you have specified. If this fails, it tries to find a message with the appropriate tag associated with the symbol General. If this too fails, then the Wolfram Language takes any function you have defined as the value of the global variable $NewMessage, and applies this function to the symbol and tag of the message you have requested.
By setting up the value of $NewMessage appropriately, you can, for example, get the Wolfram Language to read in the text of a message from a file when that message is first needed.
International Messages
The standard set of messages for builtin Wolfram Language functions are written in American English. In some versions of the Wolfram System, messages are also available in other languages. In addition, if you set up messages yourself, you can give ones in other languages.
Languages in the Wolfram System are conventionally specified by strings. The languages are given in English, in order to avoid the possibility of needing special characters. Thus, for example, the French language is specified in the Wolfram System as "French".
$Language="lang"
set the language to use
Setting the language to use for messages.
This tells the Wolfram Language to use Frenchlanguage versions of messages:
If your version of the Wolfram System has Frenchlanguage messages, the message generated here will be in French:
symbol::tag
the default form of a message
symbol::tag::Language
a message in a particular language
Messages in different languages.
When builtin Wolfram Language functions generate messages, they look first for messages of the form s::t::Language, in the language specified by $Language. If they fail to find any such messages, then they use instead the form s::t without an explicit language specification.
The procedure used by builtin functions will also be followed by functions you define if you call Message with message names of the form s::t. If you give explicit languages in message names, however, only those languages will be used.
Documentation Constructs
When you write programs in the Wolfram Language, there are various ways to document your code. As always, by far the best thing is to write clear code, and to name the objects you define as explicitly as possible.
Sometimes, however, you may want to add some "commentary text" to your code, to make it easier to understand. You can add such text at any point in your code simply by enclosing it in matching (* and *). Notice that in the Wolfram Language, "comments" enclosed in (* and *) can be nested in any way.
You can use comments anywhere in the Wolfram Language code you write:
(*text*)
a comment that can be inserted anywhere in Wolfram Language code
Comments in the Wolfram Language.
There is a convention in the Wolfram Language that all functions intended for later use should be given a definite "usage message", which documents their basic usage. This message is defined as the value of f::usage, and is retrieved when you type ?f.
f::usage="text"
define the usage message for a function
?f
get information about a function
??f
get more information about a function
Usage messages for functions.
Here is the definition of a function f:
Here is a "usage message" for f:
This gives the usage message for f:
??f gives all the information the Wolfram Language has about f, including the actual definition:
When you define a function f, you can usually display its value using ?f. However, if you give a usage message for f, then ?f just gives the usage message. Only when you type ??f do you get all the details about f, including its actual definition.
If you ask for information using ? about just one function, the Wolfram Language will print out the complete usage messages for the function. If you ask for information on several functions at the same time, however, the Wolfram Language will give the name of each function, if possible with a link to its usage information.
This gives all the symbols in the Wolfram Language that start with "Plot":
If you use the Wolfram Language with a textbased interface, then messages and comments are the primary mechanisms for documenting your definitions. However, if you use the Wolfram Language with a notebook interface, then you will be able to give much more extensive documentation in text cells in the notebook.